CRKT Lil’ Guppie

Lil' Guppie

Sorry its been so long since my last post. I have been going thru some major life changes and have been busy.

I recently purchased a new toy, and boy is it pretty fucking cool. Its called the Lil’ Guppie and is produced by Columbia River Knife & Tool. I recently bought my first CRKT product and I can tell you that it was not gonna be my last, I plan on buying a lot more of their great products. If you want a little background on CRKT then read my previous post on the RSK MK5.

Lil Guppie 3

The Lil’ Guppie is part of CRKT I.D. Works tools product line. The product line is motivated by design that is inspired and functional, CRKT’s vision is that of painter Leonardo Di Vinci who said “Observe Everything in Nature”, great man, great quote but that’s the last thing I am thinking of when I am skinning a dear, or fixing my motorcycle(Just kidding). CRKT is going for products that are ergonomic and organic shapes that are sometimes whimsical but always useful. CRKT’s I.D. Works designs are nothing like the traditional Leatherman tools, their tools are ready to go right out of the sheath or pocket. Just a flick of the finger and the blade is ready to slice and dice, or the pliers are ready to pull and pry.

Lil Guppie opening beer

The Lil’ Guppie was designed by Launce Barber & Tom Stokes, who also invented its bigger brother the Guppie. There is a few different versions of the Guppie, they come in different colors and also with different tool line up. Currently the one I have is the all black version with the standard vise grip, bottle opener, flat head screw driver, and Phillips head screw driver, and a 1in blade, and of course the carabiner that it is the base frame of the Guppie. The Lil Guppie is 3in long and only 1.9oz so you will hardly notice it when in your pocket or hooked to a belt loop or backpack/bag.

Lil Guppie 2

The adjustable wrench opens up to about 10mm for light repair and assembly, along with small jobs such as building model cars or Lego’s. The small carbon blade really does come razor-sharp right out of the box and it can be convinently opened with one had using the small blade slot at the top. The tail end of the Guppie flipper is where the flat head screw driver is located which comes in handy for many small screws that plague our everyday lives. The clip on the little Guppie can be used to attach to your pants or backpack but it can also be used as a nifty little money clip.

Lil Guppie BLack

I really enjoy this little tool, I keep it hooked to my backpack so that I have it near me whenever I go out hiking, riding my motorcycle, to work, etc. I also get a lot of comments on how cool of a little tool it is. I recommend it to everyone who is looking to buy a carabiner for your keys or to clip to your backpack/bag to hold different items for you, remember that this is not a load bearing carabiner so it cannot be used to climb with or for any type of substantial amount of weight. Why buy a plain old normal carabiner when you can purchase one with a knife and a bottle opener, right?? Lets get drunk and then be armed(lol). After purchasing the Lil’ Guppie I defiantly plan on buying its bigger brother the Guppie, so I can attach it to my backpack. If you have any questions regarding this post please don’t hesitate to leave a comment with your question or comment.

Thank you for reading and go out and buy one NOW!!!

Columbia River Knife & Tool Ritter RSK Mk5

CRKT Logo

Hey ya’ll blade fanatic’s,

CRKT SporkCRKT Hisshou

Move over Kershaw, Gerber, there is a new kid on the block and he is one badass SOB. Well CRKT is not too new but compared to some of the big name brands they are the wild and crazy teenager. They make all types of different knifes and tools, ranging from small 2 inch neck knife Ritter RSK that this blog will review to the 13 inch tactical sword, the Hisshou, which is a totally badass sword specifically designed for our men who operate in the shadows and need something that can kill quietly and efficiently. They also make many different incredible tools that range from you basic field utensils such as the Eat N Tool which looks like a spork on steriods, that has a fork, spoon, bottle opener, 3 hex wrenches, and a carabiner, to a multi-tool that has 10 different tools all in one.

CRKT Carabiner

Columbia River Knife & Tool or otherwise known as CRKT was found in 1994 in Tualatin Oregon by Rod Bremer to bring the end user the best quality products and most innovative tools and knives on the market at an affordable price. Personally I love CRKT’s products and plan on purchasing there products as much as possible.

CRKT RitterCRKT Ritter Box

The Ritter RSK is a little tiny thing that comes with an Altoids looking tin box to carry it in. The Ritter RSK is made out of 3Cr13 Stainless steel and its only 3.81 inches long and weighs less then an ounce with and comes with a stone wash finish to prevent corrosion, and it comes with a fitted kydex sheath that makes it the perfect for a neck knife or for a women to carry on her key chain or attached to her purse for easy access. The knife comes sharp right out of the box so be careful don’t underestimate it due to its size. CRKT open box I think it would be great for a survival kit because of its size and weight, one of the most important things when putting together a survival kit is to find items that are small and light but still a quality product that will be there when you need it the most. The ergonomic skeleton grip is perfect for a two finger grip to make fuzz sticks, gut a fish, or dress game, wrap some para-cord around it to improve the grip and give it more real estate to hold on to. In my opinion this is a great little knife, but you have to remember that this is only $20.00 and is less then 4 inches in total length. It is a small knife but a quality product that is less then an ounce.

CRKT Ritter hand CRKT Wrapped

I hope this post gives you a good idea about what you are getting when you purchase Ithis product. I have read negative reviews online with one person stating that the knife is small and doesn’t weigh anything, well duh thats what the description says. I love it when people don’t read the description and when they pay only a few dollars for a product and then get angry when they didn’t get a 7 inch fighting knife made our of 1095 Cro-Van Stainless steel with powder coated finish. Anyways thats my rant for the day. Thanks for listening. Please don’t forget to leave any comments or questions in the comment section and also don’t forget to click on the “follow” button so you don’t miss out on any great posts.

Thanks

nw Tactical

Gerber Skeleton Frame Knive’s – Bare Essentials

What’s up Steel Junkies,

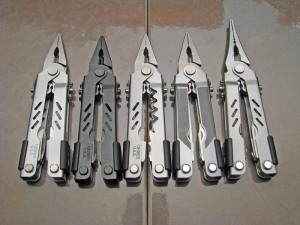
It’s been a while since I have reviewed a new product, I only want to review products that I actually put to the test for you so you are getting a real honest review. So today we are going to go back to the basics and review two different blades from Gerber. We are gonna be learning about the Gerber Paraframe I Stainless Steel Serrated knife, and the Gerber RipStop Stainless Steel Straight Edge. These two blades are some of Gerber’s more affordable knives. I purchased both these at Target. The Paraframe I was roughly $30.00 and the RipStop I was about $15.00. First lets learn a little bit about the history of Gerber.

Gerber Logo

History of Gerber:

Gerber was founded in 1939 by a gentleman named Joseph R. Gerber in Portland Oregon. Gotta love that this is a good old North West company. It started out as a small batch of handmade cutlery sets that were given as holiday gifts. It quickly turned into thousands of retail accounts around the country. Gerber makes different knives for different purposes.

Military:

Gerber Cable Dawg

They specialize in Military were every design is based on direct feedback from members of our Armed Forces. Iconic knives such as Mark I, Mark II, and the Guardian series are some of the inspirations for Gerbers Military knife lines. Some of the innovative products that they have developed for the Military is the Cable Dawg, LMF II and the De Facto which serve alongside the standard issue Gerbers such as MP600 and the Gerber Strap Cutter.

Hunting:

Gerber Gator

From the smallest game to the epic trophy, Gerber equips the great predator on earth The Hunter. They focus on making their blades evenly balanced and tough as nails, they focus on making specific gear with long lasting blades, tactile handles and all weather sheaths. Their most famous hunting knife is the Gator which has paved the way for some of todays most innovative blades on the market.

Survival:

Gerber Bear Grylls

Some men enjoy hunting in the great outdoors and some men just enjoy being in the great outdoors. For the men that enjoy nature for what it is they have created the Bear Grylis line of knives. They specialize in knives for the first timer boy scout on their first trip to the seasoned adventurer exploring some of the highest mountains in the world.

Tactical:

Gerber Covert

Gerber created the Tactical line to service the men and women who protect us on the home front from Police officers, to firefighters, to EMTs. One staple of that line is the Covert series which was developed in conjunction with one of the greatest close quarters combat and fighting instructors Colonel Rex Applegate.

Outdoor:

Gerber E-Z Out

Gerber takes being outdoors to the next step and they do not generalize they specialize by making knives that are specific to all activities, Their Outdoor line specializes in Hiking, Camping. Be the man who is prepared for everything with E-Z Out Rescue, and don’t forget the new Steady blade which are breaking ground in the industry and challenging the status quo on what tools can do.

Essentials:

Gerber Compact Sport MP400

Next they have what they call the Essentials. Gerber Essentials are the tools and knives that get us out of unexpected jams every single day. They are the pocket tools, multi-pliers and everyday carry. One of their top sellers is the Compact Sport MP400 and the Gerber LST, they both utilize their famous one handed open and close technology.

Industrial:

Gerber Groundbreaker

Last but not least is the Industrial line. We cannot forget the men and women who build out countries infrastructure. They are constructed with advanced materials, both lightweight and indestructable, every tool is designed for all-day efficiency and durability. One of the top sellers is the Gerber Legend and the Gerber Groundbreaker.

Over the last 70 plus years Gerber has taken your grandpa’s wooden handle folder blade and took it to the next level.

Gerber Paraframe

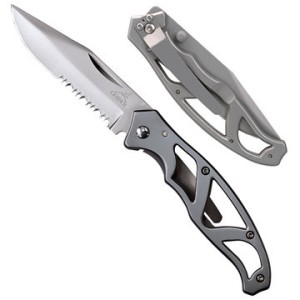
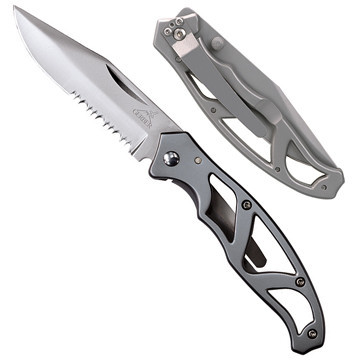
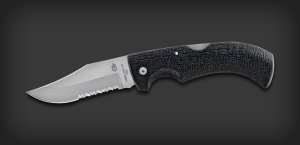
Now lets get back to business and review the Paraframe I. The Paraframe I  has eight different knives in the series. I carry the serrated for those extra tough cutting jobs. The Paraframe I is based on a minimal frame lock design. It is wonderfully simple, open frame(skeleton) knife with a serrated locking blade that is super lightweight, it cleans easily and opens effortlessly. The Paraframe is built with a smooth stainless steel handle and a pocket clip to secure the blade to your pocket. The knife has an overall length of 7.01 inches with a blade length of 3.01 inches. Closed it is only 4.11″ with a total weight of 2.6 oz. The blade of the knife is a Clip Point that is made of High Carbon Stainless Steel. The Paraframe is a great everyday folder. I personally used it as my EDC for about two years and didn’t have to sharpen it once. It could have used one but it was not necessary. I mostly used it for cutting boxes, rope, paper, and fabric and anything else that came across the blade, it made quick work of everything I put to the test. For the price it is a great knife, and I really like the skeleton handle. It was the first knife I owned that was this style and I was a little concerned about the lack of grip but I didn’t have any problems. After owning the knife for 4 years and it being my EDC for 2 straight years the knife has no blade play at all. It is as tight today as it was the first day I took it out of the package which is pretty amazing for a $30.00 knife.

Gerber RipStop

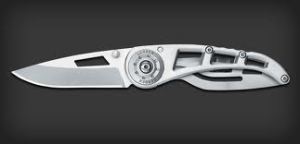
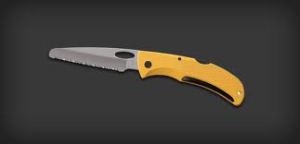
Next up we are gonna be reviewing the Gerber RipStop I, the blade I own has a fine straight edge with a Clip Point tip. Gerber built these knives for the non-conformist in you. The RipStop I is super lightweight from lock concept that delivers bold strength and high functionality. The weight of the all Stainless Steel blade that is only 5.75″ in overall length, with a blade length of 2.3″ and when closed it is only 3.4″ is only 2 oz because of the intriguing handle and blade design. All bulk has been stripped off this streamlined race car of a blade. The RipStop has dual thumb studs that make opening the blade a snap for either left or right handers, and closing it is just as simple one handed. I have really enjoyed owning this knife. I bought it only a few months after I purchased the Paraframe because of the skeleton style handle like the Paraframe. I actually carried both blades most of the time, I would carry the larger Paraframe in my back pocket and the smaller RipStop in the front pocket. Sometimes you just didn’t need a 4 inch blade to do the work a 2 in blade could just as easy. It is also not as threatening when whipping it out at work and cutting open a box especially when you work with all women, or when they ask to use something to open a box or package. I could hand them the smaller of the two blades and they don’t look at me like I am some blade freak for having a huge pocket knife even though secretly I am. bwahahahaha(that was supposed to be my evil genius laugh). Once again this knife has cut everything I asked it to but unfortunately it dulled rather fast on me and after years of abuse the blade has quite a bit of play on it. It wiggles back and forth and side to side, and with the design you cannot tighten it without specialized tools. For $15.00 the blade is a good buy and I would recommend it to anyone looking for a small pocket knife for light duty jobs. I recommend this knife for any women who want a small knife they can carry in their purse without adding much weight at all.

So today we reviewed two different Gerber knives, the RipStop I, and the Paraframe I. Both are lightweight and stainless steel blades that I would recommend to anyone who needs a lightweight durable knife for light duty jobs. I hope this review will help you in deciding if one of these knives is right for you. If you have any questions or comments please leave them in the comments section and I will answer them. Also don’t forget to click on the follow link so you don’t miss out on any updates.

Thanks for reading and keep buying those blades, in my opinion you can never own enough. Blade Junkie for life.

nw Tacitacl

Survival Tips – Edible Plants Part IV

Howdy Partners,

Sorry its been so long since my last post. Life has been hectic, but I’m back and in full force. Today we are gonna cover some more edible plants. I really enjoy this topic cause I love learning about the outdoors and some of the plants you would never in a million years think you could eat and that they would sustain life. So lets jump right in.
Manioc Root
Manioc Tree

  1. Manioc (Cassava): Perennial shrub. The Manioc gros up to three to nine feet tall. It has fingerlike leaves radiating from central, jointed stem. You can find the Cassava in all moist, tropical areas. The Manioc roots need to be ground into pulp. Then cook them for one hour to remove poison from the roots. Once the pulp is cooked thoroughly shape the remaining pulp into cakes for baking. You can also mix in some flour into the cakes before you cook them and they will last a really long time as long as they are shielded from insects. Remember that the roots must be cooked, they are extremely LETHAL if ate RAW.
    Maple
  2. Maple: Common tree in scores of species. Leaves have three distinctive lobes; the maple fruits have two lobes and flutter as they fall. The Maple grows throughout temperate forests. You can eat the Maples young leaves and seeds. To get the sweet sweet nectar that everyone loves so much all you need to do is cut a V-shaped notch in the tree trunk and then collect the sap or what we say Maple Syrup YUM YUM! You can also chew the leaves and seeds; or eat the bark.
    Marsh Marigold
  3. Marsh Marigold: Flowering water plant. The Marsh Marigold has beautiful round, dark green leaves, five-petaled yellow flowers. You can find them in temperate zones to arctic; bogs, streams, and lakes. You can eat every part of the Marsh Marigold but it must be cooked first. You want to bring water to strong boil and then cook in the water until tender.
    Mountain Ash
  4. Mountain Ash: Small tree with orange or red fruits. The Mountain Ash has clusters of white flowers three to five inches apart. The Mountain Ash has smooth grey bark and it grows in woody and rocky places in temperate zones. The Mountain Ash has berries that are edible, you will want to boil the berries to reduce the sharp taste.
    Mulberries
  5. Mulberries: Small to medium tree. The Mulberry looks like large blackberries, with leaves that are deeply lobed and serrated. The Mulberry tree grows in forests and fields of northern and southern temperate and tropical zones. Berries are heavily seeded but very juicy. You can eat the berries raw, cooked, or dried. Try making jam, yum yum.
    Nipa Palm
  6. Nipa Palm: Broad, short palm. The Nipa Palm is a little different then most tree’s the trunk of the Nipa mostly grows underground.  The leaves shoot up from the trunk and can be as large as 20 feet tall, is that not out there or what? The Nipa Palm grows in the mud of east Asian shorelines. What you want to do is cut the stalks of the leaves and drink the sugary liquid juice that comes out. You can also eat the seeds but they are kinda hard. Another great use for this tree other then eating is to use the leaves to thatch a roof, since they are so large and sturdy. 
    Papaw
  7. Papaw: Shrub or small tree with brownish-gray bark. The Papaw has white, six petaled flowers. The fruits are two to six inches long. The largest ones are indigenous to North America. It grows in temperate forests; northern variety is deciduous while southern is evergreen. You will want to eat the fruit raw because it is high in protein. 

Thank you for joining me today in learning about some more plants that are edible. Remember that these are last resort and should not be ate in large quantities. I hope you learned something new today. Also make sure to get out and enjoy this beautiful country that we have at our fingertips. Just remember to make sure to bring the proper supplies.

Please let comments and questions below. Also don’t forget to click on the “follow” button so you stay up to date on all nw tactical posts.

nw tactical

Tactical Tips – Point Shooting

Sup Y’all gun geeks,

We’re gonna be reviewing Point Shooting. I really think more people should be training using this method for short distance CQC(Close Quarters Combat) then training looking down the barrel using the sights. When push comes to shove your adrenaline will be pumping and your mind will be racing so fast that you will not have the time or wherewithal to even think about using your sights, you will just start blasting away and missing every time. Even our trained LE have that same problem, but now most departments are starting to train with Point Shooting or Flash Shooting. These tactics are used by most of the top shooters in the world such as Delta Force, SEAL Team Six, SAS 22. It takes a lot of practice to get good at or even sufficient. You will need to be at the range day after day putting hundreds if not thousands of rounds down range, but in the end it will be all worth it when it comes time to protect your loved ones.

Recent science says that we lose our near vision and our fine motor skills when our fight or flight response is activated, when sight shooting both of these skills are needed to properly sight shoot. When you are in the fight or flight response you will only be able to do what your muscles have been trained to do. Studies say that most handgun fights are fought within 5-8 yards which doesn’t give you much time to react if you are being charged at or if someone else draws a weapon. Point shooting is a method of shooting a firearm that relies on a shooters instinctive reactions in a life threatening situation to quickly engage close range targets. The method is used in close quarters fighting do to lack of time to react, or you have low light conditions which hinder your ability to use your sights. When practicing point shooting it is very important to have the correct handgun for you, it must feel like an extension of your arm and hand. Do not switch guns when practicing cause the slightest difference in your gun can change the way you point shoot. The weight of the gun, the handle of the gun, the caliber and recoil can all throw off the mechanics that you are teaching your body to use in emergency situations to protect yourself and loved ones.

Now we will go over some techniques to use when point shooting, since to be effective at it you will need to practice a lot. Just like anything else that takes skill, such as basketball, football, baseball. These all take lots of practice to be good at and so does point shooting.

  1. Position yourself 3 yards away from a large(10 inch) target. In an athletic stance where you are on the balls of your feet, execute a tactical quickdraw(covered in previous post) to a firing position and fire multiple rounds into the target. I recommend to fire anywhere between 3-6 shots. DO NOT USE YOUR SIGHTS!!! The point of the drill is to get you used to not using the sights. It may take a while but you will learn to hit center mass of your target every time. One key is to try to do it as quickly as possible, but try to take just enough time to allow the momentum of your arms and gun to slow right before you pull the trigger. I like to call it controlled chaos, I teach it to my 10-year-old basketball team when doing lay up drills. Practice this drill till all your shots are in a grouping of a couple of inches. Grouping is very important, it doesn’t matter if you hit the target every time, if they are all over the place it is not effective. You want your hits in a small group near center mass. Once you have good groups at 3 yards on a 10 inch target move it back a few yards and use a small target and keep going till you reach no further then 8 yards and your target is no bigger then a standard picnic plate.
  2. After you feel you have a good grasp on step one you can start practicing with multiple targets. Try setting up 3 or more targets a couple of yards apart, some closer and some further away but all no further than a 5-8 yards down range. Now execute a tactical quickdraw and go down the line, one shot per target. Once you feel comfortable with this drill and you are hitting center mass change it up. Keep targets in the same spots but put a burst of 2-3 rounds in each. Try them in different order, or have a friend tell you which one to shoot (“one!” “two!” “three, one, two!”), the key thing is to make sure that you can hit your target center mass every time, once you can do this try to accelerate your pace. But remember to always make sure that you are in control and do not try to do more than your skill set allows. To get to this stage will probably take weeks to months of shooting hundreds of rounds every day or multiple times a week.
  3. Once you have mastered step two, try shooting while moving. While moving you should still be able to hit targets at 5 yards. Set up three or more targets a few yards apart. Start about 15-20 yards back and sprint towards your targets, once you are within 5-8 yards of your target tactically quickdraw your gun before you come to a complete stop. Fire a two shot burst, side step to engage the second target and fire a two shot burst, then so on. Each time you run through course, try to do it faster; try not to pause when shooting.

Tips to make you a better:

  1. Accuracy and speed can be improved by a methodical and well executed draw, read my post on Tactical Quickdraw, it should help you understand how to execute properly.
  2. PS abilities vary greatly between people. Dexterity and hand eye coordination are a big component, and some people just are naturally inclined in those two areas. Don’t worry about starting off close to your target, everybody is different it might take you a little longer to figure it out buy with enough practice you will master it. Don’t worry about looking uncool if the target is only a few yards away, it will look a lot more uncool if you are shooting at a target 8 yards away but are missing time after time.
  3. Point shooting is much less efficient at greater distances, this is why I’m saying to shoot no further than 5-8 yards. I will be covering Flash Sighting which you will want to use for greater distances, it only takes a tenth of a second longer but you will land hits about four times as much.
  4. I recommend using a low caliber handgun when starting out. Either a .22 or a 9mm will be best because it has less recoil which will help with grouping and shooting multiple rounds quickly.
  5. Remember SAFETY FIRST ALWAYS. These exercises should only be done by people who are comfortable with handguns. If you are new then you should take some gun safety classes at  your local gun range and practice shooting for a few months to get comfortable. Most of these exercises you will not be able to do in your local gun range for safety reasons so you will need to find an area that always shooting and has lots of wide open space. Make sure to know the state and local gun laws before shooting.
  6. Be sure to know what’s beyond your targets, bullets can travel very far distances.
  7. A great way to practice Tactical Quickdrawing the weapon and shooting motion is to practice with snap-caps, you can buy them at your local gun dealer for under $20.00.

Thanks for reading and I hope you practice this shooting technique cause it will save your life when you are in a life threatening situation. Remember though that this is not a novice technique and you need to practice a lot. This is an expert shooting technique and it takes days, weeks, if not months of practice and hundreds if not thousands of rounds down range before you are consistently hitting center mass with good grouping.

Again thank you for reading and be safe always use gun safety rules when handling a gun.

nwtactical

Survival Tips – First Aid Part IV

Welcome back to First Aid Part IV. This is the last part of the first aid survival tips. So make sure to pay attention. Remember that this tips are to be used only in an emergency situation and you should always call 911 first if you are near a hospital. Alright lets see what kind of tips I have in store for you tonight.
Poison

  1. Poisoning – Symptoms: Nausea, vomitting, diarrhea, sweating, breathing difficulties. You will experience chest or abdominal pain. You could also have seizures, headaches, dizziness, weakness, irregularpupil size. Your eyes might burn or tear up. You may experience burns on your lips, tongue, skin. You could have abnormal skin color, especially ashen or pale. Possible Condition: Poison ingested, inhaled, absorbed, or injected into your body. For example: snakes, spiders, jelly fish, etc. Course of Action: First you will want to remove the victim from the scene of the poisoning. Check the victim for life threatening conditions and treat the symptoms. If the victim has been poisoned from contact directly to the skin then wash the area with lots of water. Next you will want to apply baking soda or calamine lotion to dry up sores from poison on skin. If the victim ingested the poison then give them lots and lots of water. If the poison that was ingested is non-corosive then induce vomitting to expel from body then give them lots of water( do not induce vomitting if the poison is corrosive because it will damage the throat and stomach lining coming back up). If poison is corrosive (acid or alkaline) do not induce vomitting. Give victim water and then a mild acid or alkaline to neutralize the poison.
    rash

  2. Rashes – Symtoms: You will experience weeping, scaling, inflamed skin. Possible Condition: Skin will have rashes that are caused by infection or dirt clogging pores. Course of Action: You will want to treat the rash like you would an open wound-keep it clean and cover it with sterile bandages. If the rash is most it keep dry, if rash is dry then keep it moist. Make sure the apply antiseptics. Absolutely do not scratch the rash, it will only make it worse.
    seizure
  3. Seizures – Symptoms: Seizures will cause you to have blank stare on yours/the victims face. It will cause disorientation. You will also experience convulsions(uncontrolled muscle movements). Possible Condition: Reaction to extreme heat. It could also be caused by a diabetic reaction. They can also be cause by a traumatic injury to the brain. Course of Action: Absolutely do not try to hold the victim down this may cause injury to you or the victim. Absolutely do not put anything in the victim mouth, the victim may bite down and injury you or himself/herself worse. One thing that you can do to assist the victim is to support the head by using a pillow or a folded up piece of cloth(such as sweatshirt, blanket). If the victims mouth fills with any kind of fluid such as blood, saliva, or vomit, roll the victim on to his/her side to let the liquid drain. Once the seizure has subsided check the victim for breathing and injuries cause by convulsions also assure them that everything is ok and that help is on the way. You might also want to tell them where they are and that they are safe and that you are there to help them.
    shock
  4. Shock – Symptoms: You will become irritably, experience restlessness, nausea, vomitting, and excessive thirst. You may also experience an altered state of consciousness. You will also have a rapid breathing and pulse. You may also have skin that is cool, moist, pale, and ashen. Possible Condition: The flow of your blood is inadequate for body’s major organs and tissue (shock). Course of Action: Have the victim lay flat on their back and make sure they are as comfortable as possible. It is also a good idea to elevate the victims feet about 12 inches. It is important to keep the victims skin from getting too warm or cold. You will want to monitors the victims breathing and pulse. Do not give food or water if immediate hospitalization is an option. If hospitalization is not an option make sure to give the victim warm liquids to drink.
    snakebite
  5. Snakebite – Symptoms: You will have extreme pain around the bite marks in the victims skin. The victim will also experience swelling and strong pain around the bite(Pit Vipers). You may also have an allergic reaction. Some more reactions are blurring of vision, loss of reflexes, slurring of speech, nausea, and difficulty breathing(coral snakes). Condition: The venom of a snake bite has been injected into the bloodstream. Course of Action: To treat pit vipers, rattlesnakes, copperheads, or cottonmouths wash the wound; make sure to keep the bite site low and still and below your heart. For coral snakes, the treatment is similar as above but apply an elastic band starting farthest from the heart and rolling it around the wound. You will also want to keep the bite site still and lower then the heart. Make sure to keep the victim calm as possible to keep heart rate low. Absolutely do not apply ice to bite sites, you will want to cut the wound, and apply a tourniquet or apply suction.
    sprains
  6. Sprains – Symptoms: The sprained body part will swell and start bruising. You will also experience severe pain in the ankle, knee, wrist, and fingers. You will not be able to use the injured area normally, and you will experience weakness in that body part. Possible Condition: Tearing of ligament at joint. Course of Action: For mild sprains you will want to apply ice and elevate. You will also want to get lots of rest. You can also take a Tylenol regiment if not allergic, this will help control the swelling and help with the pain. For severe sprains treat as you would for broken bones.You will want to immobilize the body part as it was found. Do not apply a splint unless you need to move the victim, if you need to move the victim then you can apply a splint by attaching two pieces of wood/board on either side of the area and then wrap with tape or ace bandage. You will want to elevate and apply ice, unless elevating increases the pain.

Thanks for reading the last blog post on First Aid, I hope that over the course of the last 4 posts you have learned something new. I had a great time researching and explaining how to treat injuries, it is something that I have been interested in since I was young. I always wanted to become a sports therapist/physical therapist or sports trainer. I did some volunteer hours with my schools sports trainer and I had a blast helping the athletes when they were injured or wrapping the wrists and ankles with sports tapes to prevent injury. I enjoyed running out on to the field and assessing the situation on the fly and coming to a conclusion and applying my knowledge on how to fix the injury. If you have any questions or comments please leave them below. Also don’t forget to click the button at the bottom of the screen to follow my blog so you don’t miss out on new posts. Thank You!!!!

Tactical Tips – How to be Combat Ready with a Handgun Part II

1911

Welcome back to nwtactical blog,

We will be picking right up where we left off, we finished with the most popular rounds and now we are going to move onto how to practice reloading your pistol.

When practicing reloading your pistol you should be practice with at least two different pistols. One primary and one secondary. If you practice enough you will not have to think about the process it will come natural to you, you will build muscle memory. So instead of thinking is the slide locked? -> press magazine release -> magazine is clear -> grab new magazine -> insert new magazine with correct orientation -> release slide. Those are the steps you take to reload a magazine. It may seem like a lot when put on paper but if you practice it will become second nature. The reason you need to practice is so when you are in a life threatening situation you don’t have to think about reloading your pistol you will do it and you will be able to focus on the situation at hand instead.

  1. You should be able to load your handgun rapidly, and flawlessly 100% of the time – w/o looking at your hands, your pistol, or your magazines.
  2. Pistol Reload

    An Emergency reload is when you have fired all the rounds in the current magazine and your slide is in the locked back position. You should be able to reload your magazine while your gun is still pointed at the target. Psychologically, lowering your gun gives the perp an advantage over you and keeps you focused on your gun and not on the perp who is trying to hurt you and your loved ones. The technique you want to use is: when the slide locks back, you want to remove a magazine from your magazine belt clip. As you move the fresh magazine to the gun, eject the current empty magazine letting it fall to the floor. Align the magazine against the magazine well and slam the magazine home with some force, seat the magazine using the palm of your hand; then push the slide release and allow the slide to slam forward. This is not a gentle process, it should be fast, loud, and aggressive. You should also enjoy the primal feeling that you get when doing this procedure.
    tactical reload

  3. A Tactical reload is when there is a pause in the gun fight and you have the opportunity to duck behind cover. Currently your magazine still has some rounds in it but you know you are running low, this is when you should reload so when you resume the firefight you will have a full magazine to work with. Now this drill is a little different then an emergency reload. What you will want to do is: From behind cover reach into your mag pouch/holder and grab the mag with your thumb, pointer, and middle finger. Move the mag back to the gun while you eject the partially spent mag into your hand, catch the ejected mag with your ring finger, pinkie, and the palm of your hand (in the emergency reload you let your empty mag hit the floor but since there are still rounds in this mag you will want to catch it and save it for later). After catching the partially used mag, insert the mag with your fingers and give it a little tug to make sure it is seated properly (since you have your partially used mag in your hand you can not slam it home like before). Since you didn’t run out of ammo you don’t have to manipulate the slide and you should have a round already loaded as well so do not cock the gun or you will eject a perfectly good round.

Gun Malfunction
This section we will be going over Malfunctions, unfortunately with semi-automatic handguns you will eventually have a malfunction no matter how well made the gun is. It might take 50,000 rounds but you will experience one and its good to know how to fix a malfunction. 

  1. Type-1 malfunction: This is a failure-to-fire (FTF) malfunction. When you pull the trigger and you hear a “click” instead of a “Ka-Boom” then you know there is something wrong. This is the simplest type of malfunction, and the easiest to fix: just tap, rack/filp and viola its fixed.
  2. Type-2 malfunction: Is a failure-to-eject is a common problem on older 1911s and other guns with shorter ejectors. This type of malfunction is affectionately known as a “stove pipe.” The symptom of this malfunction is a “dead trigger”, and there will probably be a brass casing poking out of the ejection port but not always, and the slide is not all the way forward. To fix it do the same method as Type-1: Tap, Rack/Flip.
  3. Type-3 Malfuntions: This is known as “The Mother of All Malfunctions” (MOAM) by some. This is a feed-way stoppage, which means that too much brass is in the chamber at the same time. If you do get a type-3 malfunction under fire, may instructors will tell you to grab your back up but sometimes that is not an option. First thing you will want to do is find cover before executing. To Clear: Grab your slide and lock it back. Press the mag eject, and grab the magazine and toss it to the ground. Grab the slide and rack it hard 3 times in a row. Then reach for a brand new mag and slam it home and rack a new round into the chamber. Some pistols, notably glocks, may be cleared of a type-3 malfunction simply by dropping the mag far enough to allow the slide to go forward and then re-seating the mag with authority, slam the damn thing home hard!!! If the slide goes completely forward then the gun is ready to fire, if it does not go all the way forward then perform Type-1 clearing action.
  4. Type-4 malfunction: Type-4 malfunction is very uncommon, and if it ever happens to you when you are practicing with your gun at the range, throw the fucking gun away and get a new one. Just kidding don’t be rude but you do have a serious problem that is a manufacturing fault. THis malfunction is when the slide does not go back into battery after firing. This might happen because your guide rod or guide rails are really gummed up (to the point where it looks as if there is a wad of chewed up gum in it), your guide spring is too weak or your chamber design is bad. This should never happen in a modern semi-automatic pistol. What I recommend is to either send the gun back to the manufacture to have their professional gunsmiths look at it and fix it or take it to a local gunsmith you know and trust.

Today we went over some more of the technical aspects of how to be combat ready but they are just as important. Next we will be going over how to “Point Shoot and Flash Sighting”. It should be fun so stay tuned and make sure you click on the follow button so stay up to date on the blog. 

Thank you for following.

Tactical Tips – How to be Combat Ready with a Handgun Part I

Springfield EMP

What’s Up Killa’s!!!

Today we are gonna stay true to the blog name and go over some tactical procedures. If you own a gun then you should know how to use it, you should be tactically ready because you never know when you will need it. If you are not ready it could be the difference between your life or the life of a loved one, if you are ready then it should be the life of the person who made the wrong choice to F with you and your family. I’m gonna go over how to be combat ready with a Pistol, their are other weapons that can be used as a self defense/home defense weapon but we are gonna focus on Pistols. Pistols are the most widely used gun for defense from the home to Law Enforcement to Military. Unlike the latter two groups we as civilians do not have extensive training using handguns. I highly recommend taking a handgun class when you purchase a gun. It will go a long way in helping keep you and your family safe from yourself.

The primary purpose of this post will be practicing with the pistol to be used in a defensive manner, but many of these techniques will easily translate to offensive use. While revolvers are a very common handgun, we will be focusing on semi-automatic pistols, since they are more widely used in tactical situations. It is true that revolvers are more reliable and unsurpassed, but when all factors are considered, semi-autos are the weapon of choice for police and armies around the world especially special forces. One important thing to remember is that just because you know how to use the weapon doesn’t mean you can use the weapon when push comes to shove. Not only do you need to know how to use the weapon tactically but you need to have a tactical mindset. 

Before you can learn to use a handgun you have to choose the right handgun for you. The right handgun for you might not be the right handgun for someone else, so don’t take someone elses word for it. Take the time to do the research and go to the firing range and test as many different handguns as you can get your hands on. The choice of weapon can seriously limit your ability to protect yourself with lack of accuracy or, more importantly, reliability. Here are some qualities to look for when purchasing a weapon for this specific use. Remember none of these are absolute as there are exceptions to all of them, and a pistol that fits you personally is always the best choice. Below are some points to remember when choosing the right handgun for you:

  • Larger handguns are usually more accurate than smaller ones, usually larger handguns are more easy to hold since your hand will cover the whole area, weight of gun and the length of the barrel usually helps reduce recoil which aids in grouping and faster follow-up shots.
  • Small pistols are easier to conceal and are lighter to carry.
  • Smaller calibers will result in less recoil, which once again helps with faster follow-up and better grouping. The one trade off is stopping power. Smaller calibers will usually require more shots to slow down or stop the perp. Unless your shot is strategically placed in the head or heart(or if you knee cap them 😉 )
  • Larger calibers will have more stopping power but more recoil.
  • A reliable pistol is more important then accuracy, purchase a high-quality pistol and make sure that you clean and maintain the weapon at all times so that when you need it, it is ready.
  • Semi-Auto’s can be more complicated then revolvers but new polymer guns are pretty simply and do not have that many pieces.
  • In my personal opinion point-shoot accuracy is more important then sighted accuracy when it comes to self defense tactics. 1st: You will want to determine basic point-shoot capabilities of the gun. Take an unloaded gun, close your eyes and point the gun with your finger next to the trigger, but not on it, at a makeshift target. Once you think you have aquired your target open your eyes – the sights should be lined up exactly where  you wanted it. At five yards, it should be no more than a couple inches off center-target. 2nd: If your handgun is pointing high or low, this can be compensated for with practice. For example anyone who has never used a Glock has a high point-shoot location due to the ergonomics of the gun, but with practice you can correct the location. But, if you then pick up a better-fit gun, like a springfield XD(m) you will notice that your point will a lot closer but probably a bit low due the the natural ergonomics of the gun. 

Next up we will be covering how to select a Caliber. This is a very tough choice, I am constantly second guessing myself and changing my mind on what I want. I go back and forth between 9mm or .40S&W. Do I want a bigger caliber with more stopping power or do I want a smaller caliber with less recoil. Also 9mm holds more rounds then a .40S&W. Can I stop the perp with more rounds if they are accurately placed or can I stop the perp with only a couple shots no matter where they are really placed. 

  1. An important rule of thumb is that no cartridge is perfect, so consider both the benefits and drawbacks. Handgun rounds are mostly considered weak and placement is much more important then the round itself. There are some advantages of one round over the other and in a fight the advantage should always be on your side.

There are a few attributes which should always be considered in a caliber:

  1. Permanent Cavity is the resulting “void” in a target where the majority of a bullets energy was transferred and tissue was destroyed. The bigger the Permanent Cavity the better the chance you have to cause fatal damage to the organs or the central nervous system.
  2. Penetration is highly important. If the trajectory does not Penetrate deep enough it may not cause fatal damage to the organs and the damage to the central nervous system may be less severe. It is recommended that each round should penetrate at least 14-16 inches to be considered reliable. This allows the round to penetrate the body at different angles some less desirable then others and still have enough energy to cause maximum damage to vital organs.
  3. Recoil is not talked about enough when it comes to bullet ballistics b/c it is a very subjective and weapon-specific characteristic. Low recoil allow you to have better grouping and faster follow up. Also each handgun will transfer the recoil differently.
  4. Bullet Energy is an extremely emphasized feature. Handguns have an extremely low Bullet Energy. “Knock down power” is a fable born from action movies; stories of people being knocked down when shot is all mental, it has been proven that they fall down because thats what they assume is supposed to happen. People shot with a .22 LR in a non life threatening area have fallen down b/c they assume that since they were shot they should fall down and die.

Last we are gonna do a comparison of the most common semi-automatic handgun rounds:

  • 9mm Parabellum is the most common caliber in the world. The 9mm has a low recoil which allows for quick, accurate follow up shots and small grouping. The 9mm magazine capacity is usually much greater than other larger rounds. They also cost less and the availability is excellent, which in turn makes it the number 1 choice for long term practice. Finally there are wonderful higher pressure loads available called +P rated rounds, producing outstanding self-defense characteristics (make sure your handgun is rated to shoot +P loads).
  • .40 S&W is one of my favorite rounds and is also very common. The .40 S&W is the newest of the three rounds it was created only a few decades ago, to replace the 10mm and was specifically made for Law Enforcement because the rounds they were using at the time (9mm and .38 special) were not cutting the mustard. A couple of benefits of the round is that the flat nose of the bullet creates a larger temporary cavity and also to allow the energy to transfer at a quicker rate to create a sizable permanent cavity.
  • .45 ACP is the largest of the 3 bullets but travels at a lower velocity. The caliber is the only round that can be used efficiently with the sound suppressor due to the fact that the standard round (230 grain) is subsonic under almost all circumstances. The permanent cavity on a ballistic gel of a JHP .45 ACP is about 40% larger than a JHP 9mm. Some of the negatives about the round is that the recoil is vicious but manageable with the correct stance and grip and also the magazine holds a lot fewer rounds then a 9mm or .40 S&W magazine. It is a common saying in LE that if you don’t hit them in the first 3 rounds then you are not gonna hit them at all. So, if you live by that theory then a smaller capacity magazine shouldn’t be a problem.

Those three rounds are the most commonly used rounds in semi-auto pistols but they can also be calibered in .38 special, .357 Magnum, and .44 Magnum. These are common revolver cartridges. The .357 SIG ( a 9mm bullet in a necked down .40 cal casing) and 10mm Auto are also somewhat prevalent autoloader calibers. Another specialty round is the 5.7x28mm, made by FN, (Fabrique Nationale) designed to defeat Class III body armor with this ammunition. These steel-core rounds are not widely available to civilians, but the advantage of the round as a very low-recoil, high velocity round cannot be denied. Due to the calibers tumbling effect in soft targets it will inflict a considerable amount of permanent cavity while still penetrating the required depth of 14 inches. There is a very similar round with similar characteristics is the 4.6x30mm that is created by Heckler and Koch.

Thank you for joining me in Part I of How to be Combat Ready with a Handgun. Please remember that these are my opinions based on the research that I have done and also my experiences shooting and using handguns. These opinions are shared by many experts in the handgun field so please read them carefully. I hope you have learned something reading my blog today. Stay tuned for Part II of How to be Combat Ready with a Handgun. We will be covering how to reloading your pistol, pistol malfunctions, point shooting and flash sighting, how to train yourself, human targets and quick draw. Please leave any comments or questions below and also don’t forget to click the follow button so you don’t miss out on any future posts.

Thanks!!!!

Survival Tips – Part II Edible Plants

What’s up Y’all,

I’m back with Part II of edible plants. I love this topic, I think its cool learning about what tree’s and plants are edible. Some of them I would have never expected you could eat. Let’s start with my usual disclaimer. ONLY eat these if you are in a survival situation and you do not have any other options and make sure that you only eat a small quantity some of these plants can make you sick if eaten in large quantities. Just like most food for that matter. Well lets dive right in and get out grub on.
cattails

  1. Cattails: Grasslike, water-loving plants. Grows up to six feet tall. Cattails produce distinctive brown heads. The stems, pollen, and young seed heads are edible. Gather young, tender shoots and you can either eat them raw or cooked. You can also boil the young heads and eat them like corn on the cob(make sure to salt and butter :)) You can also make dough by mixing the pollen and water and then either bake or fry. Not only is this plant edible but you can use the fluff for tinder and the leaves for weaving. Also burn to make a natural bug repelant.
    chicory_blue
  2. Chicory: Flowering plant on stems up to four feet tall. Thick, hairy leaves with sky blue flowers. Chicory grows throughout the temperate Norther Hemisphere. The best part is that you can consume the entire plant, no picky eating here. To eat the leaves boil them or consume raw. Boil roots and/or roast them. If you roast the roots you can grind them into a powder and use as a coffee substitute.
    Chokeberry
  3. Chokecherry: Shrub that grows up to eight feet tall and bears dark fruit. Tiny, white flowers. The Chokecherry grows in woods and swamps in temperate zones. The berries of the Chokecherry are edible but do NOT eat the leaves and pits. Both are extremely toxic. Mr. YUCK :(> says make sure not to confuse with buckthorn berries, which cluster along stems and cause vomitting.
    Clover
  4. Clover: Small plant with flowers of white, cream, pale green, or pink. Leaves (in three lobes) and roots are edible. You can either consume raw or boil them. The roots of the plant are sweet and are best when smoked over an open fire.
    coconut palm
  5. Coconut Palm: Common palm tree. Found throughout tropics, especially near coast lines. Coconut Palms are a great source of nutrition when on a deserted island. The entire Coconut Palm can be consumed. The milk in a coconut is great if you are dehydrated because it has plenty of vitamins and sugars which need to be replenished. You can eat the Coconut meat raw or you can dry it in the sun to preserve if you are trying to escape the deserted island you are trapped on. Not only is the Coconut a great source of food but you can boil the nuts to render an oil that you can either cook with or you on your skin. You can use the husks as tinder and it will also repel mosquitoes. The most dangerous part of the Coconut is the shell itself. Make sure not to fall asleep under a tree, more people are killed by falling Coconuts then sharks. Coconuts floating in the sea are a great source of water so if you are ever stranded on a boat in the ocean look for floating Coconuts, but then again if you see floating Coconuts you probably are not to far away from an island. 
    Crowberries
  6. Crowberries: Dwarf evergreen shrub. The Crowberries are shiny, small black berries with needlelike leaves. Grows in arctic tundra. Berries are edible raw or dried. Dried fruits always keeps better then raw fruit. One unique trait of the Crowberry is that the berries remain on stems throughout winter.
    Daisy
  7. Daisy: Ox-eye daisy is a bright perennial flower, with yellow button inside a ring of white pedals. Daisies grow in temperate climates throughout the world. They can grow up to three feet tall. The Daisies young stems and young leaves are edible. An interesting fact about Daisy’s is that you can steep the flowers to make tea that is great for soothing coughs. Gotta love homeopathic medicine. 
    Dandelion
  8. Dandelion: Low-Growing weed. Bright Yellow flowers, hollow stems, with jagged-edged leaves radiating from central stems. The Dandelion grows in the Northern Hemisphere. One great aspect of the Dandelion is that the entire plant is edible, so do not worry about being picky with this plant just pop the whole thing in your mouth and enjoy. YUM YUM. What makes Dandelions a great survival food is that they contain large amounts of Vitamins A & C.

I hoped you learned something new reading this post. I sure know I learned a few cool facts while researching this post. Who would ever have thought that Dandelions are edible and high in vitamins, and I never even heard of Crowberries before I started the research. Once again please only eat most of these plants when you are in a survival situation and you need them for survival. Some of these plants are great in moderation but can cause sickness if ate in large quantities, except for cranberries eat as much of those as you want they are a great way to clean toxins out of your system. If you have any questions or comments please leave them below. Also don’t forget to click on the follow button so you can stay up to date on my new posts.

Survival Tips – First Aid Part II

P79_first_aid__14244_zoom-287x300

What’s up Y’all?

Welcome back, we will be continuing talking about how to treat minor injuries if you are stuck far from a hospital. Please remember that this is something you should only do if you cannot access an emergency room. Alright lets dive right in.

  1. Boils – Symptoms: Red, tender spot on skin. Soft, pus-filled center forms amid tender area. Possible Condition: Skin abscess-deep, localized infection. Course of Action: Soak boils in warm water or apply heat packs to increase circulation and improve body’s ability to fight infection. Do not attempt to drain boil until it forms a “head” or pustule. If large boil forms, lance it with a sterile needle or knife and drain pus. Cover w/ sterile gauze and bandage.
  2. Breathing Difficulties – Symptoms: Slow or rapid breathing. Gasping, clinching the throat with one or two hands. Deep or shallow breathing. Gurgling, wheezing, dizziness. Unusually cool or moist skin. Possible Condition: It could be asthma, and/or bronchitis. Hyperventilation, often caused by anxiety, head injury, or severe bleeding. Allergic reaction. Foreign object in air-way. Course of Action: Switch person’s position; lying on side w/ upper leg bent or sitting may improve breathing. To treat blocked airway(choking), give blows to the back; wrap your arms around victim’s abdomen from behind, place fist just above naval, grab fist w/ other hand and make fast, upward thrusts into abs. If you find yourself alone and choking you can use an object around you like a chair or if nothing is around you that will work try using your fists like you would on someone else. If victim in unconscious and not breathing, place victim on back, push down on forehead while pulling up on bony part of jaw to lift the chin. This “head-tilt chin-lift technique” moves the tongue so air can reach the lungs. Check victims. If still not breathing, give two rescue breathes with each breath lasting one second. Pinch nose shut; take a breath and make a complete seal over victim’s mouth; blow in to make chest rise. Check to see if breaths go in; check for pulse by feeling at side of windpipe. If breaths do not go in, clear airway. If victim has no pulse and is not breathing begin CPR. If victim has a pulse but is not breathing, give 10 rescue breaths per minute until victim breathes on his own.
  3. Burns – Symptoms: Skin is red, dry, and swelling. In more severe cases, skin has blisters, appears wet or mottled, or skin turns brown or black. Possible Conditions: Thermal burns; radiation burns (sun’s ultraviolet light) Course of Action: Cool burn with lots of cold, running water. Cover with sterile dressing and bandage. In severe cases, take steps to minimize shock. Do not let victim get too hot or cold. Do not apply ice except if the burn is small, and then for only 10 minutes. Do not attempt to clean or apply ointment directly on a severe burn.
  4. Cuts and Abrasions – Symptoms: removal of outer skin layers. Red rash caused by scraping. Bleeding from opening in skin caused by sharp object. Possible Condition: Abrasion, laceration, puncture wound, or avulsion (tearing/ removal of skin and soft tissue). Course of Action: Clean abrasions w/ soap and water to prevent infection. Care for open wounds w/ dressings and bandages.
  5. Dehydration – Symptoms: Thrist. Dizziness. Dry mouth and nasal passages. Infrequent urination; urine is dark. Weakness/fatigue. Headache. Confusion, irritability, slurring of speech. Possible Condition: Body has lost too much water to function properly. Course of Action: Drink small amounts of water at frequent intervals. Keep clothes on; clothing barrier decreases water loss through sweating. Sugar or oral rehydration salts may be added to first water given to victim. Victim should refrain from physical activity while recovering. If victim must move, take frequent breaks for rest and water.
  6. Drowning – Symptoms: Submerged victim does not breathe and/or has no pulse after being pulled from water. Possible Condition: Water in lungs (drowning, partial drowning) Course of Action: Clear airway and follow guidelines under “breathing difficulties.” Prepare to administer CPR.

I hope this comes in handy when you really need it. I also hope you learned something new as well. Remember that you should only use these skills when you are in an emergency. You should always take the injured person to an emergency room if you have access to one.

Thank you again for reading my blog post on First Aid. Please leave a comment and also don’t forget to click on the button at the bottom to become a follower.