It’s been a long time, I shouldn’t have left you…

Hey hey hey, what’s up you crazy cats. I’m sorry that this site has been inactive for so long. About a year ago a good friend of mine introduced me to these sweet machines called Multirotors or quadcopter but best known as drones. Now the ones I enjoy flying are not the ones that have 4K camera: on them and fly around all slow taking video and crashing into planes or buildings or brides. What I fly are called Racing Quadcopters, I do enjoy a hexacopter every now and again but quadcopters are currently the most popular setup. If this sounds interesting to you check out my other WordPress blog fullthrottlequadsrt I just started it so the content is still growing or check out my YouTube channels which has a good amount of videos to choose from it is also called fullthrottlequadsrt. My goal is to post about once a week or once every two weeks it just depends on how caught up I am on my videos and other blogs. So thanks for checking out my blog and stay tuned for new material. And don’t forget to Like, Subscribe, and Comment. 

Thanks,

Review: Wazoo Bushcraft Necklace

bushcraft necklace2


Hey hey hey,

Hows it going my friends, its been a while but I am back and hope to be posting more great reviews and tips and tricks for the everyday survivalist. Since we last talked I have picked up a few new hobbies and started a few new ventures. If your interested check out my two new YouTube channels fullthrottlelighters and fullthrottlequadsrt. Also I posted a couple product reviews from this site as well to youtube.com under pnwtactical.

bushcraft necklace3

Okay now lets get started. Recently Wazoo which is an amazing company, with the best slogan ever, saying that there products will save your wazoo and that couldn’t be any more spot on. They have some of the most innovative and creative and damn cool looking gear on the market today. They reached out to me and asked if I could review a couple of their products for them and boy was I more then thrilled to do so. I was just a giddy as a little school girl when that first package arrived in my mail. They sent me a little package with a few different products for me to review. Seeing how this is my first time reviewing for them they sent me a some little survival products to see how I do and to get my feet wet. Well those little pieces of equipment really make a huge impact on any go bag, or first aid kit, or even as an add on to your EDC gear. I was able to incorporate all three products to my EDC gear and I couldn’t even tell that I added 3 new pieces and those pieces became the most essential pieces I carry. One was the Bushcraft Necklace. it is this great looking leather strap necklace with a shard of ceramic and faracerium rod attached. Now just for you folks who read that are are like what in the world is a faracerium rod. Well faraceium is a man made metal, it is an amazing fire starter tool. It was made so that when you scrap it using a hard object like ceramic it will shave tiny particles off the rod and when those tiny partical are shaved off and hit the air the oxygen will cause the faracerium to com-bust and create a little molten metal spark that will start a fire in no time for you. The necklace is super light weight and you can barely tell you are wearing it. Ever since the first day i received it i haven’t taken it off only a handful of times to start a fire using the attached tools. One thing to remember is that when you order your necklace and i promise you will order one don’t throw away the attached Jute rope, it has been dipped in beeswax and makes an amazing tinder and will help you start a fire in no time or you can use it to practice starting a fire with your new survival gear(but make sure you are outside when doing this so as not to create a fire that can cause damage to your home and to people. Remember safety first and always put a humans life a head of using any type of equipment. Remember guys life is precious and you and everyone else are irreplaceable. Its one of the reasons i do this blog so that I can help you stay alive when you go out to do recreational activities that you love in the great outdoors, to make sure you come home safe to your loved ones). To practice using your new necklace take the Jute rope and tear it up into tiny strands and fluff it up in a pile. Take your necklace and slide the faracerium rod to one end and hold the rod steady in one hand and the ceramic shard steady in the other hand. Place the ceramic piece above the faracerium rod and scrape the rod using medium pressure and in a backwards motion towards your body against the ceramic in a steady quick motion. Now it doesn’t have to be lightening fast but you want to be quick enough to produce sparks. The faracerium was engineered for this purpose so it will create the sparks fairly easily. If done correct huge sparks of molten faracerium will fly off the rod. Now the reason I am telling you to do it this way and not to just slam the ceramic into the rod is because if you do it the way i just explained you should be able to control where the flames are going making it much easier to start a fire where you want to and not have the sparks flying all over the place starting little bush fires here and there and you are running around like a fool putting out small fires before they become forest fires(just kidding that would only happen Mel Brooks movie.

bushcraft necklace1

I love my Bushcraft necklace and I wear it everyday. The one and only thing I think I would say that they could improve on is by making it come in at least two sizes. I have a huge head and I had to slide the slip knot all the way to the biggest setting to get it around this giant melon of a head I have on my shoulders. The slip knot they use was a great idea and I think two sizes would be able to cover pretty much everyone. This necklace has been a great conversation starter for me, I have had many random conversations with people in the grocery line, or at the bar, or dog park. By the way the dog park is a great place to meet women and I have had plenty of conversations with many beautiful women there with just the help of mans best friend but with the addition of this interesting piece of gear it has made the conversations that much better, think you are some sort of magician when you cause giant sparks to fly out of your hand. People always tease magic but girls love it even if they don’t say so everyone secretly loves magic and even though making sparks with a fire starter isn’t magic who says you can’t pretend right? heck if its gonna get a you a one of gods greatest achievements to sit across from you on a lunch or dinner date then heck I say do what you gotta do. Well guys that’s the basic’s of using this amazing article of bushcraft accessories. When you visit their website to purchase your very own bushcraft necklace make sure to browse and check out all the other cool stuff they have, you will find yourself spending hours looking at every product and reading every description just because you can’t get enough of their creative ideas to Save Your Wazoo. So push that buy button and hit that plus sign and buy a couple of them for your brothers or your dad and your friends they will worship the ground you walk on when you give it to them.

Ex-claimer: Wazoo provided me with the Bushcraft Necklace free of charge in exchange to do a product review and write a review on their website. This in no way effected my opinion of the product. I truly do love this and plan on buying it for my brother in laws. I am here to bring you an unbiased opinion so that when you go to purchase a product you are armed with as much knowledge as possible and feel comfortable about the purchase you just made. Their are so many different products out there to choose from that its hard to know what is good and what is bad and I hope I can help you navigate those waters. I want to make sure that when you head into those woods, or go to bed at night that you are safe and will come home to your loved ones or are able to protect your loved ones from any sort of threat. Prevention and proper preparation is the key to this, so educate yourself because knowledge is power.


Xikar Tech Double Jet Flames Torches


Sup Y’all

I’m baaack, I hope you all are more happy I’m back then mad that I was gone for over a year. Well I do apologize my life  sdave to give all you guys who come to my blog and read a huge thank you. It’s unbelievable how many visits I’m getting a day.  Okay enough of this sappy stuff back to what you came here for. 
 I bet you are sitting here like why in the world am I reading about a Jet Torchs on my survival tools blog. Well in my opinion what kind of lighter would work better in a cold, wet, maybe windy situation….a Jet Torch of course. Now there are better ones out there for surviving in harsh climates but a Jet Torch such as the Xikar Tech would be more than adequate for camping in the woods during Summer, Spring. I am personally loving this little work horse. Well let’s jump in and take a look around.lll  the 

pee you right ther rolling your eyes just bare with me or skip to the next paragraph, j/k guys. The company was started in 1994, when now  President Kurt Van Keppel decided he wanted to buy a good cigar not only then to ruin it because he couldn’t find good cigar cutters. He found that it didn’t matter how much money he spent they always were underperforming. So he set out with vice President Scott Almsberger to match good design with the best styling and materials you can find. The final result which took them 6 months is what we know as the market leader in cigar cutlery, The Xi cutter which was first assembled and ship from his garage in 1996. The word Xikar originated from sikar which is believe to be the first Spanish spelling for Cigar. 

 
Xikar’s Corporate Mission is to Serve a Great Products. They are dedicated to providing value to consumers through unique, artful cutlery at a fair price. They will provide these products through honest and ergonomic design to achieve superior form, feel and function. One of my personal favorite aspects of Xikar and its oproducts is that they offer a full lifetime warranty on all their products. Xikar’s team is dedicated to providing value through honest and ergonomic design at a fair price. On his design stands for consideration of function, we’re going on the comfort with simple, clean lines and lack of superfluous decoration on the product. Xikar has four fundamentals that all products must meet. 

  
  Pp 

  • Function: Product must be extremely high functioning, meet their high standards poll
  • Opiijlmechanical and material quality. 
  • Form: All products should meet two sayings “Easy on the Hand” and “Easy on the Eyes”. By this they mean the product should be ergonomic and artful. Beautiful design enhances the enjoyment and experience of the product. 
  • Fair: All products are set to a fair price. 
  • Forever: Lifetime unconditional guarenas on all Xikar products. 

   
 I hope you all enjoyed that little history lesson on Xikar. Now it’s time to start digging into the family of Tech Jet Torches. The Xikar Tech comes in 4 different Jet Flames and 3 different colors. Tech lighters feature a large fuel tank, and three different joke flames and durable body style that achieves Xikar’s commitment to form, feel, and function. Tech lighters combine a sleek transparent body design that comes in Blue, Black, and Clear with solid metal construction at an affordable price. Their design is what makes them great for outdoors usage and camping. 


Product Details

  • Single, Double, Triple, and Quadruple Jet Flames
  • Auto-Open Lid
  • Durable Body Style
  • Oversized flame adjustment wheel
  • Ergonomic Design
  • Large fuel tank for prolong life span
  • Simple Thumb Ignition

 o  
NWTacticals Personal Opinion:

Xikar’s Tech cigar lighter is an awesome little powerhouse. You can defiantly see from the body style that it is competing with Blazers Little Buddy. Today’s Tech that I am personally reviewing is the Double Jet Flame in black which burns two immensely hot Blue flames that range from about half an inch to 2 1/2 inches. One thing that sets the Tech apart from the rest of Xikar’s lighters is that it is mostly plastic body which is what makes it ideal for camping. (Xikar does have a model that is for High Altitude, Water Resistent and Wind Proof. This model is called the Stratosphere, if you would like to look it up.) The upside to the plastic body is that you are keeping the cost down while delivering a durable and reliable Torch. NWTactical is a huge fan of single depression of the pusher which automatically opens the lid and ignites the RapidFire ignition. The Tech no only looks good but it feels good when holding it and igniting it, the ergonomics make it very comfortable in your hand. Another reason why this makes a great survival torch is that it has a rather large fuel tank, plus since the tank is made out plastic and is transparent you can always know just how much Butane you have left. At the bottom of the Tech is a huge wheel that encompasses the entire bottom, this wheel is used to adjust the size of the flame which ranges from a 1/2in to 2 1/2in blue flame. 


One important thing to remember is that if you are ulsing this in direct sunlight it can make the flame hard to see almost invisible to the naked eye, you want to stay away from the Jet Flame at all times and do not point it directly at your person or someone else. The Jet Flames reach the very hot 12,000 degrees F, which means what ever you are using the torch on will be extremely hot and make sure to give it time to cool down after exposure to the Jet Flames, also the lid will most likely be hot if you were using for an extended period of time. Xikar recommends that you do not keep the Tech lit for more then 10 seconds at a time. Last but not least remember that the Xikar Tech and all Xikar products come together with a LifeTime Warrenty so when you get your Tech go online and register it, also when you register your lighter Xikar will send you a very stylish Leather Lighter Carrying Case.


Final Thoughts:

Everyone here at NWTactical is sold on this little spit fire(haha get it, I’m not explaining it so if you don’t leave and don’t come meets all Xikar’s 4 fundamentals in that it is (Form)stylish, ergonomics of the lighter are great, (Function) the automatic lid is a must in my book I’m not trying to light the torch while flipping it open with a different finger. One solid motion will suffice for me. Also I like the see thru fuel compartment. (Fair) All Xikar products are priced accordingly to what you are getting. The Xikar Tech’s price range can vary greatly depending on where you are buying it and what model you want. The best prices you will find will be on Amazon.com. Xikar’s recommended prices are

  • Single Jet Flame in Blue, Black, Clear. Xikar.com is selling them on their website for 29.99. You can find these on   Amazon.com starting at $16+$3 Shipping. My local smoke shop in WA is charging $39.99
  • Double Jet Flame in Blue, Black, Clear Xikar.com is selling them for $44.99. On d they range from $20-$90. At my local smoke shop in WA these were prices at $49.99
  • Triple Jet Flame in Blue, Black, Clear. Xikar is selling them for 59.99. Amazon lists them for $19-$34
  • Quadruple Jet Flame in Blue, Black, Clear retails in my local smoke shop for $74.99. Xikar does not post the Quad Flame on their website and Amazon does not either. In my honest opinion the Triple is more then adequate but hey I’m a man I total understand wanting the biggest and the baddest.

Last but defiantly not the least he’s the type of butane fuel that you use to refill the torch. There are many different types of butane fuel and most will damage or break your torch. My recommendations are to use either

  • Xikar Purofine brand Butane and order it online at Amazon.com unless you can find it cheap at a local smoke shop or hardware store. At my local smoke shop I paid $5 for a bottle that weighs only 1.9oz which I feel like is only going to get me roughly a total of 3-4 refills and depending on how much often you use the lighter and how long you leave it on for at a time. For me this is not good I can go thru a tank in probably two days of  heavy usage. 
  • Newport Ultra Purified Butane with Zero Impurities which you can find for around $9 dollars for a can of 10 ounces which is amazing compares to the $5 I paid for 2 ounces. My friend said he knows a top secret location in WA where he gets bottles of Newport for $3 and that jackass won’t tell me. 
  • Whip-it brand Premium Butane w/ Zero Impurities. Comes in White Box w/ Blue and white writing. Whip It on Amazon.com usually comes in boxes of multiple cans so that’s cool cause you get them cheaper for the more you buy.  I only saw one person selling Whip It for $6 a can. 
  • DO NOT USE VECTOR QUADRUPLE REFINED BUTANE. I filled up my Xikar Tech and after only a couple uses the flames were not reaching the same heights as before and I couldn’t keep it on the lowest setting it would just sputtered out. Once I got home from my friends house I bleed my Xikar empty and refilled it using my Xikar Purofine Butane and it worked instantly you could see that the Jet Flames were bigger and it was also roaring like a jet engine. 

Thank you all for reading and look forward to seeing your comments. If you have a Jet Torch that you love please leave a comment or if you have a brand of Premium Butane please leave a comment with its name.  Vee

Paracord Bracelets, Lanyards, Dog Collars and Leashes for sale!!

Hi Faithful Readers,

NW Tactical is starting a new line of Paracord accessories. Don’t miss out on owning your very own paracord bracelet and also buy a matching one for man’s or woman’s best friend. I have been making Paracord bracelets and dog collars for over two years now and am now looking to share my handiwork with the rest of the world. Paracord is a great accessory for your casual everyday outfit. I wear a different one everyday of the week that matches my outfits. Paracord comes in almost every color you can possible think of and then some, such as

Camo
USMC Camo

Black Widow
Black Widow

Blue Camo
Blue Camo

Seahawks Camo
Seahawks Camo

Husky Camo
Husky Camo

Solid Black
Solid Black

I can make bracelets to match your favorite sports team College or Professional, I can also add charms or dog tags to make it more personalized. These make great gifts for special people in your life, the cord comes in two different sizes. It comes in your normal 550 cord which is military grade and also a smaller petite cord call NanCord that measures in at .75mm it makes great collars for small dogs or bracelets for women or small children. My 18 month old niece wears hers everyday and when she wakes up in the morning she points to her wrist and says “bracelet, uncle PJ bracelet”. She is extremely adorable. NanoCord comes in limited colors but does comes in most of the primary colors and some neon colors. I love my bracelets and I get compliments everywhere I go and so does all my family members that wear them. I especially get nice comments on my dogs collars due to the uniqueness of the collar.

I don’t make the paracord accessory until you order it so that it can be personalized to you, i make them to fit your wrist so you don’t have to have one that is to small or to big and you don’t have to worry about it not fitting cause you send me the exact size of your wrist or your dogs neck or the length of the leash you want. Also let me know what colors you want and I will make it happen. If you are local in the Seattle Washington area I can meet you same day, if you need shipping we can discuss that depending on where you are located and funds can be paid by paypal. I will ship the package within 1-2 business days thru USPS.

Prices Start @

Bracelets = $8.00-$10.00 + shipping

Lanyard = $10.00-$12.00 + shipping

Dog Collar = $20.00 + shipping

Dog Leash = $25.00-$30.00 + shipping

Prices Vary on how many colors and length of the accessory. Please contact me for more details on prices and shipping info.

Hey Guys stay tuned for my next article on Sypderco ParaMilitary 2 and Boker AK74. Both are amazing knives. My Spyderco PM2 is my new everyday carry and is an amazing knife for the price with extremely high quality steel for the price.

ESEE Izula May Be Small But Packs a Strong Pinch!

Howdy Ho Fellow Steel aficionado’s

photo-1

I ordered a ESEE Izula II because I loved my ESEE Candiru so much and I wanted something just a little bigger but exactly the same. Well they are not exactly the same but they are pretty close. The Izula has lived up to its name and has become one of the most iconic small fixed blades of our time. The locals in Peru call the meanest, nastiest, ant in the jungle, The Isula. In the USA we know it as the Bullet Ant. The ant is known for its toughness, independence, aggressiveness and lightness on its feet. The Izula fits all those characteristics and more. The Izula has a simple design that makes it a knife that is very complex and can be used for many different applications. It is the perfect survival knife, it can be worn on your belt, in your pocket, strapped to your pack, or around your neck on a lanyard. The Izula comes as a skeleton knife, but ESEE has recently released the Izula II which is what I purchased and it comes with the Micarta scales already on the blade, and it also has a slightly longer handle for those with bigger hands.

Venom Izula

As for its intended use as a survival knife I have not had the chance to take it into the woods on a backpacking adventure or a survival training session, I have used it mostly as my EDC in a suburban environment. I have taken it into the woods behind my house and put it thru a few tests just to simulate what it would be like on a survival training session or backpacking adventure. I personally think that this is a great knife to pair along with a bigger survival knife, usually something along the 7″ blade length. Something that can be used for hunting, chopping, and skinning. The Izula II can be used for skinning though and does a great job with its small blade. The Izula is actually pretty good at chopping for its small size, its good at making curled wood shavings which is great for kindling to start a fire the sparks catch better on the curled wood shavings, cutting rope with ease, slicing filet’s of fish to cook over the open fire, or taking the skin off bigger game, it also is great for trivial things such as opening boxes, opening mail, it cuts right thru an aluminum can with ease, and slices thru paracord to cut off the ends of my bracelets.

Fire Izula

Blade Specifics & Dimensions & Handle Ergonomics & Sheath:

The main difference between the Izula and the Izula II it is the handle length, weight, color and that the Izula II comes with micarta handles which are amazing might I add. The blade is made of 1095 carbon steel which holds an edge great and that is why its made for backpack adventures and survival sessions out in the wilderness for long periods of time, the down side is that it isn’t easy to sharpen. When sharpening you have to put some elbow grease into it to put an edge back on this little badass. The Izula is only 2oz and the Izula II comes in at 3.2oz and doesn’t add much to a pack, the pocket, the waist or even the neck which is where I prefer to carry mine which I rotate between the Izula II and my other ESEE my Candiru. A quick specifications run down:

Izula Micarta

Overall Length: 6.75″
Blade Length: 2.63
Thickness: .156″
Steel: Carbon Steel 1095
Weight: 2oz Izula & Izula II 3.2oz
Finish: Textured Powder Coat
Grind: Flat

Izula Fam

The Izula comes in many different colors so you can accessorize appropriately. It comes in Black, Tan, OD Green, Venom Green, Fire Ant Red, Pink, Gray, Steel, Damascus Steel. It’s like they say an ant can carry almost 50x its weight, the Izula will cut, slice and pry almost 50x its weight and out in the wilderness is almost 50x its weight in gold when it comes to survival. The Izula has a skeleton handle unless you purchase the Izula II which comes with the Micarta handles. You can also buy them separately, one of my favorite ways to make a skeleton handle more comfortable is to wrap it in paracord. The best thing about wrapping in paracord is that you can change it everyday to match the shirt you’re wearing or even your environment, you can wrap it in camo if you’re in the woods, tan if you’re in the desert or if you are going out to the club and you have a fancy purple shirt you can wrap it in purple paracord. Paracord comes in a million and one different colors and is one of my favorite things in the world. The blade has a slight angle in it for better leverage when cutting, it helps so you do not have to apply as much pressure to the knife when cutting hard objects. The Izula comes with an injection molded sheath that is light weight, has a large hole in it for a carabiner so you can wear it around your neck on a paracord lanyard, it also has a long gap that runs the length of the sheath so you can wrap the sheath in paracord to attach to a MOLLE strap or backpack or belt. The sheath holds the knife very snug, it is not going anywhere. When you insert the knife into the sheath it snaps in and you can feel and hear it engage the sheath for the utmost security so you have a piece of mind knowing that it is not going anywhere no matter how much abuse you put it thru. With a little practice you can disengage the knife using your thumb on the sheath and popping it out, this allows quick one-handed draw from your pocket, belt, or neck. Just grab, and pop it out with minimal thumb pressure and you are either good to start cutting or engage an enemy. You can also buy what is called Blade Tech Tec-Lok that makes it easy to wear on your waist band

Izula Kit 2

Blade In Review:

These amazing blades are expertly made in Idaho Falls Idaho by Rowen Manufacturing, keep up the amazing work guys and gals at Rowen. I love your products. After treating the Izula like a 15yr boy does his first girlfriend all soft and gentle. I decided to become a man and take it for a ride like you would a $50.00 day time hooker, i began abusing the wench. Chicken bones, aluminum coke cans, baby back ribs, cardboard, cloth towels, tree branches, hardwood, copper wire, steak, plastic containers, firewood, it all fell before the single pincer of this little Izula menace. It didn’t suffer a single chip or even a scratch in the powder coatin, it was still sharp enough to slice thru a tomato without squashing it but after a few seconds on my Smiths Dual sharpener it was back to the factory 20 degree angle. The Izula comes with a great little instructions manual on how to wrap the handle in paracord which comes in handy if you didn’t by the Micarta handles. I love this knife and i carry it almost everywhere i go around my neck loud and proud, if i don’t have this hanging around my neck its the ESEE Candiru just cause I felt like something different. Now go click on the address bar type in BladeHQ.com or Amazon.com and buy one of these right now you will not regret it at all. You will become a believer and love of all things ESEE. They have a great line-up of all different sizes of knife or all different applications. One day i will own them all in different sizes and colors just cause I think they are fantastic tools and weapons. Now before I leave you I want to drop a little knowledge on you so that your ESEE will last forever, it is carbon steel and the parts that are not coated with a powder coating it will rust so make sure to buy a bottle or a towellete of TUF-cloth and coat the whole blade once every month to keep away any rust and to clean with luke warm water and a mild detergent if needed. Dry as soon as possible and apply TUF-Cloth again.

Thank you and stay tuned for the next post on the best pocket knife I have own in my short knife collecting time…..the Spyderco Paramilitary 2….AMAZING!!!

paramilitary_2_5

AR-15 The Gun That Changed The Way American’s Fight

original m16


The AR-15 was a game changer, the AR-15 became the standard rifle of the US Military in 1970. Before our warriors carried the M14. The M14 is a big, bulky, powerful weapon. The M14 used a 7.62x51mm NATO(.308 Winchester) ammo, it held a 20 round box clip. It shot 700-750 rounds per min and went up to 500yds effectively. It was the standard issue rifle from 1959-1970. The reason we needed a new weapon was the M14 was to heavy at 9.4lbs empty and 10.7lbs fully loaded, and the solider could only carry anywhere between 50-75 rounds depending on how strong he was, this was a big issue when the M14 is a fully automatic weapon that shoots 700 rounds a minute. The rifleman could blow thru his ammo in only a few minutes. Enter the AR-15 or otherwise known as the M16 or CAR-15(Colt Automatic Rifle – 15). One of the major perks of the weapon was that a solider could carry 300+ rounds on his person when going on patrol, and the system only weighed in at 5.4lbs depending on the accessories on the gun such as sites and M204 grenade launcher.

m16a2 basic

The AR-15 was first produced by Arma-Lite and sold to Colt due to financial problems. Boy I bet Arma-Lite is kicking themselves now for losing out on that Military contract. They still produce the weapon for civilians but they do not have a Military contract like Colt does. The CAR-15 fires a 5.56mm NATO but it can be chambered for many different rounds. When first introduced during the Vietnam war it was universally hated amongst the soldiers. It had multiple problems that would later on be corrected and become one of the greatest small arms weapon ever produced and used universally amongst American Military Branches and many other countries Military’s. The AR-15 was introduced to the American Military as the M16 in 1962 when the Department of Defense’s Advanced Research Project Agency(ARPA) ordered 1000 rifles for testing in its Vietnam Project Agile. The M16 received enthusiastic reviews and based on these reviews Defense Secretary McNamara ordered 85,000 M16’s for Vietnam and 19,000 for the Air Force. Once in the battle field the M16’s true colors started to shine and it was having numerous malfunctions and many media outlets were blaming the deaths of American soldiers on the weapon system. The weapon was put back thru a very strict testing regiment which found the weaknesses of the gun and corrected them. Some of the biggest weaknesses of the weapon was poor training when the weapon was issued along with inadequate cleaning supplies. The humid jungle caused many of the weapons malfunctions, once the US supplied the soldiers with proper cleaning supplies it helped make the weapon more reliable.

m16a2 grenade launcher

The military didn’t just stop with cleaning supplies, it went back to the drawing board and came out with the M16A1. Colt came up with replacement of the powder, combined with a new buffer to slow rate of fire, a chrome plated chamber and barrel to improve rust resistance, a closed prong flash-hider, forward bolt assist, new butt-stock w/storage for cleaning kit, and introduction of a 30-shot magazine was adopted and performed well for the duration of the 60’s and 70’s. In the late 70’s they introduced the M16A2 which was the last major change to the weapon. The weapon went thru a Product Improvement Program(PIP). The major changes were the enhancement of the diameter of the muzzle which extended the range of the weapon and the velocity of which the bullet travels, the rear sight was modified so the user could adjust it for greater accuracy, it incorporated a case deflector so it could be used by left hander’s, and the auto fire feature was switched to the three round burst feature which also promoted greater accuracy and control of the weapon because the recoil is at its minimum at 3 rounds, over 3 rounds the recoil is a lot greater.

AR-15 tricked out

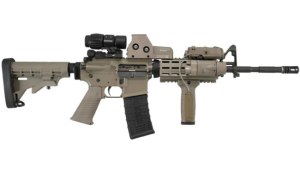
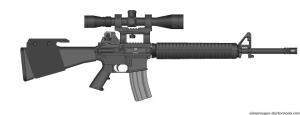
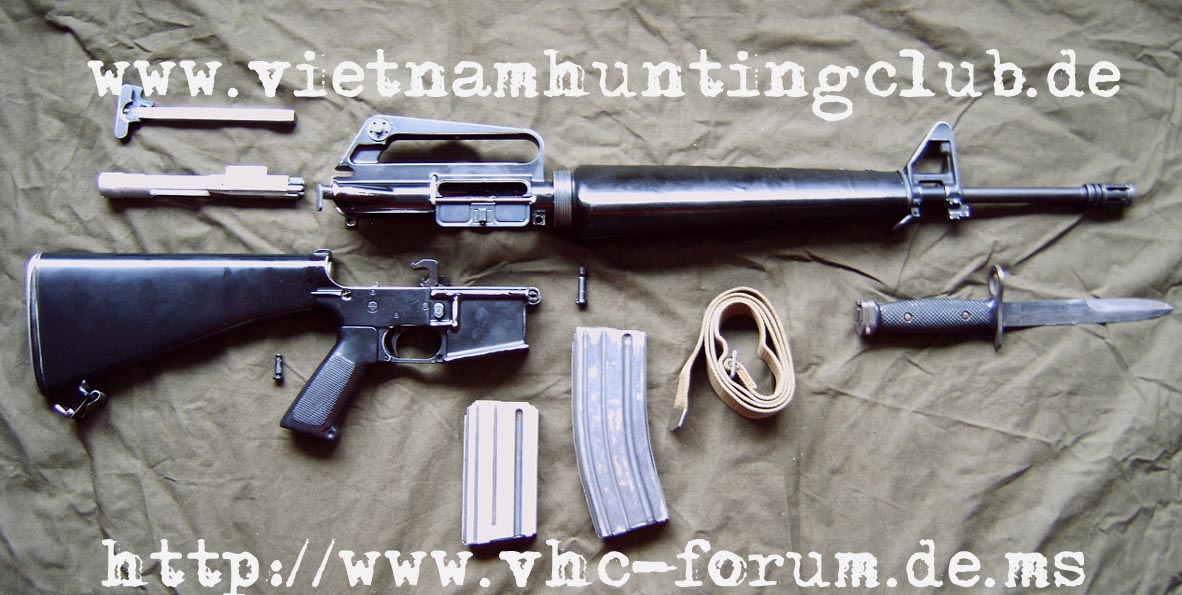
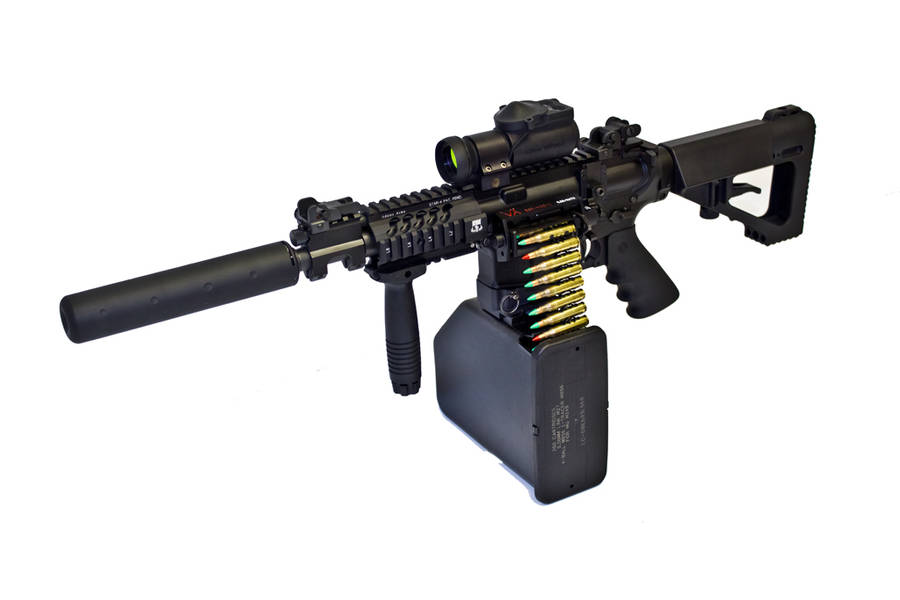
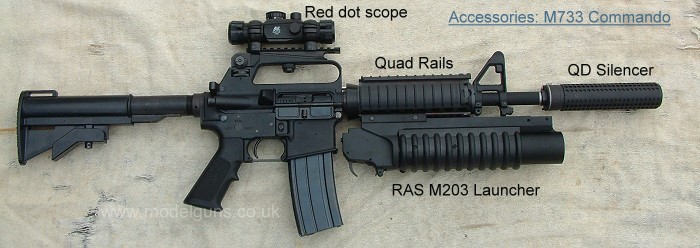
Enough about the history of the weapon let’s get down to the nitty and gritty stuff that we love to hear about. I personally love this weapon, it is my favorite rifle on the market. There are other really nice weapons such as the H&K 416 which is totally BA but I just love the CAR-15(M16 or AR-15). The AR-15 has numerous accessories, such as sights, pistol grips, magazines, butt-stocks, cover guards, barrels, receivers. One thing that sets the AR-15 apart from other rifles for the enthusiast is that you can build it from the ground up. You can go online or to the local gun dealer and purchase every part of the weapon and build it yourself. So you can customize the weapon to your specific specs. I LOVE IT. You start with purchasing a lower receiver, then slap on a butt-stock either fixed, collapsible, or adjustable, then grab a butt-stock mounting kit, along with a buffer tube, next grab a firing trigger along with a trigger guard, then throw on a pistol grip and a forward grip(optional), then you will need another integral part the upper receiver, screw on the barrel which sends the bullet down range, after the barrel is installed you need a two piece hand rail, at the end of the barrel screw on a flash hider/compensator, next put on a gas block on the barrel, after that put on a bolt carrier group kit, and a charging handle. As you can tell there are a lot of parts that go into building a AR-15 but if you are an enthusiast that is what makes it fun. You can also by complete lower and upper kits that basically takes away all the customizing and gives you all your pieces in one part, it makes building your rifle a lot faster but it takes away from the experience just a little bit. Now once you have all these parts in place, its time for all the fun stuff such as sites, scopes, vertical grips, lasers and lights, bi-pods, and magazines.

ar15 tricked out 2ar15 silicened box clip

The AR-15 can be calibrated to many different rounds such as .223 Remington, .45ACP, 5.7x28mm, 6.5mm Grendel, 6.8mm Remington SPC, .50 Beowulf, .50 BMG, and .458 SOCOM. I highly recommend not to chamber a .223 Remington into a 5.56mm NATO even though they are very similar rounds the 5.56mm NATO has an increased chamber pressure which can be dangerous, it is always better to be safe then sorry when using a weapon of any kind.

ar15 bipod

The CAR-15 showed it range in the Battle of Mogadishu, it was used on the ground by foot soldiers and also in the sky on helicopters by some of the best Special Forces Snipers in the world. SEAL Team Six and Delta Snipers used the CAR-15 a lot while in Mogadishu because they were fighting in urban warfare where they didn’t need a sniper rifle that could hit a 1000+ yard target they needed a weapon that could hit anywhere between 150-800 yard target. With a Leopold 10x power scope a CAR-15 could be adjusted to hit long-range targets, they also used the ACOG scope which helped them see at night and also in the day. It also helped because it could be suppressed which assisted them in hiding their position, it also gave them the ability to put a lot of lead down range and reach out and touch somebody quickly. One of the major complaints on the M16A2 round the 5.56mm NATO was that it was so powerful and aerodynamic that it would slice right thru the enemy going in one side and coming right out the other side clean. With the enemy being loaded on drugs such as Khat they would not fall when shot, they would keep going for a little while sometimes still engaging against our troops. The solider on the ground wouldn’t know if they took the enemy down or not because they would be able to run another 20-50 yards before they fell and at this point they would be out of the range or site of our troops. The soldier’s missed the 7.62 round that had a lower velocity rate but packed a whooping punch that would literally blow off limps and stop the enemy dead in his tracks. The NATO round was supposed to be more humane but put our troops at risk.

m4

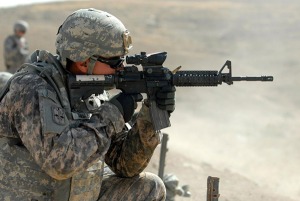
The M16A2 or AR-15 spawned many different weapon systems that are in use today. Many different companies have used the M16 platform and modified it to their specs. One weapon that is a direct descendant of the M16 is the M4 rifle which is used by many of our Special Forces Teams due to the platform being shorter and easier to use in Close Quarter Combat(CQC). Some of the different Teams that uses the M16 and M4 are Delta Force which is a Tier-One counterterrorism fighting team that recruits out of the Army mostly from the 82nd Airborne, and Green Berets, SEAL’s and SEAL DEVGRU or mostly know in the media as SEAT Team Six use the M16 and M4. SEAL Team Six is also a Tier-One counterterrorism fighting team. The SEAL’s recruit out of the Navy and SEAL Team Six members are the best of the best SEAL’s. Marine Force Recon Teams are a Special Operations team that draws from the Marine pool, they also pretty much only use the M16 and M4’s. DOG or Deployable Operations Group which is part of the Coast Guard branch use these weapons systems, the CIA Special Activities Division, SWAT, FBI HRT, or FBI SWAT all use this weapon system. As you can tell all of the top Special Forces units use this weapon because it is a classic and will be used within the teams for a long time to come.

ar-15 double round clip

I hoped that this article gave you some insight to the history of the AR-15, this gun has been given a big black eye in the media lately because of some of the tragic events that have happened over the past few years. The atrocities that were committed are nothing to turn a blind eye to but you also should have all the information before condemning something to purgatory. This is a truly wonderful weapons system and enhancement in technology that helped this country become the super power that it is today along with many other systems. Being able to own one of these weapons system is a right that every American should have and a choice that he/she should be able to make on their own. I love guns and I can understand why people do not like guns but banning guns is not the answer, because if you take guns away from the honest, hard-working, law-abiding citizens then they will only be owned by criminals and evil doers. Well this is not a debate that I am trying to get into here on this blog, I will leave it at that. I hope you enjoyed and if you have any pictures of your hand-built AR-15 or any AR-15 that you own, or any comments please leave them below. I love to read the thoughts and opinions of my readers.

ar-15 babe

THANK YOU FOR THE CONTINUED SUPPORT OF MY BLOG!!!


m16a2 silcened m16a2 scope m16a2 grenade launcher m16a2 breakdown diagram

How to do a Tactical Quickdraw with a Pistol

What’s up gun geeks and freaks!!!

Let’s jump right into the post today, we are gonna learn how to do a Tactical Quickdraw. Hopefully by the end of this post you can call yourself quickdraw McGraw. You will be able to out draw Billy the Kid. Well probably not that good but after weeks and months of practice you never know you could be the next fastest draw in the west.

Gun fights are usually spur of the moment, you don’t see it coming, and for this reason you need to know how to properly execute a quick-draw. A quick-draw is a skill that you can learn and it needs to be perfected, just like all skills involving weapons. If you do not perfect it you are endangering yourself and the people around you. There are five steps and each have a specific purpose.

Steps:

    step1

  1. Both of your hands should be moving at the same time. You will want to place your support had on or around your upper chest. Your firing hand will move above your pistol grip and come back down on your pistol to secure a solid firing grip while still holstered. The web between your thumb and index finger should be as close to the tang as possible. Your pointer finger should be straight and resting on the side of the holster to release any active-retention system your holster may have. I highly recommend just practicing this motion until you have mastered it. Stand at attention and burst into this position, and do it over and over again until you grab it perfectly everytime. If you get a poor grip on the gun it will be near to impossible to correct while drawing and will cause you to be inaccurate. This step should be practiced as much as possible. It is a short quick motion but extremely important. Its just like a sprinter coming off the blocks, or a quarterback accepting the snap, or a basketball player catching the ball and squaring his shoulders to the hoop, if not done properly it will effect the entire motion and shot.
  2. step2

  3. Your wrist needs to be as straight as an arrow. You will need to pull the pistol straight up out of the holster, if need be move your should upwards or backwards but do not contort your wrist. I recommend to buy a holster that has an open front but a high side wall, so that when you draw you do not have to pull the pistol all the way out of the holster.
  4. step3

  5. Remember to keep your wrist straight or in line with your forearm, then rotate your arm at the shoulder down and forward. This will cause you to point the gun down range and at your target. Make sure to disengage your safety while executing this motion. From this position you can fire at extremely close targets if necessary. Absolutely do not shoot from this position at targets more then 5 feet away. This is called close contact firing position or firing from retention. I recommend dry firing from this position at first using snap caps you can purchase at your local gun store. The key when practicing position two to position three is to keep your wrist inline with your forearm and rotating your shoulder.
  6. step4

  7. When executing position four you need to remember to keep your gun pointed towards the threat, move your gun toward your support hand, then grasp the gun with two hands and push forward just below your dominant shooting eye. While bringing the gun up prepare your support hand to accept the gun quickly and accurately. Your support hand should wrap around the front of the grip and the side encasing the entire handle. Once again you want to keep the barrel of your gun pointing down range at the target so that you are keeping eye contact on your target, if practiced your arms and hands will point the gun directly at what you are looking at. I recommend to set up a camera or have a friend watch, if recording your sessions you can watch and see if you are dipping the nose of the gun down or throwing it up. If you are doing either of these it will cause you to be less efficient when aquiring your target.
  8. step5

  9. You will want to keep your shoulders squared to the threat while extending both arms straight out. It is recommended in a tactical situation to only extend your arms about 2/3 of the way, the reason for this is because it will decrease your visual size and make you a smaller target. At first this will feel weird but you will get used to it, and it is much better for close quarters tactics. At the very last moment you will want to quickly focus your front sight directly on the targets center mass, do not align the front sights with the back sights this will cause you to rotate or bend your wrists and arms and eat up precious time that can be the difference between life and death.
  10. It is highly recommend to perform a tactical reload before re-holstering, it is a great habit to get into.
  11. You will want to re-holster in the exact opposite order of above. Pull the weapon back close to your body than remove your support hand, at this time i recommend you pause for a second and survey the situation and make sure that all targets are subdued and make sure the fight is not gonna resurface. After you are sure the fight is over, put the safety on, rotate your wrist and raise your elbow and push the gun straight down into the holster.
  12. Start off just practicing drawing the weapon up and out(step 1 and 2). Do this motion about 500-1000 times. If you do it this many times it will create muscle memory and you will be suprised at how fast you will be able to draw. When practicing do it with an unloaded gun. Practice for 15-25 minutes a day for a week straight.
  13. Once you have the presentation perfected practice drawing and shooting a target at the range. Some ranges do not allow you to draw and fire so make sure you know the range rules before practicing quick draw firing.

Tips:

  • Practice makes perfect, create muscle memory.
  • Guns are dangerous so make sure you are using proper gun safety procedures.
  • Take gun safety classes at your local gun range.

Remember to practice this as much as possible. You do not have to be at the range to practice tactical quickdraw, you can do it at home in your living room or bedroom(make sure your weapon is not loaded). Just practice, practice, practice, thats what it will take to be able to perform this presentation perfectly which is the only way to perform this movement. It is not ok to be intermediate at this movement you have to be an expert.

Thanks for reading, now go practice and be safe.

nwtactical

How To Identify a Venomous Snake From a Non-Venomous Snake

Welcome back to nwtactical!!!

We are gonna be covering how to tell the difference between venomous and non-venomous snakes. Most snakes you see are probably non-venomous but it is always a good idea to know what kind of signs will tell you that its a venomous snake. Most people don’t like snakes but are still fascinated by them. I can tell you that I would never hold a snake again, especially those big boa constrictors. I remember when I was a young boy in elementary school and the Reptile Man would come to our school and we would have an assembly for him. He would pull out all his cool snakes, and lizards, and turtles. I loved it when he came, because the show was fun and looking at them was fun but you couldn’t pay me to touch them. I remember after the assembly he would let students come and touch them or wrap a giant 10 foot boa constrictor around a little kids neck and take pictures. Oh Hell No! not me, not ever.

Alright lets get down to business. Of all snake species on the planet only 1/3 of them are poisonous. There are only 4 different types of poisonous snakes in the U.S. They are Cottonmouths, Copperheads, Rattlesnakes, and last but defiantly not the least Coral Snakes. I will be going over the different poisonous snakes and how to identify a Venomous Snake. So read careful and don’t forget these tips cause these could save your life someday when your out camping, hiking, or hunting.
Cottonmouth

  1. Cottonmouth Snakes (aka Water Moccasin): First and foremost the best way to tell if it is a poisonous Cottonmouth snake is that it will have elliptical eyes (cat eyes, slits). Cottonmouths can range from Black to green so be aware that they can be different colors. One very distinctive identifying mark is a white stripe that runs down the side of the Cottonmouths head. Young Cottonmouths have bright yellow tails and adults do not have this marker, so just cause it doesn’t have one doesn’t mean its not a Cottonmouth so don’t just use that as the only marker to look for. Cottonmouth habit is usually around water or in water, they also can live on dry land but mostly near rivers, and bodies of water. They usually do not congregate in groups, they are known to be loners.
    rattlesnake
  2. Rattlesnakes: One obvious sign is the rattle!!! you can’t miss it. Some harmless snakes try to imitate a Rattlesnake by brushing their tails through leaves, but only Rattlesnakes have a button like rattle at the end of their tails. They look and sound like a babies rattle but are much more deadly. Rattlesnakes also have a big, heavy triangle shape head, and elliptical eyes. So if you can’t see their tails look for those two distinguishing factors.
    Copperhead
  3. Copperheads: Copperheads are a fascinating species, they are gorgeous snakes but don’t let the beauty fool you. Their bodies are very similar to Cottonmouths but their color is much brighter, which ranges from a coppery brown to a bright beautiful orange, or a silver-pink and peach color. The young ones have a bright yellow tail just like Cottonmouths .
    coral snake
  4. Coral Snakes: This is another beautiful snake but don’t under estimate it cause its pretty. It is very dangerous. Coral Snakes have a very distinctive color pattern. They have a black, yellow, and red bands, a yellow head, and a black bank over their nose. One rhyme to help you remember how to distinguish a Coral Snake from a King Snake cause they are very similar is “Red Touch yellow, kill a fellow. Red touch black, friend to jack”. Another one is “Red on black, lucky jack; red on yellow, he’s one deadly fellow”. Coral Snakes are very shy and will usually run from you then attack you but that doesn’t mean you should try to approach one. Currently their are no known deaths by the Arizona Coral and only a few from the Eastern Coral.
  5. Color Patterns: Venomous Snakes in the U.S. tend to be different colors. If you see a snake that is a solid color in the U.S. it will most likely be non-venomous, but this is not the rule of thumb, some Cottonmouths are venomous and they can almost one solid color.
  6. head shape

  7. Head Shape: Non-Venomous snakes usually have a spoon-shaped rounded heads and venomous snakes will usually have a more triangular shaped head. The reason their heads are triangular is because of the venom glands.
  8. rattles

  9. Look for a Rattle: If you come across and snake and hear the distinctive rattle then you should stop, locate the snake and if you are a good distance away slowly back away from the snake but make no quikck moves.
  10. Pit

  11. Heat Sensor: Some venomous snakes have a depression between their eyes and thir nostrils. This is called a pit, this is used by the snake to sense heat in their prey.
  12. Watch out for Mimics: Some non-venomous snakes will mimic the patterns and behaviors of venomous snakes as a self defense tactic. Eastern milk snakes can look like Copperheads, Rat snakes can look like Rattlers, and a harmless King snake can look like a Coral snake. When you first come across a snake always assume that it is a venomous snake, until you can verify weather it is or is not. Even though you will want to kill a snake when you come across it be careful cause it could be against the law and another reason is because snakes control rodent populations, and also control snake populations as well.
  13. Swimming Snakes

  14. Watch how the snake swims: Another interesting way to tell the difference between a venomous water moccasin/cottonmouth and a harmless water snake is to watch the way it swims, if it swims with only its head above the water, or weather most of its body is floating too. If you only see the snakes head above the water then it is most likely a non-venomous snake, most of the time all venomous snakes will inflate their lungs so that they bodies float while they swim. EIther way it is a good idea to leave the snake alone and let it go about its merry way.
  15. ellptical eyes

  16. Eyes: One of the easiest and best way to tell if a snake is venomous or non-venomous. If the snake is venomous it will have elliptical eyes like a cat, like the little devils that they are and if it is non-venomous it will have round eyes like a human.

I hope you paid very close attention to this article cause it could save your life sometime. This was not an in-depth post on venomous snakes but it is enough so you can tell the difference between the two and make an educated descision on what to do. One rule of thumb that you should live by is if you see a snake don’t mess with it, just leave it alone and it will most likely leave you alone. Even though snakes are scary, and nasty they are an important part of our ecosystem and they honestly do more good then they do harm. If you have an questions or comments please leave them below. Also don’t forget to click on the button at the bottom of the page and become a follower so you don’t miss out on any new posts.

Thank you for reading

NW Tactical

Survival Tips – Edible Plants Part III

Welcome back to Part III of Edible Plants. As always I want to let you know that these plants should only be ate if you are in an emergency situation and they should be ate in small quantites. Some of the plants if ate in large quantities can make you sick, so be careful and use good judgement. Alright so this is part III and we have covered quit a bit of different plants that you can eat, some you probably already new about such as blackberries, coconuts, blueberries, but we have also covered quit a bit of ones you probably have never heard of or even seen before. I know there have been a bunch I never even heard of in my whole life. Well lets dive right in and learn some new plants that are edible. elderberries

  1. Elderberries: Shrub w/ dark blue-purple fruit. Elderberries grow up to 18 feet tall and they have multiple stems. They have tiny white flowers and they grow in the open in wetlands along lakes and rivers. The flowers and fruits that grow on it are edible raw: but make sure to avoid small red fruits they may be toxic, also the other parts of the shrub are poisonous as well.
    fireweed
  2. Fireweed: Flowering plant two to five feet high. Fireweed produces showy, large pink flowers and lance like leaves. They only grow in cold regions, especially near seashores. You can eat the leaves and stems and flowers raw. You will want to cut the old stems and eat the pith.
    fishtail palm
  3. Fishtail Palm: Large tree, with irregular toothed leaves. The flower shoots only grow at the tree top. The fishtail palm grows in the tropics of south asia. The flowering shoot also known as “palm cabbage” is edible along with the pith/juice from the plant can be ate/drank. You can either eat the palm cabbage raw or you can cook it for a warm meal.
    Wine_grapes
  4. Grapes: A variety of vines bearing fruit in clusters. Now we all know and love grapes but here is a quick break down. The vines are straggly and produce coursely toothed leaves. Wild grapes can grow anywhere in the world except in high altitudes. You can eat the fruit and young leaves either raw or cooked. 
    Hazelnuts
  5. Hazelnuts: Nut-bearing bush. Here is another plant that we are all familiar with. Hazelnuts have large bushes or trees with oval or heart-shaped leaves. Nuts grow in bristly, leafy, or hairy husks. They are mostly found in temperate zones of American West Coast, in Europe, and East Asia. Eat raw or dried. They are rich in oil which makes them great for survival situations. 
    iceland-moss
  6. Iceland Moss: Stumpy moss. The plant is a few inches high. The color can range from gray to white or red. It only grows in the arctic. All parts of the plant are edible. The best way to eat Iceland moss is to boil it to remove the bitterness. You can also dry it out and it will last a long time without spoiling.
    juniper
  7. Juniper: Tree with tiny, scaly leaves. The plant bears blue, berry-like cones that are covered with a whitish wax. Junipers are recognized by crushing the berries or sap to release the fragrant aroma of gin. They grow in temperate zones of Northern Hemisphere, plus the mountains of Africa. The berries are edible and you can eat them raw, and you can take the twigs and boil them into a wonderfully aromatic tea.
    Lambs-Quarter
  8. Lamb’s Quarters: Annual, flowering weed. Has dull green oval or spear-shaped leaves with mealy undersides and greenish flower spikes at the end of two to four foot long stems. The plant is distributed throughout temperate zones of Northern Hemisphere. The leaves and stems are edible.
    lotus-flower
  9. Lotus (Water Lily): Flowering water plant. The leaves and flowers float on the surface of still water. The leaves can grow up to four feet long and the flowers are a beautiful yellow or pink. The fruit is flat and seedy. The yellow flower varieties grow in North American temperate zones. The pink variety grows in East Asia. All parts are edible. Pull up/dig up stems for baking or boiling.

Thanks for reading Part III of edible plants, i hope you learned something new today. Remember that only eat this plants if you are in an emergency situations. Some of these can be toxic if ate in large quantities so be careful. Use you better judgement when eating this plants, like eat as much of the hazelnuts if you want unless you are allergic then do not touch them. If you do refer to my first aid tips post. Remember to leave comments or questions below and also don’t forget to click on the follow button so you don’t miss out on any new posts. Thank you.

Tactical Tips – How to be Combat Ready with a Handgun Part I

Springfield EMP

What’s Up Killa’s!!!

Today we are gonna stay true to the blog name and go over some tactical procedures. If you own a gun then you should know how to use it, you should be tactically ready because you never know when you will need it. If you are not ready it could be the difference between your life or the life of a loved one, if you are ready then it should be the life of the person who made the wrong choice to F with you and your family. I’m gonna go over how to be combat ready with a Pistol, their are other weapons that can be used as a self defense/home defense weapon but we are gonna focus on Pistols. Pistols are the most widely used gun for defense from the home to Law Enforcement to Military. Unlike the latter two groups we as civilians do not have extensive training using handguns. I highly recommend taking a handgun class when you purchase a gun. It will go a long way in helping keep you and your family safe from yourself.

The primary purpose of this post will be practicing with the pistol to be used in a defensive manner, but many of these techniques will easily translate to offensive use. While revolvers are a very common handgun, we will be focusing on semi-automatic pistols, since they are more widely used in tactical situations. It is true that revolvers are more reliable and unsurpassed, but when all factors are considered, semi-autos are the weapon of choice for police and armies around the world especially special forces. One important thing to remember is that just because you know how to use the weapon doesn’t mean you can use the weapon when push comes to shove. Not only do you need to know how to use the weapon tactically but you need to have a tactical mindset. 

Before you can learn to use a handgun you have to choose the right handgun for you. The right handgun for you might not be the right handgun for someone else, so don’t take someone elses word for it. Take the time to do the research and go to the firing range and test as many different handguns as you can get your hands on. The choice of weapon can seriously limit your ability to protect yourself with lack of accuracy or, more importantly, reliability. Here are some qualities to look for when purchasing a weapon for this specific use. Remember none of these are absolute as there are exceptions to all of them, and a pistol that fits you personally is always the best choice. Below are some points to remember when choosing the right handgun for you:

  • Larger handguns are usually more accurate than smaller ones, usually larger handguns are more easy to hold since your hand will cover the whole area, weight of gun and the length of the barrel usually helps reduce recoil which aids in grouping and faster follow-up shots.
  • Small pistols are easier to conceal and are lighter to carry.
  • Smaller calibers will result in less recoil, which once again helps with faster follow-up and better grouping. The one trade off is stopping power. Smaller calibers will usually require more shots to slow down or stop the perp. Unless your shot is strategically placed in the head or heart(or if you knee cap them 😉 )
  • Larger calibers will have more stopping power but more recoil.
  • A reliable pistol is more important then accuracy, purchase a high-quality pistol and make sure that you clean and maintain the weapon at all times so that when you need it, it is ready.
  • Semi-Auto’s can be more complicated then revolvers but new polymer guns are pretty simply and do not have that many pieces.
  • In my personal opinion point-shoot accuracy is more important then sighted accuracy when it comes to self defense tactics. 1st: You will want to determine basic point-shoot capabilities of the gun. Take an unloaded gun, close your eyes and point the gun with your finger next to the trigger, but not on it, at a makeshift target. Once you think you have aquired your target open your eyes – the sights should be lined up exactly where  you wanted it. At five yards, it should be no more than a couple inches off center-target. 2nd: If your handgun is pointing high or low, this can be compensated for with practice. For example anyone who has never used a Glock has a high point-shoot location due to the ergonomics of the gun, but with practice you can correct the location. But, if you then pick up a better-fit gun, like a springfield XD(m) you will notice that your point will a lot closer but probably a bit low due the the natural ergonomics of the gun. 

Next up we will be covering how to select a Caliber. This is a very tough choice, I am constantly second guessing myself and changing my mind on what I want. I go back and forth between 9mm or .40S&W. Do I want a bigger caliber with more stopping power or do I want a smaller caliber with less recoil. Also 9mm holds more rounds then a .40S&W. Can I stop the perp with more rounds if they are accurately placed or can I stop the perp with only a couple shots no matter where they are really placed. 

  1. An important rule of thumb is that no cartridge is perfect, so consider both the benefits and drawbacks. Handgun rounds are mostly considered weak and placement is much more important then the round itself. There are some advantages of one round over the other and in a fight the advantage should always be on your side.

There are a few attributes which should always be considered in a caliber:

  1. Permanent Cavity is the resulting “void” in a target where the majority of a bullets energy was transferred and tissue was destroyed. The bigger the Permanent Cavity the better the chance you have to cause fatal damage to the organs or the central nervous system.
  2. Penetration is highly important. If the trajectory does not Penetrate deep enough it may not cause fatal damage to the organs and the damage to the central nervous system may be less severe. It is recommended that each round should penetrate at least 14-16 inches to be considered reliable. This allows the round to penetrate the body at different angles some less desirable then others and still have enough energy to cause maximum damage to vital organs.
  3. Recoil is not talked about enough when it comes to bullet ballistics b/c it is a very subjective and weapon-specific characteristic. Low recoil allow you to have better grouping and faster follow up. Also each handgun will transfer the recoil differently.
  4. Bullet Energy is an extremely emphasized feature. Handguns have an extremely low Bullet Energy. “Knock down power” is a fable born from action movies; stories of people being knocked down when shot is all mental, it has been proven that they fall down because thats what they assume is supposed to happen. People shot with a .22 LR in a non life threatening area have fallen down b/c they assume that since they were shot they should fall down and die.

Last we are gonna do a comparison of the most common semi-automatic handgun rounds:

  • 9mm Parabellum is the most common caliber in the world. The 9mm has a low recoil which allows for quick, accurate follow up shots and small grouping. The 9mm magazine capacity is usually much greater than other larger rounds. They also cost less and the availability is excellent, which in turn makes it the number 1 choice for long term practice. Finally there are wonderful higher pressure loads available called +P rated rounds, producing outstanding self-defense characteristics (make sure your handgun is rated to shoot +P loads).
  • .40 S&W is one of my favorite rounds and is also very common. The .40 S&W is the newest of the three rounds it was created only a few decades ago, to replace the 10mm and was specifically made for Law Enforcement because the rounds they were using at the time (9mm and .38 special) were not cutting the mustard. A couple of benefits of the round is that the flat nose of the bullet creates a larger temporary cavity and also to allow the energy to transfer at a quicker rate to create a sizable permanent cavity.
  • .45 ACP is the largest of the 3 bullets but travels at a lower velocity. The caliber is the only round that can be used efficiently with the sound suppressor due to the fact that the standard round (230 grain) is subsonic under almost all circumstances. The permanent cavity on a ballistic gel of a JHP .45 ACP is about 40% larger than a JHP 9mm. Some of the negatives about the round is that the recoil is vicious but manageable with the correct stance and grip and also the magazine holds a lot fewer rounds then a 9mm or .40 S&W magazine. It is a common saying in LE that if you don’t hit them in the first 3 rounds then you are not gonna hit them at all. So, if you live by that theory then a smaller capacity magazine shouldn’t be a problem.

Those three rounds are the most commonly used rounds in semi-auto pistols but they can also be calibered in .38 special, .357 Magnum, and .44 Magnum. These are common revolver cartridges. The .357 SIG ( a 9mm bullet in a necked down .40 cal casing) and 10mm Auto are also somewhat prevalent autoloader calibers. Another specialty round is the 5.7x28mm, made by FN, (Fabrique Nationale) designed to defeat Class III body armor with this ammunition. These steel-core rounds are not widely available to civilians, but the advantage of the round as a very low-recoil, high velocity round cannot be denied. Due to the calibers tumbling effect in soft targets it will inflict a considerable amount of permanent cavity while still penetrating the required depth of 14 inches. There is a very similar round with similar characteristics is the 4.6x30mm that is created by Heckler and Koch.

Thank you for joining me in Part I of How to be Combat Ready with a Handgun. Please remember that these are my opinions based on the research that I have done and also my experiences shooting and using handguns. These opinions are shared by many experts in the handgun field so please read them carefully. I hope you have learned something reading my blog today. Stay tuned for Part II of How to be Combat Ready with a Handgun. We will be covering how to reloading your pistol, pistol malfunctions, point shooting and flash sighting, how to train yourself, human targets and quick draw. Please leave any comments or questions below and also don’t forget to click the follow button so you don’t miss out on any future posts.

Thanks!!!!