Survival Tip – Edible Plants Part I

Hey NW Tactical family,

Today we will be going over what plants you find in nature that are edible. This will be an ongoing series so keep a look out for more to come. There are many plants and tree’s out there that you would never think are edible but they are, and if you are in a pinch gobble them up and enjoy. I will be going over how to recognize them and what part of the plant is edible and how to prepare them. So let’s get down to business.

acorns

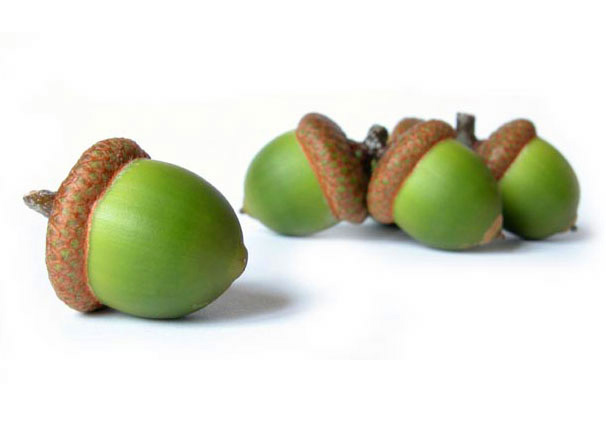
  1. Acorns: Hard, round, capped fruit of the red and white oak tree. Slice the cap off and split the shell. The flesh inside is edible, but make sure to dry it out first. The white acorns have a much better flavor then the red ones. You can either eat the acorns plain or salt them. You can also grind them and use as a coffee substitute.
    bamboo 
  2. Bamboo: Giant, fast-growing grass.The pith is edible, as are the bamboo seeds. First split the bamboo shell the remove the pith with a knife. Cook the pith like you would cook asparagus in boiling water. You can eat the seeds raw. Bamboo is a good source of water, to find it shake the bamboo and listen for a sloshing sound.
    Barrel Cactus
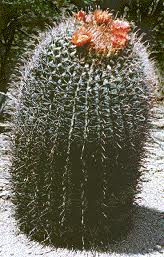
  3. Barrel Cactus: Desert plant with J-Shaped barbs. A cactus is a great source of water. The barrel cactus grows up to four feet tall. You can eat the fruit that grow off them but the taste is bitter and dry. Native American’s used to collect the fruit when there were food droughts. Be extremely careful when approaching a barrel cactus, if you are poked by one of the thorns it can be a very serious wound clean immediately. Wounds from the cactus are consider “dirty wounds”, if it is deep enough to draw blood antibiotics may be needed and could take several months to heal. Another great fact about barrel cactus is that they only grow to the south, so you can use them to gain your barring.
    bgnay 
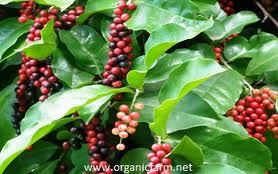
  4. Bignay: Shrub or small tree, The Bignay can grow from 10 to 35 feet tall. The Bignay has long, pointy leaves and flowers that grow in clusters. Fruit is the width of a finger, fleshy, and dark red or black. It only grows in the tropics. Only the fruit is edible, you can eat the fruit raw. Make sure not to eat the roots or other parts of the tree because they are POISONOUS.
    Bearberry
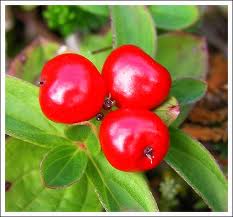
  5. Bearberries(Kinnikinnick): Evergreen shrub, that grows at high latitudes. The Bearberries has a reddish bark, white flowers, and red fruit. The berries and leaves are the only edible part of the shrub. You can use young leaves to brew tea, and only eat the berries when cooked. Make sure not to eat these in large doses, in large doses it can cause vomiting, back pain, and fever. So even though its edible do not eat a lot, and only eat if you must and are in a survival situation.
    Bistort
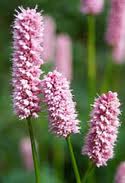
  6. Bistort: Grow one to two feet tall. Has triangular, narrow leaves on a thin, straight stalk. Grows in grassland and woods far into the north. You can eat the leaves in the spring and the roots in the fall. You can put the leaves in a salad for a nice green lunch. Soak the roots to remove the bitterness, then thoroughly roast the roots before you eat them. You can also dry, and grind the roots into a powder to use as an antiseptic.
    Blackberries
  7. Blackberries: Dark, aggregate berries on thorny canes. Berries grow on fiercely sharp thorns on arching stems. Canes grow in woods, scrub, and open ground in temperate climates. Fruit is popular with birds and other animals, so canes make good hunting sites. Make sure to rinse the berries first. On a side note that is not survival related, blackberries make an incredible jam. YUM YUM YUM!!!
    Black Walnut
  8. Black Walnut: Fruit of black walnut tree. Look for hard, green globes with a thick husk on limbs with paired, serrated leaves. Mostly found in temperate forests. To prepare crack open the husk and shell then remove the meat and enjoy.
    Breadfruit
  9. Breadfruit: Fruit-bearing tree can grow up to 50 feet tall, the leaves are more than two feet long, and with fruit that is very large and has hard seeds so be careful not to chip a tooth. The Breadfruit tree mostly grows in the tropics. The seeds are edible when cooked, do not eat raw. You can eat the fruit raw after removing the skin, or you can slice, dry it, and the grind it into flour.
    Burdock
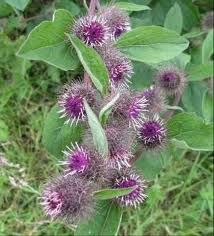
  10. Burdock: A biennial, flower thistle. Stalks grow 6 feet tall. Velcro-like stick-tight heads. The Burdock grows in northern temperate zones. You can eat the leaf stalks raw or boiled. Bake or boil before eating the roots. Be sure not to eat the leaves they can be confused with poisonous rhubarb.

These are all edible plants but should only be consumed when in need and you are in a life or death situation with the exception of the blackberries. I recommend picking and eating blackberries as often as possible. It is a fun activity to do with your kids, then teach them how to make different homemade treats with them such as blackberry jam or blackberry pie/cobbler, or just cover in sugar and gobble them down. Remember to eat these plants in moderation do not eat large quantities. This is only a small fraction of edible plants out there and there will be many more edible plants to come.

Thanks for joining me today and I hope you learned something new. If you have any comments or questions please leave them and I will try my best to answer them all. Also don’t forget to click on the follow button so you don’t miss out on any new posts. 

Spyderco Persistence

Spy Per Box

Sup Y’all

Alright back to the meat and potatoes of the blog, product reviews. Sorry its been so long since I have done a review but I thought I would spice up the blog by expanding beyond just product reviews. I hope you all liked the new Survival and Tactical Tips.

This post we will be reviewing the Spyderco Persistence folding knife. The Persistence is part of their value series knives, If this is their value series I would love to see what their normal knives are like cause this blade rocks. This is a strong, sturdy, sharp as sin knife. This is my first Spyderco knife and I can say I am a big fan. I really like the knife, the blade is big and strong.

spyderco logo

Spyderco is one of the most innovative knife makers in the knife industry. They brought serrated edge folding knives to the market, they designed pocket clips to make accessing your pocket knife easier, they also perfected the one-handed opening knife. Spyderco puts all their knives thru a rigerous product testing in the million dollar test facility. In their facility they test edge retention using a CATRA machine, they test rust using a QFOG machine, they also test the force needed to open and close the knife. Another thing that all Spyderco knives are tested for is steel strength, stress tests, and wear. Spyderco has a few features that they invented and trademarked.

SypderEdge serrations

One of the features they invented is the SpyderEdge. Spyderco claims that their SpyderEdge has the most efficient cutting performance of all serrated blades on the market. The Persistence blade that I own does not have serrations it is a straight edge blade, but if its quality is anywhere near mine then I don’t doubt them. A serration is a sharpened recessed curve along the edge of the blade which provides the user with more linear edge surface then a straight edge blade. The SpyderEdge serration pattern is one large serration to every two small serrations(as seen in image above). This increases the blade length by 24% and also makes the blade retain its sharp edge because the tips of the serrations come in contact with what you are cutting first easing the amount of force required by the recessed edges. Serrated blades are best used for cutting ropes, seat belts, cardboard, leather.

Spyderco Pers CLP

Next Spyderco was the first knife company to introduce the clip to the knife. They first introduced it in 1981 and called it the CLIPIT, the CLIPIT allowed the carriar to have better access to the knife. Instead of having to reach into the pocket to fish it out the knife sat on the edge of the pocket and could be easily removed. The CLIPIT allows the user to change the way the carrier can carry the pocket knife, either blade up or blade down. I gotta give Spyderco major props for developing the pocket clip. I do not know what I would do without it.

Spyderco1

The last but definitely not the least innovation Spyderco introduced is The Round Hole. The Round Hole is an industry symbol of quality. The Round Hole is spyderco’s most recognizable feature and allows the carrier to open and close the blade with one hand easily, and believe me it is crazy how easy I can flip the blade open, and it is probably the easiest knife to close one-handed that I have ever owned and I own a ton of pocket knives from a variety of industry leading companies. The hole offers convenient access and maximum control while opening as well as accommodating large, small and gloved  hands. The Round Hole is so well-known throughout the knife industry that some of the top blade companies have licensed it to use on some of their models.

Spy Per Full

Now let’s get back to the Persistence. The reason Spyderco choose the name is because of the steadfastness and never-give-up attitude. The Spyderco Persistence is the little brother to the Tenacious. The knife is made in China but the quality is still top-notch. This is one of my two EDC knives, I carry the Persistence in my back pocket opposite my wallet. The other is my ESEE Candiru that I carry around my neck using the Paracord lanyard that I made. The Persistence is a great entry-level knife and is a great value for only $30.00. The knife comes scary sharp out of the box which is always the first test of quality, and it has not lost its edge over the last few months of intense daily use.

Spyd Per Color

The knife is a total of 6.8 inches long, with a 2.75 inch blade and the knife only weighs 3.3 ounces, great for carry in the pocket you barely notice it’s there. They use 8CR13MOV Stainless Steel which has a high carbon rating which means the steel is strong and will hold an edge longer. The 8Cr13MoV stainless blade is a modified skinning-style, ground-flat from tip to tang which gives more cutting real estate. Careful positioning of the over-sized Spyderco Round Hole allow for fumble-free one-hand blade open/close. The handle is made out of G-10 laminate which is an epoxy and filled with woven glass fibers that is impervious to temperature changes and it also comes in many different colors. The handle is carved to fit the hand comfortable for prolong use in mind, which decreases hand fatigue. The handle also has skeletonize steel lines tucked inside to increase the handle’s rigidity and strength level without adding non-functional weight or bulkiness. It also comes with a 4-way pocket clip so you can position the blade up or down or for left or right hands.

Spy Per Closeup

Overall this is a great beginners blade and anyone looking for a sturdy, quality knife that will not break the bank I recommend getting the Spyderco Persistence, over any Gerber or Kershaw in the same price range. The Spyderco opens more smooth than any folding knife I have ever owned and you do not have to work it in at all. You can flip it open with a flick of your wrist right out of the box. It also has no blade play at all even after months of hard use.

Once again thank you for joining me and don’t forget to leave any comments or questions. Also if you have any stories about the knife please leave it in the comments section. Don’t forget to click on the follow button so you don’t miss out on any new posts.

Survival Tips – Insect Do’s and Don’t and How to remove a Leech

Image

Hey Guys,

Lets talk about bugs and leachs everybodies favorite topics. Bugs and leaches are both gross and can cause serious harm to you.

There are plenty of different types of bugs in the wilderness and some of them are huge. I’m gonna cover what to do to avoid bites and stings.

  • Use insect repleelents such as DEET or permethrin. Permethrin is a synthetic chemical that is widely used as an insecticide, acaricide, and insect repellent. A cool fact about permethrin is that the US Army is fielding factory treated uniforms to protect soliders against bug bites in countries where bugs carry deadly diseases.
  • If you are in a situation where you do not have netting or access to repellent you can use mud or oil as a repellents, just smoother it all over your skin and your good to go.
  • Surround your bed with netting to add additional protection against bugs. Make sure that you do not sleep directly against the net because the bugs will still be able to reach you.
  • To add additional protection to your bed add repellent to ropes that suspend your bedding.
  • Make sure to check your body especially your scalp and crevices daily for bug bites and ticks.
  • If you are in the woods, or jungle make sure to wear something that covers your head so bugs to not drop, fly or crawl into you hair.
  • When you make camp for the night make sure to make a real smokey fire to deter bugs. One way to do this is to find as much alive/green wood as possible, also damp wood will burn slow and smokey.
  • Do not walk thru the forest or jungle barefoot. You open yourself up to step on something that can either sting or bite you.
  • Do not let your wet clothes dry on the ground. Insects are attracted to dark damp places and may lay eggs in your clothing.
  • Do not wear perfume or use excessively fragrant soaps or deoderants, the odor attracts bees and wasps.
  • I highly recommend not to walk to jungle in a hawiian shirt, not just cause its tacky but because it will attract pests to you rapidily.

Forests are abound with bugs especially ants. Bugs cover nearly every conceivable surface in the forest, it doesn’t matter where you step, sit, lean you will encounter ants. One very important preventative measure is to raise your bed off the ground. Use repellents that contain 15-30% deet, do not use a higher concentration because it can be bad for your health. When using it cover your entire body. Cover an exposed area and also your clothing. Spray your socks, spray your pants and your hands so you can rub it into your hair.

Image

I want to cover how to remove a leech real quick. Sticking to things that make you squirm I thought leeches will fit right in. One important thing to remember is do not burn the leech off, which is a common belief because of pop culture. Burning it will remove it from your skin but it will also cause the leech to regurgitate into your skin, which will most likely cause a serious infection. Instead move your fingernail under the thin end of the leech to break the seal on its oral sucker. Then as quickly as possible do the same to the thicker end of the leech before it reattaches itself to you.  Once the leech has been removed flick it away and apply antibiotics. Leeches release an anticoagulant when attached so they can feed continuously, so the bite will bleed profusely. Just treat like you would any other bleeding wound and you will be fine.

I hope you all enjoyed ready this blog post. Remember to please leave any quesitons or comments and also don’t forget to click the follow button so you don’t miss out on any new posts.

Tactical Tip – Tactical Shooting Positions

What’s Up Y’all,

We are gonna flip the script on you and instead of giving you a survival tip and will be giving you a Tactical Tip, after all this is called NW Tactical. Today we will be going over different shooting positions.

First and foremost is the Ready Positions there are three different type of Ready Positions, all three of these Ready Positions allows you to have one hand off the gun so you can perform seperate tasks, but you are still ready to fire when nessacary.

The first Ready Position is Low and Ready. This is the most common position for tactical shooting. Low and Ready is the best position when you are searching for a target or approaching a target area at a fast rate. This position also is the fastest to move from to a shooting position.

high-ready

High Ready is one of the least common ready positions but something worth knowing, the reason for this is because at most shooting ranges it is against the rules to point your gun straight up in the air because of accidental discharge. No one wants bullets raining down on them. However when in a tactical situation and you are moving around a large group of people it is the safest way to hold your gun. It is also easier to perform tasks with the support hand while holding the gun in a High Ready position, such as reloading, or pulling and tossing a grenade/flashbang to clear a room.

Sling Ready

The last ready position is Sling Ready or in other terms Patrol Ready. You always hear that that you should always be in a low ready position but unfortunately it is just not practical. Sling Ready is the most comfortable position for long term patrols with a rifle like an M16A2 or M4A1. WIth the Sling Ready position you can relax both your arms against your body to prevent fatigue, you can also let go of the weapon to perform two handed tasks while the rifle remains in the Low Ready position so you can move to a firing position quickly.

Next Position group we will cover is the Standing Positions. These positions you are most likely to use while on the move, you first will lay down cover fire and then move to the nearest cover available. There are three standing positions as well.

off hand shooting stance

First standing position is the Traditional Offhand Position. The body is canted towards the target. The firing arm is cocked, and the support arm is directly under the barrel, and the feet are placed firmly at a 90 degree angle. The offhand is good for unsupported accuracy at medium ranges but is slow to get into and out of position. It is also not good for rapid fire because you can not absorb recoil very well. Also the firing arm is very exposed and has a greater chance of banging into walls or door jams when clearing rooms or clearing alleys.

DOD-ModifiedOffhand

Next is the Modified Offhand Position. The body is also canted as to present the smallest target possible to the enemy. In this position you should be bent slightly forward at the hips and both your elbows are dropped towards the ground, this makes it easier to absorb recoil during rapid fire, it also makes it so you do not bump into walls and door jams while clearing rooms. Your feet should be a little wider then your shoulders at a more natural stance so you can move forward and backwards easily and you can also turn your body 180 degrees.

UFP

Last we have the Universal Fighting Position. This position is the most commonly used especially among our elite warriors such as delta force, Navy SEALS and SWAT Teams. In this position both of your feet are pointed directly at the target and your arms are drawn inward. The one down side is that it presents your chest to the target but today’s warriors wear highly effective body armor which makes this position more practical. The shooter should grip the magazine with the support arm or have a pistol grip. Thisis an advanced position and should not be used by novices.

THe next set of positions will be the Low Positions. These should be used when taking cover.

SFP

First is the Squatting Position. Your feet are completely flat on the ground and you are slightly leaning forward. One thing to remember is to not rest your elbows on your knees this will make you very unstable when trying to absorb recoil, remember the saying meat to bone not bone to bone. This position is the most stable, it is much better then any standing position and can be easy to get in and out of.

DSP

The Kneeling shooting position. One foot should be flat on the ground and one knee resting on the ground. Do not sit on your foot cause this will make it hard to move if nessacary. This position is also easy to get in and out of, and remember you should not rest your elbow on your knee but rest your tricep on your knee. Remember the saying meat to bone not bone to bone, just like the squatting position.

SFP

Another Low Position is the sitting position. This is similar to the previous one. You do not want to rest your elbows on your knees, meat to bone. This is the hardest position to get in and and out of, and that is why I do not recommend to use it.

PSP

One of the most stable low positions is the Prone Position. One advantage of the prone position is that you offer the enemy a very small target, the down side is its hard to get in and out of especially when fully kited up. One way to get out of the prone position is to do a prone roll which makes it harder for the enemy to engage.

SSP

Next we will cover Using Support while shooting. Using support should always be a last resort option, mainly because if you are using support then you are most likely exposed. One reason to use support is if you are firing long range and the enemy can not engage you at the distance. Snipers use support all the time and effectively because they are trained to do so.

Lastly we will cover three standing Pistol Shooting Positions. The positions can also be used while kneeling.

Isosceles

Isosceles is when your feet are together and pointed at the target, your body square to the target, both arms fully extended, and with firing hand pushing forward and support hand pulling back slightly this should help you absorb the recoil better. Similar to the UFP above this is a very good position if you are wearing body armor.

Weaver

The Weaver is when the feet are spread about shoulder width and at about 45 degree angle. Both arms fully bent, body canted with respect to target. Firing hand pushing forward and support hand pulling back slightly to absorb recoil.

MWP

Lastly we have the Modified Weaver with your feet spread shoulder width apart and at a somewhat less than 45 degree angle. Firing arm should be mostly straight and support arm bent to help absorb recoil. Most of the arm positions are the way they are to help absorb recoil which is very important so you can shoot rapidly and maintain consistant grouping.

I am sorry that this post is so long but there are a lot of different positions and they are all important to know, you do not have to execute all these positions perfectly but it is good to know what they are and how to utilize them.

Once again thank you all for joining me here and please leave any questions or comments. Also don’t forget to click on the follow button so you don’t miss out on all my new blog posts.

Survival Tips – How to apply first aid to yourself or a companion

P79_first_aid__14244_zoom-287x300

Hi NW Tactical family,

Today I wanna go over some basic first aid that you can use on yourself or on your companion if you are not near a hospital. These are tips should only be used if you can not reach a hospital, a hospital should always be your first option if its available.

  1. Allergic Reaction – Symptoms: Skin swells and turns red. Hives, itching, weakness, nausea/stomach cramps, vomitting, difficulty breathing, obstructed airway, low blood pressue, and shock. Possible Condition: Allergic reaction/anaphlactic shock(anaphylaxis). Course of Action: Check airway/ move victim into the most comfortable position possible so they can breath unassisted. Keep victim calm, Administer antihistamine. If you have an epinephrine auto-injector in your first aid kit you should inject it if allergic reaction is severe. It is always a good idea to have an epinephrine auto-injector as part of your first aid kit because you never know what you or your companions will be allergic to in the wild, it may be something that you never knew you had.
  2. Bleeding-Surface – Symptoms: Blood running down body part or blood pooling on clothing, or blood spurting from a wound. Possible Conidition: Torn or cut blood vessel or punction wound. Coure of Action: First thing you want to do is cover the open wound with a sterile dressing and bandages to control bleeding and prevent any sort of infection to set in. If wound requires continuous pressure and you cannot hold it there apply an elastic bandage or tourniqut the nearest artiry. Remember that if you apply a tourniqut make sure that you get help as soon as possible or the wounded person could loose the limb. To apply elastic bandage place end of bandage against skin and roll it around wounded limb while gently stretching it, start from the farthest area from the heart. When finished, tape or tie in place. Make sure that you do not wrap it to tight that you cut off circulation. If blood starts to seep thru bandage to not remove old dressing just add more. Do not completely close wound off from the air, except for certain chest and abdominal wounds(I.E. sucking chest wounds or gut shots).
  3. Bleeding Internally – Symptoms: Vomitting or coughing up large amounts of blood. Bruised, tender, swollen, or hard flesh. Severe pain/inability to move injured body part. Weak, rapid, pulse. Pale, bluish skin or cool moist skin. Excessive thirst. Confusion, drowsiness, or loss of consiousness. Possible Condition: Injury to a large blood vessel and deep muscle tissue, bleeding beneath the skin. Course of Action: Apply Ice on and off wound for 20 minute intervals. Wrap in damp cloth to prevent ice from being directly on skin for long periods of time. Keep victim still and comfortable and elevate injury if it does not cause excessive pain to the injured person.
  4. Blisters – Symptoms: Large and painful fluid filled sac beneath the skin. Possible Condition: Burn causing blister or excessive friction to a concentrated area. Course of Action: If the blister forms and there is a small chance that the area the blister is on will come in contact with abrasive materials then leave it alone to heal on its own. Never ever pop a blister that has been caused by a burn. If the blister is on the bottom of the foot where it will encounter abrasive materials then clean the area around blister and use a sterile needle to puncture blister and drain fluids. Make sure to apply a sterile bandage once all fluid is expelled from blister and if the bandage is wet from fluid make sure to change right away to ward off any infections.
  5. Broken Bones – Symptoms: Sudden, serious deformity. Bone sticking out of skin, Bruising or swelling. Unable to move a specific body part with out severe pain. Victim heard a loud pop, crack, or snap sound. The sensation of bones rubbing together. Injuried area is numb or cold. Possible Condition: Broken bone or fraction or compound fracture. Dislocation. Course of Action: Immobilze the injuried body part as it was found. Absolutely do not apply a splint unless you have to move the victim to get help, if you must apply a splint do so above the fractured area, and do not manipulate injuried area. SOme options for splinting are, splint injured area to another body part; making a soft splint or sling for injured arm, wrist, or hand; and splinting a fracture with wood, metal, folded magazines, or anything else that is rigid and offers a lot of protection and support. Apply ice to the injured area, but make sure to have a cloth barrier between ice and the skin. While applying ice to injured area elevate if possible without causing great pain.

Those are just a few quick tips on some basic first aid. Please remember that it is always best to seek a medical professional first but the tips will help if you are in a remote area or help will not arrive fast enough. Please keep an eye out for more first aid tips to come.

Thank you for joining me today, I hope I was able to teach you something new. Remember to leave any questions or comments and also click on the follow button at the bottom of the screen so you don’t miss out on new blog posts.


Survival Tip – Basic Survival Kits

survival kit

Howdy NW Tactical Family,

Today will be talking about basic survival kits. You should always have a survival kit ready to go in a closet and also if possibly one in each car you own.

There is no such thing as the perfect survival kit. The right kit will vary depending on the nature of the trip or disaster. In general, it should be simple, small, affordable, functional, and waterproof. Most of all, in the hands of someone lost in the wild, it should be as familiar as a razor or a toothbrush. Any kit prepared for use in an emergency should be field tested before it’s needed. A wire saw for cutting limbs should be field tested in your backyard, a magnesium rod should be sparked in your fireplace or on a routine camping trip even if you have plenty of matches around. Having a kit but never using it until “do or die” day is like jumping on skis for the first time and heading to a black-diamond slope(which in my case I have actually done, but not on purpose. My friends took me on a double black-diamond on my first snowboarding trip. Lets just say I ended up walking down 3/4 of the mountain do to a gear malfuntion).

Items that can serve a multitude of uses are most desirable because they conserve space and weight. Remember those two commodities are very important especially weight. You do not want to hauling around a ton of weight if you are lost and weak. The boy scouts red scarf is a great example. It can be drawn across surfaces to collect dew for drinking, soaked in a stream to cool the head, knotted to make an arm sling or ankle brace, or used as a signal flag. Also like my previous post, paracord has many different uses such as snare to catch wild animals for food, it can be used as shoe laces, it can be used to tie up food high in a tree to keep away from bears, you can pitch a tent with it, it can be used a turniquit. Items such as these are very important and take the time to figure out things that can be used for multiple purpose. Elastic Bandages can be used in splints and as part of the treatment for snakebite. A shiny space blanket can be used for creating an emergency shelter, signaling to a seach-and-rescue team, or melting snow and ice to make drinking water. Get creative and have some fun.

Crucial items such as a stout knife(read some of my earlier blog post to find a good knife for you, all the ones I have done are great for survival purposes so choose the one that you like best and fits your needs), a compass, and a whistle to attract attention should be tied to paracord and hung around your neck, or you can contact me and I will be more then happy to make you a paracord braclet that has a whistle that is part of the clasp. Its a two in one item that takes up no room in your kit and weighs next to nothing. If you are in survival situation, water and shelter likely will be your greatest needs. A kit that includes the means to purify water and provide for an emergency shelter is invaluable. Some things that you should keep in your kit are…

  • First aid items, I recommend buying a simple first aid kit that comes in a small case for car kits and a bigger one for home kits
  • Water purification tablets or drops such as iodine. You can also have a purification system but those are kinda bulky and space is your best friend.
  • Fire-Starting equipment, magnesium rod will be the best since it will work even if wet, metal matches or wood matches, zippo lighter
  • Signaling items, such as a small hand mirror, flare gun, or a folding red panel.
  • shelter items, such as a tent, or hammock, or even as simple as a canvas blanket that can be drapped over some paracord to create a tent when tied down
  • knife – i recommend having two knives. You will want a small knife like the ESEE Candiru for everyday tasks and simple slicing or cutting and also a survival knife such as the SOG SEAL Pup for protection or bigger tasks also the SOG SEAL Pup is extremely light and remember weight is your enemy so the lighter the better.
  • Needle and thread, paracord has 7 threads inside the outer sheath that will double as thread and fishing wire
  • Wrist compass
  • Fish and snare lines are good to have since they are specific for that purpose but paracord can be used and will save room. I would recommend to just use paracord
  • fish hooks or if you do not have them you can use a paperclip or a safety pin.
  • Candle
  • small hand lens
  • solar blanket
  • surgical blades
  • water bladder or plastic bottles. Water bladders are recommended cause when empty they take up virtually no room and weigh next to nothing. Be careful not to puncture the bladder cause it will be a major lifeline.
  • High calorie and protein foods such as powerbars and granola. Non-perishable items
  • flashlight, hand crank radio
  • glow sticks
  • sleeping bag
  • hand warmers, they don’t seem important but a little warmth will go a long ways in lifting your spirits and keeping you going
  • Utility tools, one of those leatherman 16 in 1 tools
  • waterproof folding poncho
  • duct tape
  • note pad and pencil
  • hygeine supplies such as a bar of soap and deoderant
  • Playing cards. This doesn’t seem like it will save your life but it will save your sanity. Small games go a long ways to keeping you alert and your spirits up.
  • Batteries, make sure to have a few of every kind. Do not bring items that rely solely on batteries but if you do have something in the kit that requires them make sure to have backups. A good rule of thumb is to bring electronics that can be hand cranked or solar powered.
  • my favorite Para-Cord atleast 50 feet, i recommend a 100 feet though.

Also I personally recommend to have a weapon of some sort available to use incase you need to protect you and your family or to hunt for food. If it is a car kit make sure you carry weapons that are legel(read your local laws regarding weapons). In a car kit have a survival/tactical knife or a gun that is safely secured in your vehicle. If you do decide to have a weapon in your vehicle spend the extra money to have it safely secured somewhere that you are the only one who knows where it is and make sure that it is locked and out of sight and reach of children. I also recommend have a weapon at home, which is a personal opinion and I understand if you do not feel comfortable having firearms in your home especially if you have children. You should always have your weapons in a safe that is locked at all times. You can also have bow and arrows or blow guns which are great weapons when used correctly but make sure to practice. Also bow and arrows can last longer then firearms and are easier to make ammo for then a gun. You can make an arrow out of sticks and you can buy arrow tips for really cheap.

You do not need every single item I listed above but make sure to have most of them. If its a car kit then you can pair down to the essentials. If it is a home kit then have as much stuff as possible and remember to have plenty of clean drinking water. It is recommended to have one gallon per person a day. So plan accordingly and have about a weeks supply of fresh water, and canned non-perishable foods that are high in calories and protein. All the items should be put in a bag or backpack of some kind, even if its a home kit just incase you need to leave the safety of your home. All bags and backpacks should be easy to carry and most important be waterproof and fire resistant if possible.

So in conclusion remember light and small is better, and do not have items that do the same function. If you have paracord then do not bring rope, if you have metal matches do not bring wood matches, and most of all when you are putting the kit together get creative and have some fun. Even though you will use this kit when the shit hits the fan doesn’t mean you can’t have fun putting it together, and if you have a family make sure everyone is involved in putting it together and testing the equipment so that they will know how to use it incase you are not there to do it for them. Also last but defiinitely not least make sure to have a list of everything that is in the bag/kit incase you don’t use it for a long time. Also try not to borrow things out of the kit, because most of the time it doesn’t get replaced and you will be kicking yourself when push comes to shove and you don’t have something that you need.

Thanks again for joining me, please leave comments, or if you like this please share using the buttons below. Also make sure to click on the follow button so you don’t miss out on great survival/tactical tips and reviews on gear.

A Great Local Company and a Great Knife – SOG SEAL Pup

Image

What’s up Y’all,

I recently was going thru my wallet and found a gift card in it for Target that was given to me for my Birthday in 2009. I had no idea it was in there so I logged on to Target.com to find out if there was any money on it and to my surprise I still had $50.00 on it, WOW!!! Boy was I happy, I log on to Target and started browsing and I came across the SOG SEAL Pup. I had heard a lot about SOG and thought I would give it a try. It was right around $50.00 with free shipping so I said what the hell, why not. 

When I opened my door a few days later to my surprise there was my new knife on the door step a few days early, and man I was so excited. The knife came in a long rectangular box that had pictures of the knife being used by Constructions workers, Law Enforcement, Survivalists, and Military Special Forces. When I was looking at the box I flipped it over and on the back was the companies address, and to my surprise SOG is a local company. It is based out of Seattle Wa. I had no idea. I felt good about supporting a local company, which I try to do as often as possible. After learning this new detail I excitedly opened the box. I pulled out the knife and it is freaking awesome, and the nylong sheath that came with it was just as good, it looked really cool with the SOG name patch stitched on the front and it had plenty of straps and loops to attach it to your person. It also gave the knife sheath a real tactical look. I really like nylon sheath’s even though a lot of people complain when a company only supplies them calling them cheap, I think they are great because they are light and durable and easy to clean.

SOG SEAL Pup2

After I received my new knife and learned that it was a local company I decided I needed to know more about this company that made this totally kick ass blade. After going to their website and reading the “About Us” page I learned that the company named itself after a covert group called SOG which stood for Special Operations Group and it was a group that was created during Vietnam. I couldn’t believe what I was reading, because I just started reading a book called Hunting the Jackel. The book started off in Vietnam telling the story of Billy Waugh who was part of SOG but at the time they were a covert unit which stood for Studies and Observation Group, it wasn’t till over a decade later that the government released the truth. The company SOG was created in 1986 when a knife designer Spencer Frazier decided he wanted to make a commemorative of the original SOG Bowie knife that was made just for the SOG unit to carry on covert missions in the jungles of Vietnam. The blade was so popular that soon the company created a whole line of innovative knives and tools. The tools were field tested by the best of the best the U.S. Special Forces, they were even honored as the Navy SEAL knife of choice. The company motto is “Forged out of tradition, hardened in the field, honed for you”.

After doing some more researched I learned that the SOG SEAL Pup is a smaller version of the original SOG Bowie Knife. I was elated to have a knife that was model after such a rare blade used by some of the best warriors in the Vietnam War. While their knife was made strictly for killing mine is a utility knife and can be used for many different applications. The SEAL Pup is made out of AUS8 stainless steel that is powder coated to protect against rust and corrosion, the metal is also cryogenically frozen to increase the hardness. The metal blade is brought down to -300 degrees F, then brought back up to room temperature. This process increases the overall toughness and edge retention. The knife edge stays sharp longer with significantly less micro-fracturing and edge chipping. The SEAL Pup has one of the sharpest edges on a knife I have ever seen straight out of the box. I was extremely impressed cause I have a lot of knives made from some of the best companies in the world. The overall length of the knife is 9″ and the blade length is 4.75″. One of the most surprising things about this knife is that it only weighed 5.4 ounces, I couldn’t believe how light it was. The knife has a durable Zytel handle, the handle has great grip but its a little hard. If I had to use the knife for a long period of time I could see this definitely leaving some calluses, but thats part of being a man, right guys!!! It also came with a nylon sheath that was actually pretty good looking and it had lots of straps and loops for attaching to your belt or your tactical vest. One of the features I like best is the accessory pouch on the front, you could put a lot of usually items in it. You could put a two sided sharpening stone or if you were camping/hiking you could put some survival items in it incase something bad happens. 

Holding SOG SEAL Pup

So overall this is a great knife that isn’t to big and heavy and it has a full tang which makes it real strong. If you need an all purpose light utility knife I would recommend the SOG SEAL Pup for any camping trip or hiking adventure you have in store. The knife is great for chopping down saplings for fire wood. I personally can vouch for that and so can the small tree’s and bushes outside my apartment, the gardeners probably didn’t appreciate having to pick up a bunch of branches and leaves that were chopped up into little pieces. It also is sharp and strong enough to split fire wood, which my neighbors probably appreciated when they went to get firewood from their stack and notice it was already split for them. It will make quick work of animal that needs to be killed and skinned for dinner, I didn’t kill any animals with it because I’m not into eating squirells or city birds but I am sure it will do the trick. Also like I mentioned above you can keep survival items in the pouch like a fire starter, fishing wire and hook, even water purifying tablets. Its also very reasonably priced and SOG has a great lifetime warranty, they will pretty much replace it for any reason, other then if you lose it or drop it in the fire and burn it up which is pure stupidity and if thats the case then you probably shouldn’t own a knife. 

Thanks for joining me again here on nwtactical blog, if you own a SOG SEAL Pup and you have a story about it please leave it in the comments section or any comments you might have. Also don’t forget to click on the follow button at the bottom of the page so you don’t miss out on any posts. Also stay tuned cause there will be lots more great reviews coming up.

Para-Cord is amazingly versatile and could save your life!!!

colored-paracord

Welcome back to nwtactical,

Today I am gonna review a product called Para-cord. There are a lot of people out there familiar with this product but there is also way to many people who have never heard of it. I personally love Para-cord for many reasons. Today most people know of Para-cord because of the new fad that is sweeping the nation, Para-cord bracelets. Para-cord comes in every colors imaginable. I personally think the bracelets are a good idea, they look cool and honestly and if you are in a pinch they can be used to save your hid in many situations. One of my favorite uses for Para-cord is wrapping my skeleton knife handles to give them better grip and make them a little more comfortable to hold. See my previous post on ESEE Candiru knife to see how I wrapped the handle using Para-cord.

Here is a little information and history lesson on Para-cord. Para-cord is a lightweight braided nylon sheath with anywhere between 3-7 fine nylon yarns on the inside. The all nylon construction of Para-cord makes it fairly elastic. The most popular and used Para-cord is called 550 cord or Para-cord 550, 550 cord has a minimum tensile strength of 550 lbs and is required to have 7 inner nylon strands. There is other versions of this product with less inner strands and a lower minimum tensile strength but I do not recommend purchasing it, it is the same price but not nearly as strong. So buy the better, stronger cord, trust me you will thank me when push comes to shove and you need it for one reason or another. Alright now here comes the history lesson. 550 cord was first introduced during WWII, the 82nd Airborne and many other Para-Troopers used this cord as Para-shoot cord, hence the word Para-cord. Once in the field Para-Troopers found this cord to be very useful. The Para-Troopers used it as dummy cord to tie their gear to ones person such as cooking pans, canteens, and also turning it into a sling for their M16, or tying rucksacks to vehicles, and securing camouflage nets to trees and vehicles. They would also use them as backup shoe laces, and hey would even gut the cord and use the finer cord as sewing thread to mend torn/ripped gear.

Today 550 cord is available to civilians and is used for almost everything. Like mentioned above the most popular use of 550 cord is to make bracelets. The cord comes in hundreds of different colors so you can pretty much make one to match any outfit you wear. It is also hugely popular in the tactical/survivalist community. Survivalist see this as a survival bracelet and it can be used if you are stranded in the middle of nowhere without many supplies. In a survival situation you can use the cord to pitch a tent, use the inner guts as fishing wire, or as a snare to nab you some dinner. It can also be used in emergency situations to assist in water rescue, or use it as a tourniquet. You can also fashion it into rope to climb up mountains or to lower yourself off cliffs. It is not just used as a fashion statement or survival equipment, it can be used to thread musically instruments such as xylophone, marimba, vibraphone. Some of my favorite uses for Para-cord is of course as a survival bracelet, dog collars/leashes, lanyards, and using on my skeleton handle knives.

paracordbracelet

I have read online a few stories where these bracelets have come in handy when you least expect it. In one story I read a man was working on his roof when his latter fell down and he was trapped. With no one around in shouting distance he decided to use his Para-Cord bracelet as rope. He nailed one end to his roof and used it to lower himself down safely from his two story roof. Another story I read about was a women who got her vehicle stuck in snow and instead of paying hundreds of dollars to get a tow truck she called a friend that owned a truck and used her Para-cord bracelet to attach to the truck and tow herself out. Another one I read was about some young men who where out 4×4 and the steering arms snapped from the axle bracket on their Jeep. They used their Para-cord bracelets to tie the steering arms back to the axel bracket and it work sufficient enough to get them back home without having to tow it for hundreds of dollars. These are just a few instances where the bracelet came in handy, these people never saw these situations coming but being prepared and it saved either their lives or saved them hundreds of dollars.

So in conclusion Para-cord is a complex piece of equipment that can be used for many different applications then just a fashion statement. I highly recommend everyone to keep at least 25ft of cord in theier vehicle, homes and defiantly in your bug-out bag. Also get created and have some fun with it, make a belt for your brother, or a new matching dog collar and leash for fido, use it as a fun craft for the kids to make friendship bracelets for their friends.

If you have an interesting story about how Para-cord saved your butt please write about it in the comments section. I would love to hear them and so would my readers.

Thanks again for joining me and don’t forget to leave a comment and become a follower and don’t miss out a review. If you want a bracelet, or dog collar, or leash, or lanyard leave a message in the comment section and I will be more then happy to make one for you in your choice of color. Also stay tuned for more reviews.

ESEE Candiru Knife

CandiruBlank

Welcome back nwtactical followers,

Thank you for coming back to learn about the ESEE pronounced “S E” Candiru blade. This little blade is one killer knife. I have to say it is my new favorite knife in my collection and I am excited to share it with you. It is the most expensive blade and the smallest knife in my arsenal but it is worth every penny. The blade is freakishly sharp, it has cut everything I have asked it to in nano-seconds and it hungers for more. It turned paper into confetti, it carved off huge chucks of ham right off the bone and then diced them into little pieces for my dinner of ham hock and beans, and it sheared right thru my Paracord 550 and even assisted in trimming my dogs hair. This is gonna be my new EDC(Everyday Carry) knife. Once I make a Kydex sheath for this I will be using it as my neck knife.

CandiruSingleWeave

First let me tell you about the company ESEE which makes some really great knives and survival equipment. The companies full name is Randall’s Adventure Training / ESEE Knives. Randall’s Adventure Training has been in business since 1997 providing training for LE, military, and civilians in the art of jungle survival. During their survival and training ventures they realized they needed a better quality knife, so they decided to create their own and the knives/machetes they created became insanely popular. So they decided to start their own knife making company. The company name is an acronym for Escuela de Supervivencia(School of Survival), Escape and Evasion. ESEE is what the company teaches to LE, military or civilians when they sign up for their Jungle survival classes deep in the Amazon and they also offer domestic classes across the U.S. that teaches you short-term wilderness survival, wilderness first aid, land navigation(maps and compasses), and most exciting of them all, human tracking. ESEE products are hugely popular with Narco Police because there blades are excellent in clearing paths to remote areas to eradicate illegal drug crops. The strength, the durability and the design of their blades are praised for the ability to chop down thick marijuana plants and coco plants that grow up to 10 feet tall with trunks as thick as a human leg. The ESEE Candiru is the perfect name for this little vicious blade, the orgin of the name will make all you guys and gals out there wince in pain just reading this. The Candiru is a parasitic freshwater catfish found only in the Amazon River. The Candiru is famous for the legend of swimming up male urethia or female vagina and attaching itself inside using barbs attached to its head. Ouch, you won’t ever catch me swimming in the Amazon river, just the thought of this makes me cringe, and I am sure if you are reading this you are too!!!

CandiruFish

Now lets get down to the meat and potatoes the knife itself. The ESEE Candiru is one badass little devil. The Candiru is made from some of the best carbon steel available on the market today the 1095 carbon steel which is used for professional cutlery. It has a beautiful baked on powder coating that will help it from rusting and corrosion, but don’t forget to take care of the blade by applying a coat of oil to make it last forever. The Candiru comes in three different colors, the one I purchased has a black baked on powder coating, but it also comes in a desert tan, and OD(Olive Drab) Green but it really looks more like a forest green. This is defiantly a little knife, it was a little smaller then I anticipated but I think I like it better because of the smaller, lighter make. It is small enough that I don’t have to worry about breaking any state or local laws regarding blade length which is a load off my shoulders. The overall length of the knife is 5.13″, the blade length is 2″, and its thickness is .125″ which makes it one of the thinnest knife’s available. This knife can be used for a variety of tasks. The company that created this knife uses it on the survival training trips to the Amazon. They use the knife for making what is called a frog spear by cutting down a 6 foot long sapling and splitting 4 ways down the middle. Then by rolling 3 small sticks down the split end to create spikes which are then sharpened, this task is made a lot easier because of the razor sharp and super thin blade. Then the group used the thin blade to shave wood for starting fires which the Candiru also aced because the thinner the shavings the easier it is to start a fire. Next up the crew caught a boa constrictor which was killed using a machete but was skinned using the Candiru. This is not an easy task because a boa has really thick skin which require an extremely sharpe and strong blade.

CandiruCloseupskull

The Candiru comes with a nylon sheath with a hard Kydex insert so that the blade does not cut open the sheath when inserting and removing it. I think the sheath is great for wearing on your belt or holding it in your pocket, but if you plan on wearing it as a neck knife you might want to invest in a Kydex or leather sheath that only covers the blade for easy access and so you can connect Paracord around the handle to create a lanyard of sorts. I plan on purchasing some Kydex blanks to create my own custom sheath to meet my personal needs. The Candiru is what they call a skeleton knife because it does not come with a handle but ESEE does offer two different scales, they offer a orange G10 handle. A G10 handle is an extremely durable matter made of woven fiberglass soaked in epoxy resin, then highly compressed and baked. They also offer a grey canvas micarta handle which is a man made material, made by layering resin and cloth. Personally I do not like either option that ESEE offers so I plan on making my own. I currently have wrapped the skeleton handle in black Paracord which increases the grip and makes it a lot more comfortable. I also plan on purchasing some beautiful Ebony black and white wood scale blanks and creating my own handles.

CandiruWeave

Overall this is absolutely the best knife I have ever bought. I also plan on purchasing all three colors just because of the quality of this knife and its freaking BA!!! I recommend everyone that reads this blog to purchase one of these knives no matter what you do for a living, if you are an office worker who needs to cut paper or open boxes, to a construction worker who needs to cut all types of different materials, to a camping/survivalist who plans on traversing the outskirts of civilization and living a substance life. It is small and light so it would be terrific to purchase for your gf/wife to keep in her purse for protection or even everyday tasks and the super sharp edge will make using the blade a cinch. I plan on using this knife as gifts for family/friends.Just one thing to remember when purchasing this knife make sure to buy some Paracord to wrap around the handle for comfort or just message me and I will be more then happy to make you a custom beautiful wood handle out of your favorite local or exotic wood or I can match one to the color of your knife. I will also be more then happy to make you a custom Paracord lanyard using any color your heart desires.

Once again thank you so much for joining me in reviewing this amazing knife. Please leave any comments or questions in the review section and also don’t forget to click on the follow button at the bottom of the page so you can be the first to read my product reviews.

Stay tuned for my next review, I will be covering the SOG SEAL Pup, then Paracord 550.

Springfield XD(M) .40S&W

Springfield1

Hi,

Welcome back to NW Tactical, today we are gonna switch gears hear a little bit and instead of reviewing a knife we will review our first gun. This one is my personal favorite polymer pistol on the market. The Springfield XD(m) .40S&W, this pistol not only looks badass but I think its one of the best polymer pistols on the market at this time because of its innovation in egronomics and safety.

First off let me clear up one common question, why is the round called .40S&W, when it is manufactured by Springfield. The .40S&W round was created jointly by Smith & Wesson and Winchester Repeating Arms Company. The .40 S&W was developed from the ground up as a law enforcement cartridge designed to duplicate the performance of the F.B.I. reduced-velocity 10mm Auto cartridge, which could be retrofitted into medium-frame (9mm size) automatic handguns. The reason the F.B.I. needed this type of round is because it needed a handgun that could hold more rounds then your typical 6 shooter revolver and had more stopping power then the 9mm parabellum round. The reason they came to this conclusion is because in the aftermath of the 1986 F.B.I. Miami shootout during which 2 F.B.I. agent were killed and 5 more were wounded sereverly. The F.B.I. agents were totally out gunned by the bank robbers even though they out numbered them 8 to 2, the 2 bank robbers were carrying a Ruger Mini 14 rifle, S&W M3000 shotgun and 2 S&W .357 revolvers. Eventually the two armed robbers were killed but they took some serious lead and kept on going. The F.B.I. chaulked this up to the weapons that the agents were carrying did not have sufficient stopping power.  Hope you enjoyed this little history lesson.

Springfield2

The Springfield XD(M) .40 S&W is a polymer pistol. Polymer is a type of hard plastic that is lighter, resistant to wear, abrasion, solvents, and oils compared to its steel frame brothers. Polymer plastic can be molded into a variety of ergonomic shapes that do not require separate grip panels, permitting them to use high-cap mags without increasing the bulk. It also makes them more adaptable to persons with smaller hands. Another great thing is that the polymer frame flexes under the recoil and also absorbs some of the recoil pulse so they shoot softer then the heavier guns and you can shoot faster while maintaining good grouping.

Now lets move on to the gun features which there are many. The XD(m) is a modified version of the XD which was one of the more popular polymer handguns on the market. Springfield could have been content with the XD and sold them out as fast as they came into the warehouse but they decided they wanted more and boy did they give us more. First off the XD(m) has a match grade barrel which rivals aerospace manufacturing, MG barreling is when the barrel is bored the same thickness with more consistent rifling from the rear of the barrel to the tip, which provides a more accurate shot and better grouping. Match grade is usually an aftermarket part that requires special ordering from a barrel manufacture but Springfield has made this their standard.

Springfield has invented terms for the XD(m) that all start with the letter “M”. Lets explore these features and the clever terms that Springfield as invented. First the XD(m) Major Grasp slide Serrations which means it has deeper serrations on the slide to make it easier to cock the weapon in harsh weather or if you are like me and have sweaty palms.

New home protection system.

Next we have the Mega Lock Texture which gives the weapon an all terrain look. Springfield claims that this isn’t all about cosmetic looks but it sure doesn’t hurt. The extra texture on the handle helps you keep a tighter grip in extreme weather. The angle and depth of each contour has been calculated for maximum control vertically, horizontally, and torsionally, it also asists with long rapid fire strings which once agains assists in grouping. The angle of the handle is very similar to that of the legendary 1911. Like I stated previously the polymer guns have a Model Contour Frame which contours to your hand and makes it feel like the gun is gripping you not you gripping the gun. The gun also comes with 3 different backstrapes that they call Mold-Tru backstrapes. These backstrapes add another layer of comfort to the shooter by conforming to the size of his/her hand. It comes with a small, medium and large size so everyone should be able to find a comfortable grip. Along with the Mold-Tru Backstrapes it comes with Magazine X-Tensions which also assist in making it more comfortable.

One thing that sets Springfield XD(m) apart from other polymer guns on the market is that they use a Melonite finish which is a lot thicker then most finishes used on its competitors. The Melonite finish is a salt bath nitriding process that leaves a thicker, harder and more corrosion resistence finish on the slide.

The XD(m) has a Minimal Reset Trigger which gives it the shortest travel of any polymer gun on the market. The single action trigger is very clean and breaks between 5.5 and 7.7 lbs. The XD(m) also has the shortest reset on the market as well which keeps you on target with a greater ease for faster more accurate follow up shots which once again aides in grouping. The XD(m) has a Picatinny rail system that they call Multi-Adjust Rail System. This allows you to personalize your gun by adding a laser, flashlight system, or even new sights.

The XD(m) comes with a ton of safety features to help the shooter/carry protect himself and the people around him from an accidently discharge. On the slide there are two indicators that tell you the gun is loaded and cocked, first there is an indicator on the slide by the discharge chamber that will protrude from the top to let you know visually and by touch that there is a bullet in the chamber ready to fire. Second there is a pin that protrudes from the back of the slide letting you know that the chamber has been cocked and ready to fire. This pin will protrude even if there is no bullet in the chamber. Some of the other safety features are the Grip Safety which is on the back of the handle and has to be depressed to fire the weapon. Last but defiantly not least is the USA Trigger System. The USA Trigger System stands for Ultra Safety Assurance which guards against accidental discharge from dropping or bumping by locking the trigger in place until direct rearward pressure is applied. Thats four different safety features all on one gun to protect you against accidental discharge. One more thing Springfield has changed about the XD(m) is that you do not have to pull the trigger to field strip the weapon. Talk about field stripping the weapon, the XD(m) only takes seconds to field strip and put back together. With only 5 different parts anyone can field strip the weapon and clean it, which is great for novice shooters or people who are not looking for a complicated home defense system. Springfield is defiantly leading the field in safety which makes them one of the top weapon distributors in my opinion. They have the shooters safety in mind not just their bottom dollar.

Last but not least the Springfield XD(m) comes is a very nice hard plastic carry case that comes with everything you need to use the weapon immediately and it makes a great range case. The case comes with styrofoam cut out for your gun, two magazines(one compact that holds 12 rounds and another extended version that holds 16 rounds), a hard plastic gun holster, a hard plastic magazine holster that holds two fully loaded magazines, a speed loader, three back straps, a gun chain lock, and last but not least cleaning supplies to keep your gun at its best.

Springfield1

In conclusion I think this gun is a no brainer for any level shooter, from beginner to advanced. When I bought this gun I had never owned any type of weapon before. This was my first gun and I am glad that I went with it, I have put over 2,000 rounds thru it without a single jam or malfunction which is a great indicator of the quality of this handgun. The safety features were one of the main reasons I purchased the gun, also the ergonomics of the gun felt like an extension of my arm where as the Glock and other guns didn’t feel as natural when I would point them down range. Also the increased grip texture helped make the gun look pretty badass. I was also looking for a gun with a little more stopping power then a 9mm, but to my surprise I learned that the XD(m) .40S&W is one of the only guns on the market that you can switch to a 9mm with only a few changes. All you have to do is buy a 9mm barrel and some 9mm magazines and switch them out with the .40S&W barrel and the .40S&W magazines and magically you have a 9mm pistol. Two in one, who would have thought. One of the nice things about that is the 9mm bullets are a lot cheaper to purchase then the .40S&W so it helps save money when you just want to go to the range and enjoy blowing the shit out of a target, it also is great if you are sharing this weapon with your spouse because the 9mm round has less recoil and is easier to shoot for women. I would recommend this gun to everyone, from a women just looking for a small concealable gun for self-defense, a husband who is looking for a home defense weapon to protect his family, to a Police Officer looking for a secondary or primary weapon for duty. The XD(m) comes in pretty much every size and caliber that you could possibly want. In this review we focused on the 3.8 Compact .40S&W but they are all exactly the same but for caliber size and barrel length. They come in 3.8″ barrel with full handle and compact handle, and shoot .45ACP, .40S&W, 9mm rounds, its also comes in 4.5″ barrel that shoots .45ACP, .40S&W, 9mm, and last but not least it comes in 5.25″ barrel that shoots .45ACP, .40S&W, and 9mm rounds. What else could you possible want/need in a polymer handgun. I know this was a long blog but I do love this gun and there is a lot to know before you make such an important purchase. I hope this blog will help you make your desicion on if this is the right weapon for you.

Thank you for reading and keep an eye out for my next post. My next post I will be reviewing Smiths SK2 2-Stone sharpening kit. Also please leave a review/comment in the section below.