Survival Tips – First Aid Part IV

Welcome back to First Aid Part IV. This is the last part of the first aid survival tips. So make sure to pay attention. Remember that this tips are to be used only in an emergency situation and you should always call 911 first if you are near a hospital. Alright lets see what kind of tips I have in store for you tonight.
Poison

  1. Poisoning – Symptoms: Nausea, vomitting, diarrhea, sweating, breathing difficulties. You will experience chest or abdominal pain. You could also have seizures, headaches, dizziness, weakness, irregularpupil size. Your eyes might burn or tear up. You may experience burns on your lips, tongue, skin. You could have abnormal skin color, especially ashen or pale. Possible Condition: Poison ingested, inhaled, absorbed, or injected into your body. For example: snakes, spiders, jelly fish, etc. Course of Action: First you will want to remove the victim from the scene of the poisoning. Check the victim for life threatening conditions and treat the symptoms. If the victim has been poisoned from contact directly to the skin then wash the area with lots of water. Next you will want to apply baking soda or calamine lotion to dry up sores from poison on skin. If the victim ingested the poison then give them lots and lots of water. If the poison that was ingested is non-corosive then induce vomitting to expel from body then give them lots of water( do not induce vomitting if the poison is corrosive because it will damage the throat and stomach lining coming back up). If poison is corrosive (acid or alkaline) do not induce vomitting. Give victim water and then a mild acid or alkaline to neutralize the poison.
    rash

  2. Rashes – Symtoms: You will experience weeping, scaling, inflamed skin. Possible Condition: Skin will have rashes that are caused by infection or dirt clogging pores. Course of Action: You will want to treat the rash like you would an open wound-keep it clean and cover it with sterile bandages. If the rash is most it keep dry, if rash is dry then keep it moist. Make sure the apply antiseptics. Absolutely do not scratch the rash, it will only make it worse.
    seizure
  3. Seizures – Symptoms: Seizures will cause you to have blank stare on yours/the victims face. It will cause disorientation. You will also experience convulsions(uncontrolled muscle movements). Possible Condition: Reaction to extreme heat. It could also be caused by a diabetic reaction. They can also be cause by a traumatic injury to the brain. Course of Action: Absolutely do not try to hold the victim down this may cause injury to you or the victim. Absolutely do not put anything in the victim mouth, the victim may bite down and injury you or himself/herself worse. One thing that you can do to assist the victim is to support the head by using a pillow or a folded up piece of cloth(such as sweatshirt, blanket). If the victims mouth fills with any kind of fluid such as blood, saliva, or vomit, roll the victim on to his/her side to let the liquid drain. Once the seizure has subsided check the victim for breathing and injuries cause by convulsions also assure them that everything is ok and that help is on the way. You might also want to tell them where they are and that they are safe and that you are there to help them.
    shock
  4. Shock – Symptoms: You will become irritably, experience restlessness, nausea, vomitting, and excessive thirst. You may also experience an altered state of consciousness. You will also have a rapid breathing and pulse. You may also have skin that is cool, moist, pale, and ashen. Possible Condition: The flow of your blood is inadequate for body’s major organs and tissue (shock). Course of Action: Have the victim lay flat on their back and make sure they are as comfortable as possible. It is also a good idea to elevate the victims feet about 12 inches. It is important to keep the victims skin from getting too warm or cold. You will want to monitors the victims breathing and pulse. Do not give food or water if immediate hospitalization is an option. If hospitalization is not an option make sure to give the victim warm liquids to drink.
    snakebite
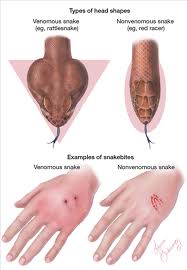
  5. Snakebite – Symptoms: You will have extreme pain around the bite marks in the victims skin. The victim will also experience swelling and strong pain around the bite(Pit Vipers). You may also have an allergic reaction. Some more reactions are blurring of vision, loss of reflexes, slurring of speech, nausea, and difficulty breathing(coral snakes). Condition: The venom of a snake bite has been injected into the bloodstream. Course of Action: To treat pit vipers, rattlesnakes, copperheads, or cottonmouths wash the wound; make sure to keep the bite site low and still and below your heart. For coral snakes, the treatment is similar as above but apply an elastic band starting farthest from the heart and rolling it around the wound. You will also want to keep the bite site still and lower then the heart. Make sure to keep the victim calm as possible to keep heart rate low. Absolutely do not apply ice to bite sites, you will want to cut the wound, and apply a tourniquet or apply suction.
    sprains
  6. Sprains – Symptoms: The sprained body part will swell and start bruising. You will also experience severe pain in the ankle, knee, wrist, and fingers. You will not be able to use the injured area normally, and you will experience weakness in that body part. Possible Condition: Tearing of ligament at joint. Course of Action: For mild sprains you will want to apply ice and elevate. You will also want to get lots of rest. You can also take a Tylenol regiment if not allergic, this will help control the swelling and help with the pain. For severe sprains treat as you would for broken bones.You will want to immobilize the body part as it was found. Do not apply a splint unless you need to move the victim, if you need to move the victim then you can apply a splint by attaching two pieces of wood/board on either side of the area and then wrap with tape or ace bandage. You will want to elevate and apply ice, unless elevating increases the pain.

Thanks for reading the last blog post on First Aid, I hope that over the course of the last 4 posts you have learned something new. I had a great time researching and explaining how to treat injuries, it is something that I have been interested in since I was young. I always wanted to become a sports therapist/physical therapist or sports trainer. I did some volunteer hours with my schools sports trainer and I had a blast helping the athletes when they were injured or wrapping the wrists and ankles with sports tapes to prevent injury. I enjoyed running out on to the field and assessing the situation on the fly and coming to a conclusion and applying my knowledge on how to fix the injury. If you have any questions or comments please leave them below. Also don’t forget to click the button at the bottom of the screen to follow my blog so you don’t miss out on new posts. Thank You!!!!

Survival Tips – First Aid Part II

P79_first_aid__14244_zoom-287x300

What’s up Y’all?

Welcome back, we will be continuing talking about how to treat minor injuries if you are stuck far from a hospital. Please remember that this is something you should only do if you cannot access an emergency room. Alright lets dive right in.

  1. Boils – Symptoms: Red, tender spot on skin. Soft, pus-filled center forms amid tender area. Possible Condition: Skin abscess-deep, localized infection. Course of Action: Soak boils in warm water or apply heat packs to increase circulation and improve body’s ability to fight infection. Do not attempt to drain boil until it forms a “head” or pustule. If large boil forms, lance it with a sterile needle or knife and drain pus. Cover w/ sterile gauze and bandage.
  2. Breathing Difficulties – Symptoms: Slow or rapid breathing. Gasping, clinching the throat with one or two hands. Deep or shallow breathing. Gurgling, wheezing, dizziness. Unusually cool or moist skin. Possible Condition: It could be asthma, and/or bronchitis. Hyperventilation, often caused by anxiety, head injury, or severe bleeding. Allergic reaction. Foreign object in air-way. Course of Action: Switch person’s position; lying on side w/ upper leg bent or sitting may improve breathing. To treat blocked airway(choking), give blows to the back; wrap your arms around victim’s abdomen from behind, place fist just above naval, grab fist w/ other hand and make fast, upward thrusts into abs. If you find yourself alone and choking you can use an object around you like a chair or if nothing is around you that will work try using your fists like you would on someone else. If victim in unconscious and not breathing, place victim on back, push down on forehead while pulling up on bony part of jaw to lift the chin. This “head-tilt chin-lift technique” moves the tongue so air can reach the lungs. Check victims. If still not breathing, give two rescue breathes with each breath lasting one second. Pinch nose shut; take a breath and make a complete seal over victim’s mouth; blow in to make chest rise. Check to see if breaths go in; check for pulse by feeling at side of windpipe. If breaths do not go in, clear airway. If victim has no pulse and is not breathing begin CPR. If victim has a pulse but is not breathing, give 10 rescue breaths per minute until victim breathes on his own.
  3. Burns – Symptoms: Skin is red, dry, and swelling. In more severe cases, skin has blisters, appears wet or mottled, or skin turns brown or black. Possible Conditions: Thermal burns; radiation burns (sun’s ultraviolet light) Course of Action: Cool burn with lots of cold, running water. Cover with sterile dressing and bandage. In severe cases, take steps to minimize shock. Do not let victim get too hot or cold. Do not apply ice except if the burn is small, and then for only 10 minutes. Do not attempt to clean or apply ointment directly on a severe burn.
  4. Cuts and Abrasions – Symptoms: removal of outer skin layers. Red rash caused by scraping. Bleeding from opening in skin caused by sharp object. Possible Condition: Abrasion, laceration, puncture wound, or avulsion (tearing/ removal of skin and soft tissue). Course of Action: Clean abrasions w/ soap and water to prevent infection. Care for open wounds w/ dressings and bandages.
  5. Dehydration – Symptoms: Thrist. Dizziness. Dry mouth and nasal passages. Infrequent urination; urine is dark. Weakness/fatigue. Headache. Confusion, irritability, slurring of speech. Possible Condition: Body has lost too much water to function properly. Course of Action: Drink small amounts of water at frequent intervals. Keep clothes on; clothing barrier decreases water loss through sweating. Sugar or oral rehydration salts may be added to first water given to victim. Victim should refrain from physical activity while recovering. If victim must move, take frequent breaks for rest and water.
  6. Drowning – Symptoms: Submerged victim does not breathe and/or has no pulse after being pulled from water. Possible Condition: Water in lungs (drowning, partial drowning) Course of Action: Clear airway and follow guidelines under “breathing difficulties.” Prepare to administer CPR.

I hope this comes in handy when you really need it. I also hope you learned something new as well. Remember that you should only use these skills when you are in an emergency. You should always take the injured person to an emergency room if you have access to one.

Thank you again for reading my blog post on First Aid. Please leave a comment and also don’t forget to click on the button at the bottom to become a follower.

Survival Tips – How to apply first aid to yourself or a companion

P79_first_aid__14244_zoom-287x300

Hi NW Tactical family,

Today I wanna go over some basic first aid that you can use on yourself or on your companion if you are not near a hospital. These are tips should only be used if you can not reach a hospital, a hospital should always be your first option if its available.

  1. Allergic Reaction – Symptoms: Skin swells and turns red. Hives, itching, weakness, nausea/stomach cramps, vomitting, difficulty breathing, obstructed airway, low blood pressue, and shock. Possible Condition: Allergic reaction/anaphlactic shock(anaphylaxis). Course of Action: Check airway/ move victim into the most comfortable position possible so they can breath unassisted. Keep victim calm, Administer antihistamine. If you have an epinephrine auto-injector in your first aid kit you should inject it if allergic reaction is severe. It is always a good idea to have an epinephrine auto-injector as part of your first aid kit because you never know what you or your companions will be allergic to in the wild, it may be something that you never knew you had.
  2. Bleeding-Surface – Symptoms: Blood running down body part or blood pooling on clothing, or blood spurting from a wound. Possible Conidition: Torn or cut blood vessel or punction wound. Coure of Action: First thing you want to do is cover the open wound with a sterile dressing and bandages to control bleeding and prevent any sort of infection to set in. If wound requires continuous pressure and you cannot hold it there apply an elastic bandage or tourniqut the nearest artiry. Remember that if you apply a tourniqut make sure that you get help as soon as possible or the wounded person could loose the limb. To apply elastic bandage place end of bandage against skin and roll it around wounded limb while gently stretching it, start from the farthest area from the heart. When finished, tape or tie in place. Make sure that you do not wrap it to tight that you cut off circulation. If blood starts to seep thru bandage to not remove old dressing just add more. Do not completely close wound off from the air, except for certain chest and abdominal wounds(I.E. sucking chest wounds or gut shots).
  3. Bleeding Internally – Symptoms: Vomitting or coughing up large amounts of blood. Bruised, tender, swollen, or hard flesh. Severe pain/inability to move injured body part. Weak, rapid, pulse. Pale, bluish skin or cool moist skin. Excessive thirst. Confusion, drowsiness, or loss of consiousness. Possible Condition: Injury to a large blood vessel and deep muscle tissue, bleeding beneath the skin. Course of Action: Apply Ice on and off wound for 20 minute intervals. Wrap in damp cloth to prevent ice from being directly on skin for long periods of time. Keep victim still and comfortable and elevate injury if it does not cause excessive pain to the injured person.
  4. Blisters – Symptoms: Large and painful fluid filled sac beneath the skin. Possible Condition: Burn causing blister or excessive friction to a concentrated area. Course of Action: If the blister forms and there is a small chance that the area the blister is on will come in contact with abrasive materials then leave it alone to heal on its own. Never ever pop a blister that has been caused by a burn. If the blister is on the bottom of the foot where it will encounter abrasive materials then clean the area around blister and use a sterile needle to puncture blister and drain fluids. Make sure to apply a sterile bandage once all fluid is expelled from blister and if the bandage is wet from fluid make sure to change right away to ward off any infections.
  5. Broken Bones – Symptoms: Sudden, serious deformity. Bone sticking out of skin, Bruising or swelling. Unable to move a specific body part with out severe pain. Victim heard a loud pop, crack, or snap sound. The sensation of bones rubbing together. Injuried area is numb or cold. Possible Condition: Broken bone or fraction or compound fracture. Dislocation. Course of Action: Immobilze the injuried body part as it was found. Absolutely do not apply a splint unless you have to move the victim to get help, if you must apply a splint do so above the fractured area, and do not manipulate injuried area. SOme options for splinting are, splint injured area to another body part; making a soft splint or sling for injured arm, wrist, or hand; and splinting a fracture with wood, metal, folded magazines, or anything else that is rigid and offers a lot of protection and support. Apply ice to the injured area, but make sure to have a cloth barrier between ice and the skin. While applying ice to injured area elevate if possible without causing great pain.

Those are just a few quick tips on some basic first aid. Please remember that it is always best to seek a medical professional first but the tips will help if you are in a remote area or help will not arrive fast enough. Please keep an eye out for more first aid tips to come.

Thank you for joining me today, I hope I was able to teach you something new. Remember to leave any questions or comments and also click on the follow button at the bottom of the screen so you don’t miss out on new blog posts.