
Welcome back to nwtactical blog,
We will be picking right up where we left off, we finished with the most popular rounds and now we are going to move onto how to practice reloading your pistol.
When practicing reloading your pistol you should be practice with at least two different pistols. One primary and one secondary. If you practice enough you will not have to think about the process it will come natural to you, you will build muscle memory. So instead of thinking is the slide locked? -> press magazine release -> magazine is clear -> grab new magazine -> insert new magazine with correct orientation -> release slide. Those are the steps you take to reload a magazine. It may seem like a lot when put on paper but if you practice it will become second nature. The reason you need to practice is so when you are in a life threatening situation you don’t have to think about reloading your pistol you will do it and you will be able to focus on the situation at hand instead.
- You should be able to load your handgun rapidly, and flawlessly 100% of the time – w/o looking at your hands, your pistol, or your magazines.
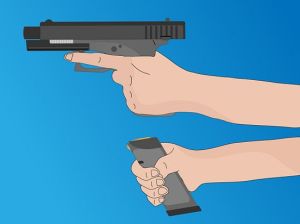
An Emergency reload is when you have fired all the rounds in the current magazine and your slide is in the locked back position. You should be able to reload your magazine while your gun is still pointed at the target. Psychologically, lowering your gun gives the perp an advantage over you and keeps you focused on your gun and not on the perp who is trying to hurt you and your loved ones. The technique you want to use is: when the slide locks back, you want to remove a magazine from your magazine belt clip. As you move the fresh magazine to the gun, eject the current empty magazine letting it fall to the floor. Align the magazine against the magazine well and slam the magazine home with some force, seat the magazine using the palm of your hand; then push the slide release and allow the slide to slam forward. This is not a gentle process, it should be fast, loud, and aggressive. You should also enjoy the primal feeling that you get when doing this procedure.

- A Tactical reload is when there is a pause in the gun fight and you have the opportunity to duck behind cover. Currently your magazine still has some rounds in it but you know you are running low, this is when you should reload so when you resume the firefight you will have a full magazine to work with. Now this drill is a little different then an emergency reload. What you will want to do is: From behind cover reach into your mag pouch/holder and grab the mag with your thumb, pointer, and middle finger. Move the mag back to the gun while you eject the partially spent mag into your hand, catch the ejected mag with your ring finger, pinkie, and the palm of your hand (in the emergency reload you let your empty mag hit the floor but since there are still rounds in this mag you will want to catch it and save it for later). After catching the partially used mag, insert the mag with your fingers and give it a little tug to make sure it is seated properly (since you have your partially used mag in your hand you can not slam it home like before). Since you didn’t run out of ammo you don’t have to manipulate the slide and you should have a round already loaded as well so do not cock the gun or you will eject a perfectly good round.


This section we will be going over Malfunctions, unfortunately with semi-automatic handguns you will eventually have a malfunction no matter how well made the gun is. It might take 50,000 rounds but you will experience one and its good to know how to fix a malfunction.
- Type-1 malfunction: This is a failure-to-fire (FTF) malfunction. When you pull the trigger and you hear a “click” instead of a “Ka-Boom” then you know there is something wrong. This is the simplest type of malfunction, and the easiest to fix: just tap, rack/filp and viola its fixed.
- Type-2 malfunction: Is a failure-to-eject is a common problem on older 1911s and other guns with shorter ejectors. This type of malfunction is affectionately known as a “stove pipe.” The symptom of this malfunction is a “dead trigger”, and there will probably be a brass casing poking out of the ejection port but not always, and the slide is not all the way forward. To fix it do the same method as Type-1: Tap, Rack/Flip.
- Type-3 Malfuntions: This is known as “The Mother of All Malfunctions” (MOAM) by some. This is a feed-way stoppage, which means that too much brass is in the chamber at the same time. If you do get a type-3 malfunction under fire, may instructors will tell you to grab your back up but sometimes that is not an option. First thing you will want to do is find cover before executing. To Clear: Grab your slide and lock it back. Press the mag eject, and grab the magazine and toss it to the ground. Grab the slide and rack it hard 3 times in a row. Then reach for a brand new mag and slam it home and rack a new round into the chamber. Some pistols, notably glocks, may be cleared of a type-3 malfunction simply by dropping the mag far enough to allow the slide to go forward and then re-seating the mag with authority, slam the damn thing home hard!!! If the slide goes completely forward then the gun is ready to fire, if it does not go all the way forward then perform Type-1 clearing action.
- Type-4 malfunction: Type-4 malfunction is very uncommon, and if it ever happens to you when you are practicing with your gun at the range, throw the fucking gun away and get a new one. Just kidding don’t be rude but you do have a serious problem that is a manufacturing fault. THis malfunction is when the slide does not go back into battery after firing. This might happen because your guide rod or guide rails are really gummed up (to the point where it looks as if there is a wad of chewed up gum in it), your guide spring is too weak or your chamber design is bad. This should never happen in a modern semi-automatic pistol. What I recommend is to either send the gun back to the manufacture to have their professional gunsmiths look at it and fix it or take it to a local gunsmith you know and trust.
Today we went over some more of the technical aspects of how to be combat ready but they are just as important. Next we will be going over how to “Point Shoot and Flash Sighting”. It should be fun so stay tuned and make sure you click on the follow button so stay up to date on the blog.
Thank you for following.
