CRKT Lil’ Guppie

Lil' Guppie

Sorry its been so long since my last post. I have been going thru some major life changes and have been busy.

I recently purchased a new toy, and boy is it pretty fucking cool. Its called the Lil’ Guppie and is produced by Columbia River Knife & Tool. I recently bought my first CRKT product and I can tell you that it was not gonna be my last, I plan on buying a lot more of their great products. If you want a little background on CRKT then read my previous post on the RSK MK5.

Lil Guppie 3

The Lil’ Guppie is part of CRKT I.D. Works tools product line. The product line is motivated by design that is inspired and functional, CRKT’s vision is that of painter Leonardo Di Vinci who said “Observe Everything in Nature”, great man, great quote but that’s the last thing I am thinking of when I am skinning a dear, or fixing my motorcycle(Just kidding). CRKT is going for products that are ergonomic and organic shapes that are sometimes whimsical but always useful. CRKT’s I.D. Works designs are nothing like the traditional Leatherman tools, their tools are ready to go right out of the sheath or pocket. Just a flick of the finger and the blade is ready to slice and dice, or the pliers are ready to pull and pry.

Lil Guppie opening beer

The Lil’ Guppie was designed by Launce Barber & Tom Stokes, who also invented its bigger brother the Guppie. There is a few different versions of the Guppie, they come in different colors and also with different tool line up. Currently the one I have is the all black version with the standard vise grip, bottle opener, flat head screw driver, and Phillips head screw driver, and a 1in blade, and of course the carabiner that it is the base frame of the Guppie. The Lil Guppie is 3in long and only 1.9oz so you will hardly notice it when in your pocket or hooked to a belt loop or backpack/bag.

Lil Guppie 2

The adjustable wrench opens up to about 10mm for light repair and assembly, along with small jobs such as building model cars or Lego’s. The small carbon blade really does come razor-sharp right out of the box and it can be convinently opened with one had using the small blade slot at the top. The tail end of the Guppie flipper is where the flat head screw driver is located which comes in handy for many small screws that plague our everyday lives. The clip on the little Guppie can be used to attach to your pants or backpack but it can also be used as a nifty little money clip.

Lil Guppie BLack

I really enjoy this little tool, I keep it hooked to my backpack so that I have it near me whenever I go out hiking, riding my motorcycle, to work, etc. I also get a lot of comments on how cool of a little tool it is. I recommend it to everyone who is looking to buy a carabiner for your keys or to clip to your backpack/bag to hold different items for you, remember that this is not a load bearing carabiner so it cannot be used to climb with or for any type of substantial amount of weight. Why buy a plain old normal carabiner when you can purchase one with a knife and a bottle opener, right?? Lets get drunk and then be armed(lol). After purchasing the Lil’ Guppie I defiantly plan on buying its bigger brother the Guppie, so I can attach it to my backpack. If you have any questions regarding this post please don’t hesitate to leave a comment with your question or comment.

Thank you for reading and go out and buy one NOW!!!

Columbia River Knife & Tool Ritter RSK Mk5

CRKT Logo

Hey ya’ll blade fanatic’s,

CRKT SporkCRKT Hisshou

Move over Kershaw, Gerber, there is a new kid on the block and he is one badass SOB. Well CRKT is not too new but compared to some of the big name brands they are the wild and crazy teenager. They make all types of different knifes and tools, ranging from small 2 inch neck knife Ritter RSK that this blog will review to the 13 inch tactical sword, the Hisshou, which is a totally badass sword specifically designed for our men who operate in the shadows and need something that can kill quietly and efficiently. They also make many different incredible tools that range from you basic field utensils such as the Eat N Tool which looks like a spork on steriods, that has a fork, spoon, bottle opener, 3 hex wrenches, and a carabiner, to a multi-tool that has 10 different tools all in one.

CRKT Carabiner

Columbia River Knife & Tool or otherwise known as CRKT was found in 1994 in Tualatin Oregon by Rod Bremer to bring the end user the best quality products and most innovative tools and knives on the market at an affordable price. Personally I love CRKT’s products and plan on purchasing there products as much as possible.

CRKT RitterCRKT Ritter Box

The Ritter RSK is a little tiny thing that comes with an Altoids looking tin box to carry it in. The Ritter RSK is made out of 3Cr13 Stainless steel and its only 3.81 inches long and weighs less then an ounce with and comes with a stone wash finish to prevent corrosion, and it comes with a fitted kydex sheath that makes it the perfect for a neck knife or for a women to carry on her key chain or attached to her purse for easy access. The knife comes sharp right out of the box so be careful don’t underestimate it due to its size. CRKT open box I think it would be great for a survival kit because of its size and weight, one of the most important things when putting together a survival kit is to find items that are small and light but still a quality product that will be there when you need it the most. The ergonomic skeleton grip is perfect for a two finger grip to make fuzz sticks, gut a fish, or dress game, wrap some para-cord around it to improve the grip and give it more real estate to hold on to. In my opinion this is a great little knife, but you have to remember that this is only $20.00 and is less then 4 inches in total length. It is a small knife but a quality product that is less then an ounce.

CRKT Ritter hand CRKT Wrapped

I hope this post gives you a good idea about what you are getting when you purchase Ithis product. I have read negative reviews online with one person stating that the knife is small and doesn’t weigh anything, well duh thats what the description says. I love it when people don’t read the description and when they pay only a few dollars for a product and then get angry when they didn’t get a 7 inch fighting knife made our of 1095 Cro-Van Stainless steel with powder coated finish. Anyways thats my rant for the day. Thanks for listening. Please don’t forget to leave any comments or questions in the comment section and also don’t forget to click on the “follow” button so you don’t miss out on any great posts.

Thanks

nw Tactical

Gerber Skeleton Frame Knive’s – Bare Essentials

What’s up Steel Junkies,

It’s been a while since I have reviewed a new product, I only want to review products that I actually put to the test for you so you are getting a real honest review. So today we are going to go back to the basics and review two different blades from Gerber. We are gonna be learning about the Gerber Paraframe I Stainless Steel Serrated knife, and the Gerber RipStop Stainless Steel Straight Edge. These two blades are some of Gerber’s more affordable knives. I purchased both these at Target. The Paraframe I was roughly $30.00 and the RipStop I was about $15.00. First lets learn a little bit about the history of Gerber.

Gerber Logo

History of Gerber:

Gerber was founded in 1939 by a gentleman named Joseph R. Gerber in Portland Oregon. Gotta love that this is a good old North West company. It started out as a small batch of handmade cutlery sets that were given as holiday gifts. It quickly turned into thousands of retail accounts around the country. Gerber makes different knives for different purposes.

Military:

Gerber Cable Dawg

They specialize in Military were every design is based on direct feedback from members of our Armed Forces. Iconic knives such as Mark I, Mark II, and the Guardian series are some of the inspirations for Gerbers Military knife lines. Some of the innovative products that they have developed for the Military is the Cable Dawg, LMF II and the De Facto which serve alongside the standard issue Gerbers such as MP600 and the Gerber Strap Cutter.

Hunting:

Gerber Gator

From the smallest game to the epic trophy, Gerber equips the great predator on earth The Hunter. They focus on making their blades evenly balanced and tough as nails, they focus on making specific gear with long lasting blades, tactile handles and all weather sheaths. Their most famous hunting knife is the Gator which has paved the way for some of todays most innovative blades on the market.

Survival:

Gerber Bear Grylls

Some men enjoy hunting in the great outdoors and some men just enjoy being in the great outdoors. For the men that enjoy nature for what it is they have created the Bear Grylis line of knives. They specialize in knives for the first timer boy scout on their first trip to the seasoned adventurer exploring some of the highest mountains in the world.

Tactical:

Gerber Covert

Gerber created the Tactical line to service the men and women who protect us on the home front from Police officers, to firefighters, to EMTs. One staple of that line is the Covert series which was developed in conjunction with one of the greatest close quarters combat and fighting instructors Colonel Rex Applegate.

Outdoor:

Gerber E-Z Out

Gerber takes being outdoors to the next step and they do not generalize they specialize by making knives that are specific to all activities, Their Outdoor line specializes in Hiking, Camping. Be the man who is prepared for everything with E-Z Out Rescue, and don’t forget the new Steady blade which are breaking ground in the industry and challenging the status quo on what tools can do.

Essentials:

Gerber Compact Sport MP400

Next they have what they call the Essentials. Gerber Essentials are the tools and knives that get us out of unexpected jams every single day. They are the pocket tools, multi-pliers and everyday carry. One of their top sellers is the Compact Sport MP400 and the Gerber LST, they both utilize their famous one handed open and close technology.

Industrial:

Gerber Groundbreaker

Last but not least is the Industrial line. We cannot forget the men and women who build out countries infrastructure. They are constructed with advanced materials, both lightweight and indestructable, every tool is designed for all-day efficiency and durability. One of the top sellers is the Gerber Legend and the Gerber Groundbreaker.

Over the last 70 plus years Gerber has taken your grandpa’s wooden handle folder blade and took it to the next level.

Gerber Paraframe

Now lets get back to business and review the Paraframe I. The Paraframe I  has eight different knives in the series. I carry the serrated for those extra tough cutting jobs. The Paraframe I is based on a minimal frame lock design. It is wonderfully simple, open frame(skeleton) knife with a serrated locking blade that is super lightweight, it cleans easily and opens effortlessly. The Paraframe is built with a smooth stainless steel handle and a pocket clip to secure the blade to your pocket. The knife has an overall length of 7.01 inches with a blade length of 3.01 inches. Closed it is only 4.11″ with a total weight of 2.6 oz. The blade of the knife is a Clip Point that is made of High Carbon Stainless Steel. The Paraframe is a great everyday folder. I personally used it as my EDC for about two years and didn’t have to sharpen it once. It could have used one but it was not necessary. I mostly used it for cutting boxes, rope, paper, and fabric and anything else that came across the blade, it made quick work of everything I put to the test. For the price it is a great knife, and I really like the skeleton handle. It was the first knife I owned that was this style and I was a little concerned about the lack of grip but I didn’t have any problems. After owning the knife for 4 years and it being my EDC for 2 straight years the knife has no blade play at all. It is as tight today as it was the first day I took it out of the package which is pretty amazing for a $30.00 knife.

Gerber RipStop

Next up we are gonna be reviewing the Gerber RipStop I, the blade I own has a fine straight edge with a Clip Point tip. Gerber built these knives for the non-conformist in you. The RipStop I is super lightweight from lock concept that delivers bold strength and high functionality. The weight of the all Stainless Steel blade that is only 5.75″ in overall length, with a blade length of 2.3″ and when closed it is only 3.4″ is only 2 oz because of the intriguing handle and blade design. All bulk has been stripped off this streamlined race car of a blade. The RipStop has dual thumb studs that make opening the blade a snap for either left or right handers, and closing it is just as simple one handed. I have really enjoyed owning this knife. I bought it only a few months after I purchased the Paraframe because of the skeleton style handle like the Paraframe. I actually carried both blades most of the time, I would carry the larger Paraframe in my back pocket and the smaller RipStop in the front pocket. Sometimes you just didn’t need a 4 inch blade to do the work a 2 in blade could just as easy. It is also not as threatening when whipping it out at work and cutting open a box especially when you work with all women, or when they ask to use something to open a box or package. I could hand them the smaller of the two blades and they don’t look at me like I am some blade freak for having a huge pocket knife even though secretly I am. bwahahahaha(that was supposed to be my evil genius laugh). Once again this knife has cut everything I asked it to but unfortunately it dulled rather fast on me and after years of abuse the blade has quite a bit of play on it. It wiggles back and forth and side to side, and with the design you cannot tighten it without specialized tools. For $15.00 the blade is a good buy and I would recommend it to anyone looking for a small pocket knife for light duty jobs. I recommend this knife for any women who want a small knife they can carry in their purse without adding much weight at all.

So today we reviewed two different Gerber knives, the RipStop I, and the Paraframe I. Both are lightweight and stainless steel blades that I would recommend to anyone who needs a lightweight durable knife for light duty jobs. I hope this review will help you in deciding if one of these knives is right for you. If you have any questions or comments please leave them in the comments section and I will answer them. Also don’t forget to click on the follow link so you don’t miss out on any updates.

Thanks for reading and keep buying those blades, in my opinion you can never own enough. Blade Junkie for life.

nw Tacitacl

Tactical Tips – Point Shooting

Sup Y’all gun geeks,

We’re gonna be reviewing Point Shooting. I really think more people should be training using this method for short distance CQC(Close Quarters Combat) then training looking down the barrel using the sights. When push comes to shove your adrenaline will be pumping and your mind will be racing so fast that you will not have the time or wherewithal to even think about using your sights, you will just start blasting away and missing every time. Even our trained LE have that same problem, but now most departments are starting to train with Point Shooting or Flash Shooting. These tactics are used by most of the top shooters in the world such as Delta Force, SEAL Team Six, SAS 22. It takes a lot of practice to get good at or even sufficient. You will need to be at the range day after day putting hundreds if not thousands of rounds down range, but in the end it will be all worth it when it comes time to protect your loved ones.

Recent science says that we lose our near vision and our fine motor skills when our fight or flight response is activated, when sight shooting both of these skills are needed to properly sight shoot. When you are in the fight or flight response you will only be able to do what your muscles have been trained to do. Studies say that most handgun fights are fought within 5-8 yards which doesn’t give you much time to react if you are being charged at or if someone else draws a weapon. Point shooting is a method of shooting a firearm that relies on a shooters instinctive reactions in a life threatening situation to quickly engage close range targets. The method is used in close quarters fighting do to lack of time to react, or you have low light conditions which hinder your ability to use your sights. When practicing point shooting it is very important to have the correct handgun for you, it must feel like an extension of your arm and hand. Do not switch guns when practicing cause the slightest difference in your gun can change the way you point shoot. The weight of the gun, the handle of the gun, the caliber and recoil can all throw off the mechanics that you are teaching your body to use in emergency situations to protect yourself and loved ones.

Now we will go over some techniques to use when point shooting, since to be effective at it you will need to practice a lot. Just like anything else that takes skill, such as basketball, football, baseball. These all take lots of practice to be good at and so does point shooting.

  1. Position yourself 3 yards away from a large(10 inch) target. In an athletic stance where you are on the balls of your feet, execute a tactical quickdraw(covered in previous post) to a firing position and fire multiple rounds into the target. I recommend to fire anywhere between 3-6 shots. DO NOT USE YOUR SIGHTS!!! The point of the drill is to get you used to not using the sights. It may take a while but you will learn to hit center mass of your target every time. One key is to try to do it as quickly as possible, but try to take just enough time to allow the momentum of your arms and gun to slow right before you pull the trigger. I like to call it controlled chaos, I teach it to my 10-year-old basketball team when doing lay up drills. Practice this drill till all your shots are in a grouping of a couple of inches. Grouping is very important, it doesn’t matter if you hit the target every time, if they are all over the place it is not effective. You want your hits in a small group near center mass. Once you have good groups at 3 yards on a 10 inch target move it back a few yards and use a small target and keep going till you reach no further then 8 yards and your target is no bigger then a standard picnic plate.
  2. After you feel you have a good grasp on step one you can start practicing with multiple targets. Try setting up 3 or more targets a couple of yards apart, some closer and some further away but all no further than a 5-8 yards down range. Now execute a tactical quickdraw and go down the line, one shot per target. Once you feel comfortable with this drill and you are hitting center mass change it up. Keep targets in the same spots but put a burst of 2-3 rounds in each. Try them in different order, or have a friend tell you which one to shoot (“one!” “two!” “three, one, two!”), the key thing is to make sure that you can hit your target center mass every time, once you can do this try to accelerate your pace. But remember to always make sure that you are in control and do not try to do more than your skill set allows. To get to this stage will probably take weeks to months of shooting hundreds of rounds every day or multiple times a week.
  3. Once you have mastered step two, try shooting while moving. While moving you should still be able to hit targets at 5 yards. Set up three or more targets a few yards apart. Start about 15-20 yards back and sprint towards your targets, once you are within 5-8 yards of your target tactically quickdraw your gun before you come to a complete stop. Fire a two shot burst, side step to engage the second target and fire a two shot burst, then so on. Each time you run through course, try to do it faster; try not to pause when shooting.

Tips to make you a better:

  1. Accuracy and speed can be improved by a methodical and well executed draw, read my post on Tactical Quickdraw, it should help you understand how to execute properly.
  2. PS abilities vary greatly between people. Dexterity and hand eye coordination are a big component, and some people just are naturally inclined in those two areas. Don’t worry about starting off close to your target, everybody is different it might take you a little longer to figure it out buy with enough practice you will master it. Don’t worry about looking uncool if the target is only a few yards away, it will look a lot more uncool if you are shooting at a target 8 yards away but are missing time after time.
  3. Point shooting is much less efficient at greater distances, this is why I’m saying to shoot no further than 5-8 yards. I will be covering Flash Sighting which you will want to use for greater distances, it only takes a tenth of a second longer but you will land hits about four times as much.
  4. I recommend using a low caliber handgun when starting out. Either a .22 or a 9mm will be best because it has less recoil which will help with grouping and shooting multiple rounds quickly.
  5. Remember SAFETY FIRST ALWAYS. These exercises should only be done by people who are comfortable with handguns. If you are new then you should take some gun safety classes at  your local gun range and practice shooting for a few months to get comfortable. Most of these exercises you will not be able to do in your local gun range for safety reasons so you will need to find an area that always shooting and has lots of wide open space. Make sure to know the state and local gun laws before shooting.
  6. Be sure to know what’s beyond your targets, bullets can travel very far distances.
  7. A great way to practice Tactical Quickdrawing the weapon and shooting motion is to practice with snap-caps, you can buy them at your local gun dealer for under $20.00.

Thanks for reading and I hope you practice this shooting technique cause it will save your life when you are in a life threatening situation. Remember though that this is not a novice technique and you need to practice a lot. This is an expert shooting technique and it takes days, weeks, if not months of practice and hundreds if not thousands of rounds down range before you are consistently hitting center mass with good grouping.

Again thank you for reading and be safe always use gun safety rules when handling a gun.

nwtactical

Tactical Tips – How to be Combat Ready with a Handgun Part II

1911

Welcome back to nwtactical blog,

We will be picking right up where we left off, we finished with the most popular rounds and now we are going to move onto how to practice reloading your pistol.

When practicing reloading your pistol you should be practice with at least two different pistols. One primary and one secondary. If you practice enough you will not have to think about the process it will come natural to you, you will build muscle memory. So instead of thinking is the slide locked? -> press magazine release -> magazine is clear -> grab new magazine -> insert new magazine with correct orientation -> release slide. Those are the steps you take to reload a magazine. It may seem like a lot when put on paper but if you practice it will become second nature. The reason you need to practice is so when you are in a life threatening situation you don’t have to think about reloading your pistol you will do it and you will be able to focus on the situation at hand instead.

  1. You should be able to load your handgun rapidly, and flawlessly 100% of the time – w/o looking at your hands, your pistol, or your magazines.
  2. Pistol Reload

    An Emergency reload is when you have fired all the rounds in the current magazine and your slide is in the locked back position. You should be able to reload your magazine while your gun is still pointed at the target. Psychologically, lowering your gun gives the perp an advantage over you and keeps you focused on your gun and not on the perp who is trying to hurt you and your loved ones. The technique you want to use is: when the slide locks back, you want to remove a magazine from your magazine belt clip. As you move the fresh magazine to the gun, eject the current empty magazine letting it fall to the floor. Align the magazine against the magazine well and slam the magazine home with some force, seat the magazine using the palm of your hand; then push the slide release and allow the slide to slam forward. This is not a gentle process, it should be fast, loud, and aggressive. You should also enjoy the primal feeling that you get when doing this procedure.
    tactical reload

  3. A Tactical reload is when there is a pause in the gun fight and you have the opportunity to duck behind cover. Currently your magazine still has some rounds in it but you know you are running low, this is when you should reload so when you resume the firefight you will have a full magazine to work with. Now this drill is a little different then an emergency reload. What you will want to do is: From behind cover reach into your mag pouch/holder and grab the mag with your thumb, pointer, and middle finger. Move the mag back to the gun while you eject the partially spent mag into your hand, catch the ejected mag with your ring finger, pinkie, and the palm of your hand (in the emergency reload you let your empty mag hit the floor but since there are still rounds in this mag you will want to catch it and save it for later). After catching the partially used mag, insert the mag with your fingers and give it a little tug to make sure it is seated properly (since you have your partially used mag in your hand you can not slam it home like before). Since you didn’t run out of ammo you don’t have to manipulate the slide and you should have a round already loaded as well so do not cock the gun or you will eject a perfectly good round.

Gun Malfunction
This section we will be going over Malfunctions, unfortunately with semi-automatic handguns you will eventually have a malfunction no matter how well made the gun is. It might take 50,000 rounds but you will experience one and its good to know how to fix a malfunction. 

  1. Type-1 malfunction: This is a failure-to-fire (FTF) malfunction. When you pull the trigger and you hear a “click” instead of a “Ka-Boom” then you know there is something wrong. This is the simplest type of malfunction, and the easiest to fix: just tap, rack/filp and viola its fixed.
  2. Type-2 malfunction: Is a failure-to-eject is a common problem on older 1911s and other guns with shorter ejectors. This type of malfunction is affectionately known as a “stove pipe.” The symptom of this malfunction is a “dead trigger”, and there will probably be a brass casing poking out of the ejection port but not always, and the slide is not all the way forward. To fix it do the same method as Type-1: Tap, Rack/Flip.
  3. Type-3 Malfuntions: This is known as “The Mother of All Malfunctions” (MOAM) by some. This is a feed-way stoppage, which means that too much brass is in the chamber at the same time. If you do get a type-3 malfunction under fire, may instructors will tell you to grab your back up but sometimes that is not an option. First thing you will want to do is find cover before executing. To Clear: Grab your slide and lock it back. Press the mag eject, and grab the magazine and toss it to the ground. Grab the slide and rack it hard 3 times in a row. Then reach for a brand new mag and slam it home and rack a new round into the chamber. Some pistols, notably glocks, may be cleared of a type-3 malfunction simply by dropping the mag far enough to allow the slide to go forward and then re-seating the mag with authority, slam the damn thing home hard!!! If the slide goes completely forward then the gun is ready to fire, if it does not go all the way forward then perform Type-1 clearing action.
  4. Type-4 malfunction: Type-4 malfunction is very uncommon, and if it ever happens to you when you are practicing with your gun at the range, throw the fucking gun away and get a new one. Just kidding don’t be rude but you do have a serious problem that is a manufacturing fault. THis malfunction is when the slide does not go back into battery after firing. This might happen because your guide rod or guide rails are really gummed up (to the point where it looks as if there is a wad of chewed up gum in it), your guide spring is too weak or your chamber design is bad. This should never happen in a modern semi-automatic pistol. What I recommend is to either send the gun back to the manufacture to have their professional gunsmiths look at it and fix it or take it to a local gunsmith you know and trust.

Today we went over some more of the technical aspects of how to be combat ready but they are just as important. Next we will be going over how to “Point Shoot and Flash Sighting”. It should be fun so stay tuned and make sure you click on the follow button so stay up to date on the blog. 

Thank you for following.

Spyderco Persistence

Spy Per Box

Sup Y’all

Alright back to the meat and potatoes of the blog, product reviews. Sorry its been so long since I have done a review but I thought I would spice up the blog by expanding beyond just product reviews. I hope you all liked the new Survival and Tactical Tips.

This post we will be reviewing the Spyderco Persistence folding knife. The Persistence is part of their value series knives, If this is their value series I would love to see what their normal knives are like cause this blade rocks. This is a strong, sturdy, sharp as sin knife. This is my first Spyderco knife and I can say I am a big fan. I really like the knife, the blade is big and strong.

spyderco logo

Spyderco is one of the most innovative knife makers in the knife industry. They brought serrated edge folding knives to the market, they designed pocket clips to make accessing your pocket knife easier, they also perfected the one-handed opening knife. Spyderco puts all their knives thru a rigerous product testing in the million dollar test facility. In their facility they test edge retention using a CATRA machine, they test rust using a QFOG machine, they also test the force needed to open and close the knife. Another thing that all Spyderco knives are tested for is steel strength, stress tests, and wear. Spyderco has a few features that they invented and trademarked.

SypderEdge serrations

One of the features they invented is the SpyderEdge. Spyderco claims that their SpyderEdge has the most efficient cutting performance of all serrated blades on the market. The Persistence blade that I own does not have serrations it is a straight edge blade, but if its quality is anywhere near mine then I don’t doubt them. A serration is a sharpened recessed curve along the edge of the blade which provides the user with more linear edge surface then a straight edge blade. The SpyderEdge serration pattern is one large serration to every two small serrations(as seen in image above). This increases the blade length by 24% and also makes the blade retain its sharp edge because the tips of the serrations come in contact with what you are cutting first easing the amount of force required by the recessed edges. Serrated blades are best used for cutting ropes, seat belts, cardboard, leather.

Spyderco Pers CLP

Next Spyderco was the first knife company to introduce the clip to the knife. They first introduced it in 1981 and called it the CLIPIT, the CLIPIT allowed the carriar to have better access to the knife. Instead of having to reach into the pocket to fish it out the knife sat on the edge of the pocket and could be easily removed. The CLIPIT allows the user to change the way the carrier can carry the pocket knife, either blade up or blade down. I gotta give Spyderco major props for developing the pocket clip. I do not know what I would do without it.

Spyderco1

The last but definitely not the least innovation Spyderco introduced is The Round Hole. The Round Hole is an industry symbol of quality. The Round Hole is spyderco’s most recognizable feature and allows the carrier to open and close the blade with one hand easily, and believe me it is crazy how easy I can flip the blade open, and it is probably the easiest knife to close one-handed that I have ever owned and I own a ton of pocket knives from a variety of industry leading companies. The hole offers convenient access and maximum control while opening as well as accommodating large, small and gloved  hands. The Round Hole is so well-known throughout the knife industry that some of the top blade companies have licensed it to use on some of their models.

Spy Per Full

Now let’s get back to the Persistence. The reason Spyderco choose the name is because of the steadfastness and never-give-up attitude. The Spyderco Persistence is the little brother to the Tenacious. The knife is made in China but the quality is still top-notch. This is one of my two EDC knives, I carry the Persistence in my back pocket opposite my wallet. The other is my ESEE Candiru that I carry around my neck using the Paracord lanyard that I made. The Persistence is a great entry-level knife and is a great value for only $30.00. The knife comes scary sharp out of the box which is always the first test of quality, and it has not lost its edge over the last few months of intense daily use.

Spyd Per Color

The knife is a total of 6.8 inches long, with a 2.75 inch blade and the knife only weighs 3.3 ounces, great for carry in the pocket you barely notice it’s there. They use 8CR13MOV Stainless Steel which has a high carbon rating which means the steel is strong and will hold an edge longer. The 8Cr13MoV stainless blade is a modified skinning-style, ground-flat from tip to tang which gives more cutting real estate. Careful positioning of the over-sized Spyderco Round Hole allow for fumble-free one-hand blade open/close. The handle is made out of G-10 laminate which is an epoxy and filled with woven glass fibers that is impervious to temperature changes and it also comes in many different colors. The handle is carved to fit the hand comfortable for prolong use in mind, which decreases hand fatigue. The handle also has skeletonize steel lines tucked inside to increase the handle’s rigidity and strength level without adding non-functional weight or bulkiness. It also comes with a 4-way pocket clip so you can position the blade up or down or for left or right hands.

Spy Per Closeup

Overall this is a great beginners blade and anyone looking for a sturdy, quality knife that will not break the bank I recommend getting the Spyderco Persistence, over any Gerber or Kershaw in the same price range. The Spyderco opens more smooth than any folding knife I have ever owned and you do not have to work it in at all. You can flip it open with a flick of your wrist right out of the box. It also has no blade play at all even after months of hard use.

Once again thank you for joining me and don’t forget to leave any comments or questions. Also if you have any stories about the knife please leave it in the comments section. Don’t forget to click on the follow button so you don’t miss out on any new posts.

Tactical Tip – Tactical Shooting Positions

What’s Up Y’all,

We are gonna flip the script on you and instead of giving you a survival tip and will be giving you a Tactical Tip, after all this is called NW Tactical. Today we will be going over different shooting positions.

First and foremost is the Ready Positions there are three different type of Ready Positions, all three of these Ready Positions allows you to have one hand off the gun so you can perform seperate tasks, but you are still ready to fire when nessacary.

The first Ready Position is Low and Ready. This is the most common position for tactical shooting. Low and Ready is the best position when you are searching for a target or approaching a target area at a fast rate. This position also is the fastest to move from to a shooting position.

high-ready

High Ready is one of the least common ready positions but something worth knowing, the reason for this is because at most shooting ranges it is against the rules to point your gun straight up in the air because of accidental discharge. No one wants bullets raining down on them. However when in a tactical situation and you are moving around a large group of people it is the safest way to hold your gun. It is also easier to perform tasks with the support hand while holding the gun in a High Ready position, such as reloading, or pulling and tossing a grenade/flashbang to clear a room.

Sling Ready

The last ready position is Sling Ready or in other terms Patrol Ready. You always hear that that you should always be in a low ready position but unfortunately it is just not practical. Sling Ready is the most comfortable position for long term patrols with a rifle like an M16A2 or M4A1. WIth the Sling Ready position you can relax both your arms against your body to prevent fatigue, you can also let go of the weapon to perform two handed tasks while the rifle remains in the Low Ready position so you can move to a firing position quickly.

Next Position group we will cover is the Standing Positions. These positions you are most likely to use while on the move, you first will lay down cover fire and then move to the nearest cover available. There are three standing positions as well.

off hand shooting stance

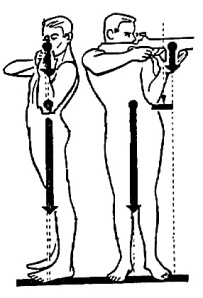
First standing position is the Traditional Offhand Position. The body is canted towards the target. The firing arm is cocked, and the support arm is directly under the barrel, and the feet are placed firmly at a 90 degree angle. The offhand is good for unsupported accuracy at medium ranges but is slow to get into and out of position. It is also not good for rapid fire because you can not absorb recoil very well. Also the firing arm is very exposed and has a greater chance of banging into walls or door jams when clearing rooms or clearing alleys.

DOD-ModifiedOffhand

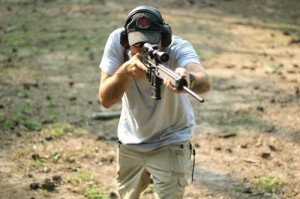
Next is the Modified Offhand Position. The body is also canted as to present the smallest target possible to the enemy. In this position you should be bent slightly forward at the hips and both your elbows are dropped towards the ground, this makes it easier to absorb recoil during rapid fire, it also makes it so you do not bump into walls and door jams while clearing rooms. Your feet should be a little wider then your shoulders at a more natural stance so you can move forward and backwards easily and you can also turn your body 180 degrees.

UFP

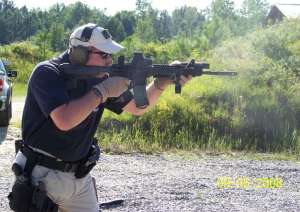
Last we have the Universal Fighting Position. This position is the most commonly used especially among our elite warriors such as delta force, Navy SEALS and SWAT Teams. In this position both of your feet are pointed directly at the target and your arms are drawn inward. The one down side is that it presents your chest to the target but today’s warriors wear highly effective body armor which makes this position more practical. The shooter should grip the magazine with the support arm or have a pistol grip. Thisis an advanced position and should not be used by novices.

THe next set of positions will be the Low Positions. These should be used when taking cover.

SFP

First is the Squatting Position. Your feet are completely flat on the ground and you are slightly leaning forward. One thing to remember is to not rest your elbows on your knees this will make you very unstable when trying to absorb recoil, remember the saying meat to bone not bone to bone. This position is the most stable, it is much better then any standing position and can be easy to get in and out of.

DSP

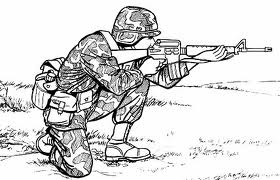
The Kneeling shooting position. One foot should be flat on the ground and one knee resting on the ground. Do not sit on your foot cause this will make it hard to move if nessacary. This position is also easy to get in and out of, and remember you should not rest your elbow on your knee but rest your tricep on your knee. Remember the saying meat to bone not bone to bone, just like the squatting position.

SFP

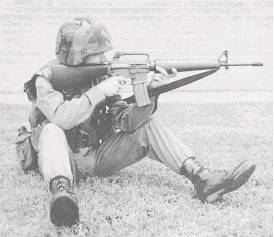
Another Low Position is the sitting position. This is similar to the previous one. You do not want to rest your elbows on your knees, meat to bone. This is the hardest position to get in and and out of, and that is why I do not recommend to use it.

PSP

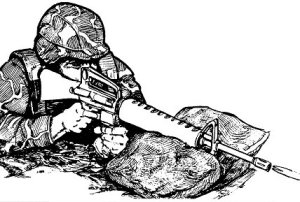
One of the most stable low positions is the Prone Position. One advantage of the prone position is that you offer the enemy a very small target, the down side is its hard to get in and out of especially when fully kited up. One way to get out of the prone position is to do a prone roll which makes it harder for the enemy to engage.

SSP

Next we will cover Using Support while shooting. Using support should always be a last resort option, mainly because if you are using support then you are most likely exposed. One reason to use support is if you are firing long range and the enemy can not engage you at the distance. Snipers use support all the time and effectively because they are trained to do so.

Lastly we will cover three standing Pistol Shooting Positions. The positions can also be used while kneeling.

Isosceles

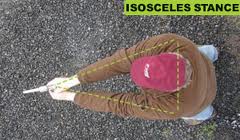
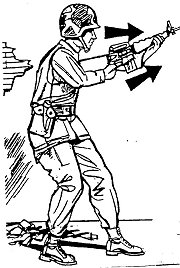
Isosceles is when your feet are together and pointed at the target, your body square to the target, both arms fully extended, and with firing hand pushing forward and support hand pulling back slightly this should help you absorb the recoil better. Similar to the UFP above this is a very good position if you are wearing body armor.

Weaver

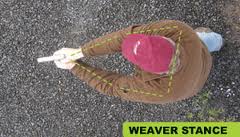
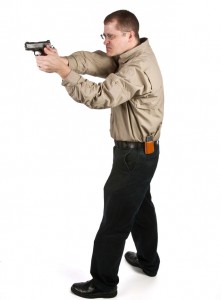
The Weaver is when the feet are spread about shoulder width and at about 45 degree angle. Both arms fully bent, body canted with respect to target. Firing hand pushing forward and support hand pulling back slightly to absorb recoil.

MWP

Lastly we have the Modified Weaver with your feet spread shoulder width apart and at a somewhat less than 45 degree angle. Firing arm should be mostly straight and support arm bent to help absorb recoil. Most of the arm positions are the way they are to help absorb recoil which is very important so you can shoot rapidly and maintain consistant grouping.

I am sorry that this post is so long but there are a lot of different positions and they are all important to know, you do not have to execute all these positions perfectly but it is good to know what they are and how to utilize them.

Once again thank you all for joining me here and please leave any questions or comments. Also don’t forget to click on the follow button so you don’t miss out on all my new blog posts.

FREE PARA-CORD BRACELET OR DOG/CAT COLLAR

Image

Attention All nw tactical Readers,

I will be raffling off a free Para-Cord bracelet or cat/dog collar in the color of your choice. All you have to do is click on the follow button at the bottom of the page and enter your email address(I will not share it with anyone). The contest will last for the week of April 8th – 21st. The winner will be announced the night of Sunday April 21st. Also if you have any cool Para-Cord stories please leave them in the comments section of this post or the Para-Cord review post and I will choose which one is the best and they will receive a Free bracelet or dog/cat collar in the color of your choice. So hurry and sign up now!!!

Looking forward to choosing a winner and reading all the great stories.

A Great Local Company and a Great Knife – SOG SEAL Pup

Image

What’s up Y’all,

I recently was going thru my wallet and found a gift card in it for Target that was given to me for my Birthday in 2009. I had no idea it was in there so I logged on to Target.com to find out if there was any money on it and to my surprise I still had $50.00 on it, WOW!!! Boy was I happy, I log on to Target and started browsing and I came across the SOG SEAL Pup. I had heard a lot about SOG and thought I would give it a try. It was right around $50.00 with free shipping so I said what the hell, why not. 

When I opened my door a few days later to my surprise there was my new knife on the door step a few days early, and man I was so excited. The knife came in a long rectangular box that had pictures of the knife being used by Constructions workers, Law Enforcement, Survivalists, and Military Special Forces. When I was looking at the box I flipped it over and on the back was the companies address, and to my surprise SOG is a local company. It is based out of Seattle Wa. I had no idea. I felt good about supporting a local company, which I try to do as often as possible. After learning this new detail I excitedly opened the box. I pulled out the knife and it is freaking awesome, and the nylong sheath that came with it was just as good, it looked really cool with the SOG name patch stitched on the front and it had plenty of straps and loops to attach it to your person. It also gave the knife sheath a real tactical look. I really like nylon sheath’s even though a lot of people complain when a company only supplies them calling them cheap, I think they are great because they are light and durable and easy to clean.

SOG SEAL Pup2

After I received my new knife and learned that it was a local company I decided I needed to know more about this company that made this totally kick ass blade. After going to their website and reading the “About Us” page I learned that the company named itself after a covert group called SOG which stood for Special Operations Group and it was a group that was created during Vietnam. I couldn’t believe what I was reading, because I just started reading a book called Hunting the Jackel. The book started off in Vietnam telling the story of Billy Waugh who was part of SOG but at the time they were a covert unit which stood for Studies and Observation Group, it wasn’t till over a decade later that the government released the truth. The company SOG was created in 1986 when a knife designer Spencer Frazier decided he wanted to make a commemorative of the original SOG Bowie knife that was made just for the SOG unit to carry on covert missions in the jungles of Vietnam. The blade was so popular that soon the company created a whole line of innovative knives and tools. The tools were field tested by the best of the best the U.S. Special Forces, they were even honored as the Navy SEAL knife of choice. The company motto is “Forged out of tradition, hardened in the field, honed for you”.

After doing some more researched I learned that the SOG SEAL Pup is a smaller version of the original SOG Bowie Knife. I was elated to have a knife that was model after such a rare blade used by some of the best warriors in the Vietnam War. While their knife was made strictly for killing mine is a utility knife and can be used for many different applications. The SEAL Pup is made out of AUS8 stainless steel that is powder coated to protect against rust and corrosion, the metal is also cryogenically frozen to increase the hardness. The metal blade is brought down to -300 degrees F, then brought back up to room temperature. This process increases the overall toughness and edge retention. The knife edge stays sharp longer with significantly less micro-fracturing and edge chipping. The SEAL Pup has one of the sharpest edges on a knife I have ever seen straight out of the box. I was extremely impressed cause I have a lot of knives made from some of the best companies in the world. The overall length of the knife is 9″ and the blade length is 4.75″. One of the most surprising things about this knife is that it only weighed 5.4 ounces, I couldn’t believe how light it was. The knife has a durable Zytel handle, the handle has great grip but its a little hard. If I had to use the knife for a long period of time I could see this definitely leaving some calluses, but thats part of being a man, right guys!!! It also came with a nylon sheath that was actually pretty good looking and it had lots of straps and loops for attaching to your belt or your tactical vest. One of the features I like best is the accessory pouch on the front, you could put a lot of usually items in it. You could put a two sided sharpening stone or if you were camping/hiking you could put some survival items in it incase something bad happens. 

Holding SOG SEAL Pup

So overall this is a great knife that isn’t to big and heavy and it has a full tang which makes it real strong. If you need an all purpose light utility knife I would recommend the SOG SEAL Pup for any camping trip or hiking adventure you have in store. The knife is great for chopping down saplings for fire wood. I personally can vouch for that and so can the small tree’s and bushes outside my apartment, the gardeners probably didn’t appreciate having to pick up a bunch of branches and leaves that were chopped up into little pieces. It also is sharp and strong enough to split fire wood, which my neighbors probably appreciated when they went to get firewood from their stack and notice it was already split for them. It will make quick work of animal that needs to be killed and skinned for dinner, I didn’t kill any animals with it because I’m not into eating squirells or city birds but I am sure it will do the trick. Also like I mentioned above you can keep survival items in the pouch like a fire starter, fishing wire and hook, even water purifying tablets. Its also very reasonably priced and SOG has a great lifetime warranty, they will pretty much replace it for any reason, other then if you lose it or drop it in the fire and burn it up which is pure stupidity and if thats the case then you probably shouldn’t own a knife. 

Thanks for joining me again here on nwtactical blog, if you own a SOG SEAL Pup and you have a story about it please leave it in the comments section or any comments you might have. Also don’t forget to click on the follow button at the bottom of the page so you don’t miss out on any posts. Also stay tuned cause there will be lots more great reviews coming up.

ESEE Candiru Knife

CandiruBlank

Welcome back nwtactical followers,

Thank you for coming back to learn about the ESEE pronounced “S E” Candiru blade. This little blade is one killer knife. I have to say it is my new favorite knife in my collection and I am excited to share it with you. It is the most expensive blade and the smallest knife in my arsenal but it is worth every penny. The blade is freakishly sharp, it has cut everything I have asked it to in nano-seconds and it hungers for more. It turned paper into confetti, it carved off huge chucks of ham right off the bone and then diced them into little pieces for my dinner of ham hock and beans, and it sheared right thru my Paracord 550 and even assisted in trimming my dogs hair. This is gonna be my new EDC(Everyday Carry) knife. Once I make a Kydex sheath for this I will be using it as my neck knife.

CandiruSingleWeave

First let me tell you about the company ESEE which makes some really great knives and survival equipment. The companies full name is Randall’s Adventure Training / ESEE Knives. Randall’s Adventure Training has been in business since 1997 providing training for LE, military, and civilians in the art of jungle survival. During their survival and training ventures they realized they needed a better quality knife, so they decided to create their own and the knives/machetes they created became insanely popular. So they decided to start their own knife making company. The company name is an acronym for Escuela de Supervivencia(School of Survival), Escape and Evasion. ESEE is what the company teaches to LE, military or civilians when they sign up for their Jungle survival classes deep in the Amazon and they also offer domestic classes across the U.S. that teaches you short-term wilderness survival, wilderness first aid, land navigation(maps and compasses), and most exciting of them all, human tracking. ESEE products are hugely popular with Narco Police because there blades are excellent in clearing paths to remote areas to eradicate illegal drug crops. The strength, the durability and the design of their blades are praised for the ability to chop down thick marijuana plants and coco plants that grow up to 10 feet tall with trunks as thick as a human leg. The ESEE Candiru is the perfect name for this little vicious blade, the orgin of the name will make all you guys and gals out there wince in pain just reading this. The Candiru is a parasitic freshwater catfish found only in the Amazon River. The Candiru is famous for the legend of swimming up male urethia or female vagina and attaching itself inside using barbs attached to its head. Ouch, you won’t ever catch me swimming in the Amazon river, just the thought of this makes me cringe, and I am sure if you are reading this you are too!!!

CandiruFish

Now lets get down to the meat and potatoes the knife itself. The ESEE Candiru is one badass little devil. The Candiru is made from some of the best carbon steel available on the market today the 1095 carbon steel which is used for professional cutlery. It has a beautiful baked on powder coating that will help it from rusting and corrosion, but don’t forget to take care of the blade by applying a coat of oil to make it last forever. The Candiru comes in three different colors, the one I purchased has a black baked on powder coating, but it also comes in a desert tan, and OD(Olive Drab) Green but it really looks more like a forest green. This is defiantly a little knife, it was a little smaller then I anticipated but I think I like it better because of the smaller, lighter make. It is small enough that I don’t have to worry about breaking any state or local laws regarding blade length which is a load off my shoulders. The overall length of the knife is 5.13″, the blade length is 2″, and its thickness is .125″ which makes it one of the thinnest knife’s available. This knife can be used for a variety of tasks. The company that created this knife uses it on the survival training trips to the Amazon. They use the knife for making what is called a frog spear by cutting down a 6 foot long sapling and splitting 4 ways down the middle. Then by rolling 3 small sticks down the split end to create spikes which are then sharpened, this task is made a lot easier because of the razor sharp and super thin blade. Then the group used the thin blade to shave wood for starting fires which the Candiru also aced because the thinner the shavings the easier it is to start a fire. Next up the crew caught a boa constrictor which was killed using a machete but was skinned using the Candiru. This is not an easy task because a boa has really thick skin which require an extremely sharpe and strong blade.

CandiruCloseupskull

The Candiru comes with a nylon sheath with a hard Kydex insert so that the blade does not cut open the sheath when inserting and removing it. I think the sheath is great for wearing on your belt or holding it in your pocket, but if you plan on wearing it as a neck knife you might want to invest in a Kydex or leather sheath that only covers the blade for easy access and so you can connect Paracord around the handle to create a lanyard of sorts. I plan on purchasing some Kydex blanks to create my own custom sheath to meet my personal needs. The Candiru is what they call a skeleton knife because it does not come with a handle but ESEE does offer two different scales, they offer a orange G10 handle. A G10 handle is an extremely durable matter made of woven fiberglass soaked in epoxy resin, then highly compressed and baked. They also offer a grey canvas micarta handle which is a man made material, made by layering resin and cloth. Personally I do not like either option that ESEE offers so I plan on making my own. I currently have wrapped the skeleton handle in black Paracord which increases the grip and makes it a lot more comfortable. I also plan on purchasing some beautiful Ebony black and white wood scale blanks and creating my own handles.

CandiruWeave

Overall this is absolutely the best knife I have ever bought. I also plan on purchasing all three colors just because of the quality of this knife and its freaking BA!!! I recommend everyone that reads this blog to purchase one of these knives no matter what you do for a living, if you are an office worker who needs to cut paper or open boxes, to a construction worker who needs to cut all types of different materials, to a camping/survivalist who plans on traversing the outskirts of civilization and living a substance life. It is small and light so it would be terrific to purchase for your gf/wife to keep in her purse for protection or even everyday tasks and the super sharp edge will make using the blade a cinch. I plan on using this knife as gifts for family/friends.Just one thing to remember when purchasing this knife make sure to buy some Paracord to wrap around the handle for comfort or just message me and I will be more then happy to make you a custom beautiful wood handle out of your favorite local or exotic wood or I can match one to the color of your knife. I will also be more then happy to make you a custom Paracord lanyard using any color your heart desires.

Once again thank you so much for joining me in reviewing this amazing knife. Please leave any comments or questions in the review section and also don’t forget to click on the follow button at the bottom of the page so you can be the first to read my product reviews.

Stay tuned for my next review, I will be covering the SOG SEAL Pup, then Paracord 550.